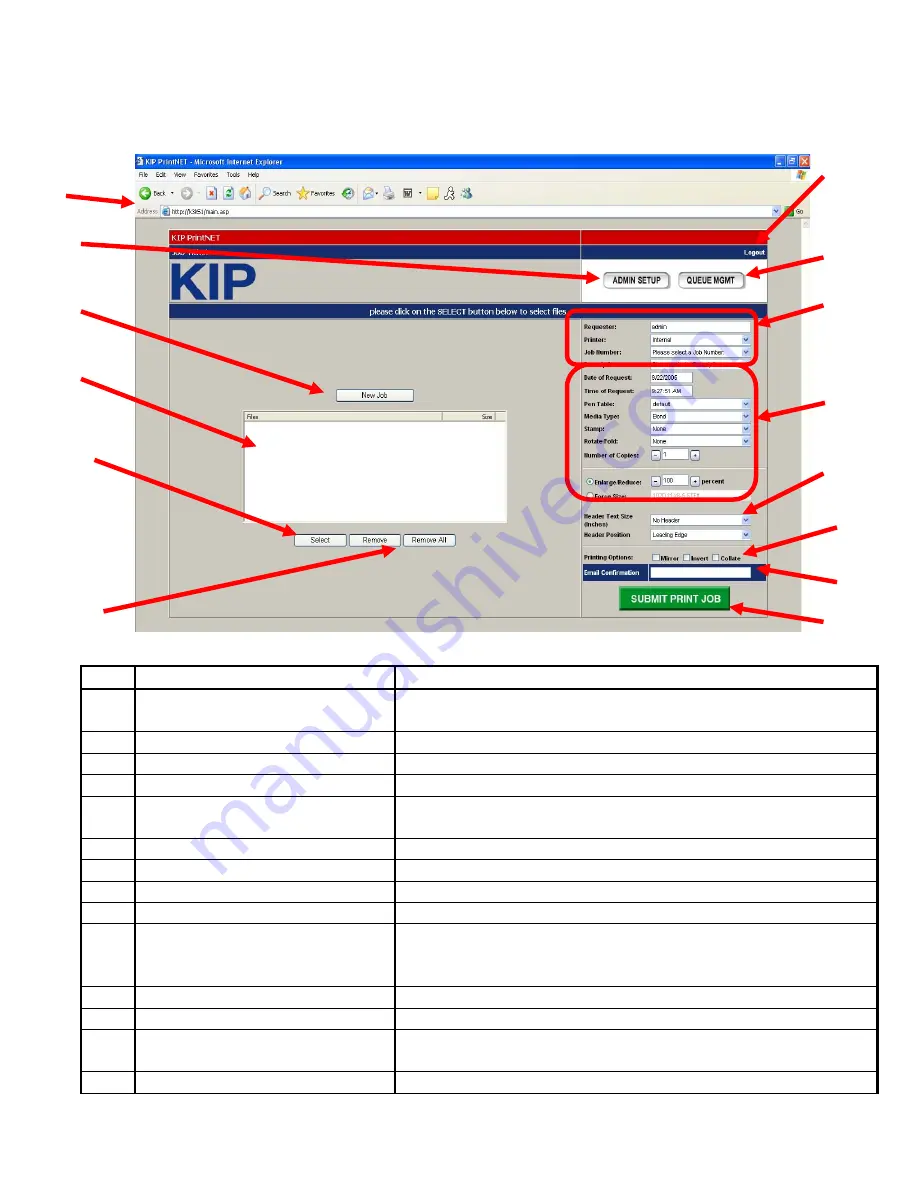
9-3 Section 9 KIP Print Net
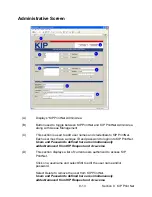
1.1 Main Screen
No. Name
Function
1 Host
Address
Type in the URL of the Server / PC that hosts KIP PrintNet
(password protected )
2
Logout
Logout from the KIP PrintNet session
3
Admin Setup
Administrative feature setup if logged on as such
4
Queue Management
Manages the job queue on the printer.
5 Accounting
Region
Selection for Name of Operator, Printer type, Project
number, Time and Date of requested Job,
6
New Job
Clear all previous setting to start a new print submission.
7
File Selected Area
Displays file names and the file size of selected files
8
Select
Browse to select the file(s) for printing from the PC / LAN
9
Remove / Remove All
Deleting one or all files from the job list.
10 Job
Settings
Pen table selection, Media type selection, Stamp
selection, Rotate / Fold selection, number of copies
selection and print / image size.
11
Header / Header Position
Inserting a Header and position of the Header on the print
12
Printing Options
Provides Mirror, Invert and Collation capability
13 Email
Communication
Add an email address to send auto response for job
acceptance
14
Job Submission
Send a job / files
3
1
4
11
10
12
13
2
5
6
7
8
9
14
Summary of Contents for CX 8036
Page 1: ...Instruction Handbook CX 8036 Large Format System ...
Page 68: ...Section 2 Copy Mode 2 28 ...
Page 94: ...Section 4 Job Info Screen 4 8 ...
Page 138: ...Section 6 Windows Driver 6 22 ...
Page 150: ...Section 7 AutoCAD HDI Driver 7 12 5 0 Custom Settings 1 2 7 3 8 4 9 10 6 5 ...
Page 201: ...Section 8 Request 8 45 ...
Page 206: ...Section 8 Request 8 50 ...
Page 224: ...9 18 Section 9 KIP Print Net KIP PrintNet on Opera ...
Page 228: ...9 22 Section 9 KIP Print Net ...
Page 242: ...Section 11 Connectivity 11 8 ...
Page 246: ... 4 ...
Page 252: ...2 2 Select the Applications folder 3 Select the Utilities folder ...
Page 255: ...5 8 Select Add 9 The printer set up will be in the Printer List ...
Page 265: ......
Page 268: ...UTAX GmbH Ohechaussee 235 22848 Norderstedt Germany ...


