background image

1-4

Installation

Date en cours : 24 mars 2003
\\Sct31nt3\doc 31nt3 mac\SAGEM FM\DOC EN COURS\MFL-MFC-MFK\MFL 251 259 240A_LU FAX LASER PRO 343SMS_345SMS Sagem

GB\Installation Gb.fm

8

13$&.,1*

7+(

6+,33,1*

%2;

+

Take the protection profiles, the packing material and the machine out of the shipping box.

profiles

Protection

Packing

Machine

Shipping box

material

MFL 251 259 240A_MF34 Sagem Gb.book  Page 4  Lundi, 24. mars 2003  2:50 14

Summary of Contents for FAX 940

Page 1: ...INSTRUCTION HANDBOOK FAX 940 ...

Page 2: ...on model send and receive faxes to E mails thanks to the F x to E mail function send and receive E mails send SMS s We recommend that you read this Manual carefully in order to familiarise yourself with the various features and functions of your terminal List of accessories1 The following additional accessories are proposed for the Fax Laser Pro range Directory card 500 page paper tray PC MF F XTM...

Page 3: ...nting on A4 paper with a 5 max black and white ratio The service life of the toner cartridge mainly depends on the type of printed document and the average number of pages per print operation Drum cartridge The standard drum cartridge can produce up to 20 000 pages The initial drum cartridge that comes with the printer can produce up to 4 000 pages Various factors may influence the effective servi...

Page 4: ...the different functions MENU 15 OK key confirm displayed selection 16 C key return to previous menu and correct data entry 17 5 or 6keys navigation keys 18 Alphabetical keypad 19 key access to special characters 20 key enter or go to next line 21 Ì key erase character before cursor 22 Ö key Shift key 23 key Caps lock key 24 and keys memorise a key combination A Scanning resolution during fax trans...

Page 5: ......

Page 6: ...DGLQJ SDSHU PDQXDOO 1 12 QVWDOOLQJ WKH VHFRQG SDSHU FDVVHWWH XQLW RSWLRQ 1 14 RQQHFWLRQV 1 15 7HOHSKRQH DQG 1 FRQQHFWLRQ 1 16 3RZHU OLQH FRQQHFWLRQ DQG VZLWFK RQ 1 16 8SGDWLQJ WKH FRQVXPDEOHV 1 16 77 1 67 57 2 1 1DYLJDWLRQ PHWKRGV 2 1 3UHVHQWDWLRQ 2 1 7KH QDYLJDWRU 2 1 7KH GLVSOD VFUHHQ 2 3 FFHVV WR IXQFWLRQV 2 3 0HQX GULYHQ DFFHVV 2 3 LUHFW DFFHVV E QXPEHU 2 4 XQFWLRQV OLVW 2 4 6 77 1 285 0 1 3 1...

Page 7: ...QHFWLRQ WR WKH QWHUQHW 3 16 3URJUDPPHG FRQQHFWLRQ 3 16 HDFWLYDWLQJ WKH QWHUQHW IXQFWLRQ 3 16 7KH 606 VHUYLFH 3 16 LVSOD RI 606 VHQGHU V 3 17 QLWLDOLVDWLRQ SDUDPHWHUV 3 17 6HQGLQJ DQ 606 3 17 5 725 4 1 UHDWLQJ VXEVFULEHUV UHFRUGV 4 1 GGLQJ D UHFRUG 4 2 UHDWLQJ VXEVFULEHUV OLVWV 4 2 GGLQJ D OLVW 4 3 GGLQJ RU GHOHWLQJ D QXPEHU IURP WKH OLVW 4 3 RQVXOWLQJ D UHFRUG RU D OLVW 4 4 0RGLI LQJ D UHFRUG RU D...

Page 8: ... 8 HOHWLQJ D WUDQVPLVVLRQ RQ KROG 5 8 DQFHOOLQJ D WUDQVPLVVLRQ LQ SURJUHVV 5 8 5HFHSWLRQ 5 8 5HFHSWLRQ RYHU WKH 3XEOLF 6ZLWFKHG 7HOHSKRQH 1HWZRUN 3671 5 9 5HFHSWLRQ RYHU WKH QWHUQHW 5 9 RS LQJ 5 9 RFDO FRS 5 9 6WDQGDUG FRS 5 9 6RSKLVWLFDWHG FRS 5 9 6SHFLILF FRS VHWWLQJV 5 10 6FDQQHU VHWWLQJV 5 11 3ULQWHU VHWWLQJV 5 12 2WKHU IXQFWLRQV 5 12 RJV 5 12 3ULQWLQJ WKH IXQFWLRQV OLVW 5 13 3ULQWLQJ WKH PDFK...

Page 9: ...DQQHU SDSHU MDP 6 22 0LVFHOODQHRXV LQFLGHQWV 6 23 0DFKLQH SDFNLQJ DQG WUDQVSRUWDWLRQ 6 23 KDUDFWHULVWLFV 6 25 8QLW FKDUDFWHULVWLFV 6 25 6 7 7 1 This unit has been designed in accordance with European standards I CTR37 and CTR21 it is designed for connection to the Public Switched Telephone Network PSTN In case of any problems first contact your Supplier The mark CE attests that the products comply...

Page 10: ...for which it is designed Double check to make sure that the location you select has the following characteristics Choose a location that is well ventilated When installing the terminal close to a wall make sure the distance between the wall and the upper edge of the stacker is at least 25 centimetres for easier opening of the upper cover 25 cm ...

Page 11: ...he terminal off or open any of its covers during a print operation Never place flammable gasses liquids or objects that generate magnetic forces near the terminal When unplugging the power cord always grasp the plug and never pull on the cord A damaged cord creates the danger of fire or electrical shock Never touch the power cord when your hands are wet Doing so creates the danger of electrical sh...

Page 12: ... amounts of heat smoke an unusual odor or noise immediately turn it off unplug it and contact your dealer Failure to take this imme diate action creates the danger of fire or electrical shock Paper for printer do not use paper previously printed by your terminal or any other printer the ink or toner deposited on that paper might damage the printing system of your terminal Caution Be sure to locate...

Page 13: ...1 4 Installation 813 1 7 6 33 1 2 Take the protection profiles the packing material and the machine out of the shipping box profiles Protection Packing Machine Shipping box material ...

Page 14: ...on 813 1 7 0 1 3 576 Remove the plastic bags and check for the parts depicted below 1 Chip card initialisation 2 Scanner output stacker 3 Printer output stacker 4 Printer paper feed tray 5 AC power cord 6 Telephone line cord 7 Fax printer terminal 8 Document feed tray for scanning 9 User Manual 5 6 4 1 3 2 8 7 9 ...

Page 15: ...1 6 Installation Peel off the three strips of shipping tape from the front of the terminal Pull out the two pads from the paper feed inlet ...

Page 16: ...ory Maintenance Safety Contents Installation Press the paper size guide on the right in order to push both paper size guides to the left or to the right Pull out the plastic tab and the shipping tape from the paper feed inlet Peel off the shipping tape from the paper tray ...

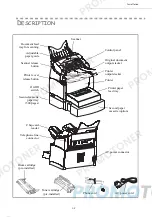
Page 17: ...nd paper cassette option Scanner AC power connector Drum cartridge pre installed Toner cartridge pre installed Phone cord AC power cord Scanner release button Printer cover release button On Off switch Second cassette paper tray 500 pages Chip card reader Telephone line connector Document feed tray for scanning Adjustable paper guide ...

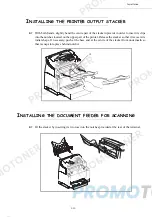
Page 18: ...intenance Safety Contents Installation 167 1 7 5 029 3 576 This section details the installation of the terminal s removable parts 167 1 7 35 17 5 3 3 5 75 Using the printer s left and right notches gently push the tray in until it stops as illustrated below Fit the tray cover ...

Page 19: ...notches located on the upper part of the printer Release the stacker so that it recovers its initial shape If necessary push at the base and at the centre of the stacker from underneath so that is snaps into place behind notch A 167 1 7 2 80 17 5 25 6 11 1 Fit the stacker by inserting its two toes into the notches provided at the rear of the terminal A ...

Page 20: ...of the terminal by inserting its two toes into the notches provided 2 1 3 3 5 Press the paper size guide on the right in order to push both paper size guides to the left or to the right Place a stack of paper into the tray In case of letterhead paper be sure to place the paper printed side up Secure the stack of paper by pushing the paper size guides against the right and left edges of the stack ...

Page 21: ...such as 60 to 160 g m max colour paper or transparent film laser printer compatible you should load the paper manually one sheet after the other To do so Insert your sheet of paper or film between the two feed pawls 1 and 2 located on the paper tray cover until it stops in the printer Supported types of paper Auto feed cassette 60 to 90 g m2 Manual feed tray 60 to 160 g m2 ...

Page 22: ...Installation 1 13 Operation Setting your machine Getting started Directory Maintenance Safety Contents Installation Adjust the sheet or film width as appropriate by means of feed pawls 1 or 2 1 2 ...

Page 23: ...ase unit Make sure to align the coupling pins of the base unit with the holes located underneath the printer Remove the cover from tray 2 Press down on the paper lifting plate located inside of tray 2 until it locks Place a stack of up to 500 sheets of paper into tray 2 so that the side that was facing up when the paper was unwrapped is still facing up Replace the cassette cover and insert tray 2 ...

Page 24: ...on Setting your machine Getting started Directory Maintenance Safety Contents Installation Remark be sure to use both hands whenever tray 2 is removed from or inserted into the second paper cassette unit 211 7 216 A B C D E 1 2 ...

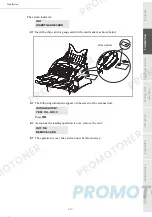
Page 25: ...ug end of the main power cord 2 into the connector E on the fax machine and the other end in the wall outlet Set the On Off switch to position 1 On After a few seconds when the printer has warmed up the date and time will appear 83 7 1 7 21680 6 A chip card is delivered with the consumables This card initialises the consumables system consumption levels fealures After every new consumable installa...

Page 26: ... Insert the chip card or gauge card in the card reader as shown below The following indications appear on the screen of the scanner unit Press OK As soon as the reading operation is over remove the card The operation is over the card can now be thrown away INIT INSERT GAUGECARD INITIALISATION YES OK NO C INIT OK REMOVE CARD Green arrow ...

Page 27: ...1 18 Installation ...

Page 28: ...7 1 67 57 1 9 7 21 0 7 2 6 35 6 17 7 21 The navigator gives you access to the menus visible on screen 7KH QDYLJDWRU This navigator has 5 keys and allows you to move within the menus available on your machine ...

Page 29: ...he main menu M Select the next line in a menu 6 Select the previous line in a menu 5 Confirm entry and go to the following menu OK Return to the previous menu C Confirm and exit from the current menu Exit without confirming from the current menu 7R 8VH NH 6 PERO XVHG Move to the right 6 Move to the left 5 ...

Page 30: ...7 216 Access to functions may be achieved in two ways Menu driven access Direct function access 0HQX GULYHQ DFFHVV You may print the functions list to know the number of a function Press the M key the functions menu appears Use the 5 or 6 navigator arrows to move the cursor in front of the required function Validate your choice by pressing OK Confirm your entry OK Delete a character by moving the ...

Page 31: ...or a list p 4 5 M 15 OK PRINT Print the directory p 4 5 M 16 OK SAVE LOAD Store the directory on a chip card 161 OK SAVE Save the directory to a chip card p 4 1 162 OK LOAD Load the directory from a chip card p 4 1 M 17 OK IMPORT Enable directory importation by e mail p 4 7 M 18 OK EXPORT Export the directory by e mail p 4 7 MAIN MENU 2 SETUP XQFWLRQV XQFWLRQ GHVFULSWLRQ 3DJH M 21 OK DATE TIME Ent...

Page 32: ...K NETWORK Set the network individually p 3 2 203 OK LANGUAGE Set the language individually p 3 2 MAIN MENU 2 SETUP XQFWLRQV XQFWLRQ GHVFULSWLRQ 3DJH MAIN MENU 3 FAX XQFWLRQV XQFWLRQ GHVFULSWLRQ 3DJH M 31 OK TRANSMISSION Single and multiple address transmission p 5 4 M 32 OK ECO TRANS Send a document during the economy period p 3 4 M 33 OK POLLING RX Polling request p 5 15 M 34 OK POLLING TX Deposi...

Page 33: ...tents of a MBX p 5 19 M 74 OK DELETE MBX Delete an empty MBX p 5 19 M 75 OK PRT MBX LIST Print the MBX list p 5 19 MAIN MENU 8 ADVANCED FCT XQFWLRQV XQFWLRQ GHVFULSWLRQ 3DJH M 80 OK CALIBRATION Scanner calibration p 6 15 M 81 OK LOCK Activate an access limitation lock p 5 15 811 OK LOCKING CODE Locking code p 5 16 812 OK LOCK KEYBD Activate keyboard lock p 5 16 813 OK LOCK NUMBER Activate dialling...

Page 34: ...OK IDENTIFIER Message service identifier p 3 11 9222 OK PASSWORD Message service password p 3 11 9223 OK E MAIL ADR Message service e mail address 923 OK SERVERS SMTP POP3 and DNS parameters p 3 11 9231 OK SMTP SMTP server 9232 OK POP3 POP3 server 9233 OK DNS 1 Primary DNS 9234 OK DNS 2 Secondary DNS M 93 OK IMMED ACCES Immediate access to ISPA p 3 16 M 94 OK SETTINGS Internet settingsA 941 OK CON...

Page 35: ...2 8 Getting started ...

Page 36: ...rs of the required time and date one after another for example November 8 2003 at 9h33 press 0 8 1 1 0 3 0 9 3 3 and press OK to confirm RXU ID QXPEHU RXU QDPH Your fax will print out your fax number on each document it transmits if you save this number and if the machine is set to SENDING HEADER refer to paragraph Technical parameters page 3 6 To save your fax number and your name M 22 OK SETUP N...

Page 37: ...icate over the public network of the country you have chosen in compliance with the applicable standards Remark these settings are different from the NETWORK TYPE p 2 5 which allows you to choose between public and private network To select the network M 202 OK SETUP GEOGRAPHICAL NETWORK Select the required option and press the OK key to confirm DQJXDJH This setting enables you to choose a languag...

Page 38: ...etween more than one criteria for printing reports WITH a report is given when the transmission was properly performed or when it is comple tely abandoned but there is only one report per request WITHOUT no transmission report however your fax will note all transmissions that took place in its log refer to paragraph Logs page 5 12 ALWAYS a report is printed with each transmission ON ERROR a report...

Page 39: ...nting them as you receive them The Fax Messages indicator light lets you know the state of your Fax answering machine Light on the answering machine is on Blinking your fax has documents in storage or is in the process of receiving faxes Light off memory full the fax cannot receive any more documents You can assure document confidentiality by using the 4 digit access code Once saved you will requi...

Page 40: ... into the feeder 1XPEHU RI FRSLHV You may print incoming documents more than once 1 to 99 To set the number of each document received M 242 OK SETUP RECEPTION NBR OF COPIE Enter the wanted number of copies and confirm with OK At each document reception your fax will print the number of copies requested 5HOD EURDGFDVW Your fax machine initiator can relay a document in other words transmit a documen...

Page 41: ...nts on fax PC PC if available fax otherwise For more details please refer to the instruction manual provided with the software kit 7 1 3 5 0 7 56 As delivered your fax is preset by default However you may adjust it to meet your requirements by resetting the technical parameters To set the technical parameters M 29 OK SETUP TECHNICALS Select the desired parameter and confirm with OK With the keys 5...

Page 42: ...our choice 10 RX HEADER 1 WITH 2 WITHOUT If this parameter is on all documents received by your fax will include the subscriber s header with his name number if available fax print date and the page number 11 RX SPEED 1 33600 2 14400 3 9600 4 4800 5 2400 Transmission speed for incoming documents For a quality telephone line compatible no echo communications occur at maximum speed However it may be...

Page 43: ...f available 74 ERASE MAILBOX 1 WITH When the fax machine receives an e mail with an attachment and cannot open it it erases the message from the ISP MBX prints and transmits with a notice of uncomprehension to the message sender 2 WITHOUT At E mail reception the fax does not destroy the MBX message it prints a notice of uncomprehension asking you to recuperate this message with your computer equip...

Page 44: ...hat person for the settings described below 2 1 7 25 6 77 1 6 XWRPDWLF FRQILJXUDWLRQ We recommend that you carry out a manual configuration of your terminal The automatic configuration of the local network settings may be considered if your local network features a DHCP or BOOTP server that can dynamically assign addresses to the peripheral devices present on the LAN To automatically configure the...

Page 45: ...P LOCAL NETWORK NETBIOS 2 NAME Enter the selected name 15 characters max and press OK to confirm 0 66 6 59 1 7 17 51 7 Your terminal lets you send and receive documents and E mails from subscribers throughout the world over the Internet An E mail is an electronic message sent over the Internet to an E mail address which is a personal Internet mailbox Access to the Internet is possible thanks to an...

Page 46: ...of DNS 1 and DNS 2 servers The server address is made up of 4 groups of 3 digits maximum separated by dots FFHVV WR FRQQHFWLRQ DQG PHVVDJH VHUYLFH SDUDPHWHUV M 91 OK INTERNET SUPPLIER Select the Internet provider from the list NO ACCESS PROVIDER_1 PROVIDER_2 PROVIDER_3 PROVIDER_4 PROVIDER_5 PROVIDER_6 or LOCAL NETWORK and press OK Choosing NO ACCESS disables access to Internet functions OK M 921 O...

Page 47: ...R 08 60 00 10 00 CONNECTION IDENTIFIER sg048944 wn net CONNECTION PASSWORD MESSAGE SERVICE IDENTIFER demo jt12 MESSAGE SERVICE PASSWORD E MAIL ADDRESS demo2 gofornet com SERVER SMTP mail gofornet com POP mail gofornet com DNS 1 103 195 014 001 DNS 2 103 195 014 002 91 SUPPLIER PROVIDER 1 CONNECTION 9211 CALL NUMB 0860001000 9212 IDENTIFIER sg048944 wn net 9213 PASSWORD MESSAGE SERVICE 9221 EMAIL I...

Page 48: ...S PERIODIC or ON DEMAND and press OK to confirm KDQJLQJ WKH FRQQHFWLRQ SHULRG PERIODIC W SH M 943 OK INTERNET SETTINGS PERIOD With the PERIODIC mode enter the new connection period by means of the numerical keypad between 00 01 am and 11 59 pm and press OK to confirm An Internet connection will be established every three hours default value SET TIMES an Internet connection is established every day...

Page 49: ...settings may also be printed together with all the other settings of your machine refer to paragraph Printing the machine settings page 5 13 0DLO VRUWLQJ This function lets you choose the mode for all Internet documents stored in your mail box You have three choices F X ONLY lets you poll and print E Mails in your machine PC ONLY lets you keep your E Mails in you mailbox for later use with a compu...

Page 50: ...resent in your mailbox are displayed on the screen 17 51 7 211 7 21 An Internet connection is made with an ISP It allows both document sending and reception while connected A connection takes place the following way Send to one or more of your subscriber s Internet mailboxes all fax Internet documents waiting for transmission If you are sending to a computer the transmitted fax will be received as...

Page 51: ...s refer to paragraph Standard settings page 3 13 7 9 7 1 7 17 51 7 81 7 21 If you do not wish to use the Internet functions M 91 OK INTERNET SUPPLIER Select NO ACCESS in the ISP list and confirm with OK 7 606 6 59 Thanks to the SMS button you can send an SMS to subscribers all over the world An SMS Short Message Service is a service which permits short written messages to be sent to mobile phones ...

Page 52: ...be operated in two different modes in the SMS IP Internet protocol mode or the SMS OPERATOR mode The latter corresponds to the service which is offered by various telephone service providers Ask your provider about the availability of this service and about the conditions You can switch from one available mode to the other SMS IP mode M 431 OK SERVICE SMS TYPE SMS SMS IP SMS OPERATOR mode M 432 OK...

Page 53: ...people To send an SMS to only one person press the key to confirm to several people press the key and enter the next person s name repeat the operations as many times as required 10 persons max Press the key to confirm SENDING SMS is displayed as the SMS is being sent Once SENDING SMS is no longer displayed the SMS has been sent and the recipient phone number is saved key If SMS appears then the S...

Page 54: ...tory card This gives you access to functions 161 and 162 refer to paragraph Functions list page 2 4 To proceed you need to contact your reseller and purchase the optional kit save 5 7 1 68 6 5 56 5 25 6 For each subscriber record you are not required to fill in each line only name tel or E Mail address are required NAME of your subscriber TEL and fax number of your subscriber E MAIL address exampl...

Page 55: ...lt If you want to change it scroll the letters by menas of the 6or 5 keys and press OK to confirm If need be select the appropriate transmission speed to send your faxes and confirm your choice by pressing the OK key 5 7 1 68 6 5 56 676 A subscriber list is made from the subscriber records already stored For each list fill in the following lines NAME of the list NUMBER ASSIGNED to the list this nu...

Page 56: ...d one or more subscribers to your list Then confirm your choice by pressing OK For every subscriber included in the list repeat the above step then validate with OK Remark you can stop record creation at any time by pressing The list ID number will automatically appear on the screen if you wish to modify this number you may do so by choosing another free number and validate with OK Press to confir...

Page 57: ...criber list L you wish to modify and press OK to confirm Modify the line or lines in the subscriber record or subscriber list and confirm each modification with OK Remark You may confirm your modification by pressing key but you will exit the menu and may not be able to modify the following lines 7R 3URFHGXUH add Enter the subscriber ID number you wish to add and confirm with OK Repeat this step f...

Page 58: ...g directory of contacts into your fax machine as an electronic file This file must be in a specific format and must not comprise more than 250 entries The process of importing a directory uses electronic mail as the transfer mechanism The electronic file containing the directory is received and processed as an e mail attachment Caution Importing a new directory completely overwrites any existing d...

Page 59: ...tacts fax number without spaces or dots can be up to 30 characters long including any and characters This field may be left empty for instance in the case of contacts to whom you only send e mails E mail address Your contacts e mail address Can be up to 80 characters long but must not comprise the field separator character Any other characters may be used in this field which can also be left blank...

Page 60: ...stance to update all the LAN faxes on your network with the same directory Caution Importing a new directory completely overwrites any existing directory entries on the fax machine Once your fax machine has a complete directory we advise you to disable importing in order to protect the data already on the fax To disable importing M 17 OK DIRECTORY IMPORT Select WITHOUT to prevent users from import...

Page 61: ...4 8 Directory ...

Page 62: ...network all fax transmissions are in black and white Over the Internet you can send black and white documents TIFF format or colour documents JPEG format 2 80 17 326 7 21 1 6FDQQHU Place your original documents in the document feeder face down first page under the stack Set the paper guide to the document width Once the operation is over take your original documents back from the document exit tra...

Page 63: ...Super Fine mode symbolised by SFine at the bottom of the display screen To be used for docu ments with very fine or small character drawings Photo mode symbolised by Photo at the bottom of the display screen To be used for photogra phic documents To select the resolution mode Press key as many times as necessary to select the required mode A g icon on the screen shows the current mode RQWUDVW You ...

Page 64: ...e ten last numbers you just dialled before RU D ID QXPEHU 7HO LQ WKH LUHFWRU Press key The screen displays the last number called Use keys 5 or 6 of the navigator to select your desired number RU DQ PDLO DGGUHVV Press key then The screen displays the last E mail address used Use keys 5 or 6 of the navigator to select your desired E mail address 7R PXOWLSOH QXPEHUV You may dial to send a document s...

Page 65: ...ON Enter the subscriber number you wish to program at a different time or choose your dialling mode refer to paragraph Dialling page 5 2 and confirm with OK Next to the current time enter the new time and confirm with OK Adjust the contrast and confirm by pressing the OK key Select the feed type FEEDER or MEMORY and confirm with OK refer to paragraph Document feed type page 3 3 You may enter the n...

Page 66: ...ocument refer to paragraph Document positioning page 5 1 Press the key and enter the recipient s E mail address or choose your dialling mode refer to paragraph Dialling page 5 2 Adjust the contrast and the resolution if necessary refer to paragraph Choosing the resolution contrast page 5 2 Press the key The document is scanned and memorised it will be sent at the time of Internet connection If you...

Page 67: ...ou will get a true editor for capital letters use key Shift key Ö or key Caps lock key To move within the data entry field use the 6or 5 keys to erase a character on the right of the cursor without moving the cursor use the Ì or C key to move in the text from one word to another press key and one of the navigator keys to go to the next line use key Then you can choose between two options Send the ...

Page 68: ... Internet connection NET Internet transmission SMS SMS transmission immediately perform a transmission from the waiting queue print a document in storage waiting to be transmitted or in deposit print the waiting queue to get the status of each document in the queue by either queue order number document name or number scheduled transmission time fax operation type regarding the document transmissio...

Page 69: ...is possible whatever the type of transmission but varies depending on whether the transmission is a single call number or a multi call number For a single call number from the memory the document is erased from the memory For a multi call number only the call number in progress at the time of the cancellation is erased from the transmission queue To cancel transmission in progress Press key A mess...

Page 70: ...utomatically converted by the F X to Fax service if you have a subscription or until computer use or automatic transfer refer to paragraph Mail sorting page 3 14 23 1 Your fax offers to print out one more copies of one or more pages 2 23 6WDQGDUG FRS Position the document face down refer to paragraph Document positioning page 5 1 Press key twice 6RSKLVWLFDWHG FRS Position the document face down re...

Page 71: ...gs to reduce or magnify any portion of a document by choosing the origin and value of the zoom to apply to that portion The assembly parameter to choose between ASSEMBLED or NOT ASSEMBLED copies The ORIGIN parameter to choose the origin to be applied to the document CONTRAST to choose the photocopy contrast BRIGHTNESS is used to make your original document lighter or darker L R MARGINS to shift th...

Page 72: ...pe between ASSEMBLED or NOT ASSEMBLED Confirm your choice by pressing key OK 2ULJLQ If you wish you can change the origin of the scanner By entering new values of X and Y given in mm X 210 and Y 286 you will move the scanning zone as shown on the figure below Select the X and Y coordinates with keys 5 or 6 Set the required coordinates with the numeric keypad or 5 or 6 Confirm your setting by press...

Page 73: ...PER using keys 5 or 6 Confirm your setting by pressing key OK 0DUJLQV If you want to shift the side margins of your document to the left or to the right Adjust the left right margin shift in steps of 0 5 mm by means the 5 or 6 keys Press OK to confirm 27 5 81 7 216 2 6 The incoming and outgoing logs list the last 30 transmissions incoming and outgoing made by your machine An automatic print out wi...

Page 74: ...y made to the default parameters Printing the machine settings M 54 OK PRINT SETUP Your fax prints the list of stored parameters 0 025 1 6 48 1 2 6 You may memorize a sequence of keys for example to send a fax directly to one or multiple subscribers to call this subscriber or to get access to a specific menu etc This sequence is registered in one of the keys F1 or F2 as you want Then by pressing o...

Page 75: ... of printed pages M 821 OK ADVANCED FCT COUNTERS PRINTED PG local copies M 822 OK ADVANCED FCT COUNTERS LOCAL COPIES transmitted pages M 823 OK ADVANCED FCT COUNTERS SENT PAGES received pages M 824 OK ADVANCED FCT COUNTERS RECEIVED PG 326 7 1 32 1 You may deposit a document in your fax and keep it available to one or more subscribers who can obtain a fax of this document by calling your fax with t...

Page 76: ...poll or choose your dialing mode refer to paragraph Dialling page 5 2 Remark you can poll several documents using the key Depending on the type of poll you should 2 There are restrictions to the use of your fax To lock the printing of received documents refer to paragraph Fax answering machine page 3 4 locking the keyboard 0HQX 3URFHGXUH SIMPLE Select FEEDER or MEMORY If necessary adjust the contr...

Page 77: ...t access to non authorised persons An access code must be entered each time a person wants to use the machine To access the keypad unlocking menu M 812 OK ADVANCED FCT LOCK LOCK KEYBD Enter the four digit interlock code Press key OK to confirm With keys 5 or 6of the navigator select the option WITH Press key OK to confirm Remark after each operation the machine interlocks automatically RFNLQJ WKH ...

Page 78: ...g code with the numerical keypad Press key OK to confirm With keys 5 or 6 select the option WITH Press key OK to confirm 0 2 0 There are 32 mailboxes MBX enabling you to transmit documents in complete confidence using an access code named code MBX to all subscribers equipped with a fax compatible to yours MBX 00 is public It is handled directly by the terminal to record the messages of the fax TAD...

Page 79: ...f a free MBX and confirm with OK Select option MAILBOX CODE and press OK Value 0000 is always displayed Enter the code of your choice if needed and press OK Select option MAILBOX NAME and press OK Enter this MBX s S I D 20 characters max and press OK The MBX is initialised If you wish to initialise another press C and repeat the same procedure To exit the MBX press 0RGLI LQJ WKH IHDWXUHV RI D 0 M ...

Page 80: ...s deleted and will appear as a free MBX in the list Press to confirm MBX deletion 3ULQWLQJ WKH 0 OLVW M 75 OK MAILBOXES PRT MBX LIST The list gives the status of each MBX 0 GHSRVLW LQ RXU ID Insert the document in the fax machine s feeder Select M 72 OK MAILBOXES DEPOSIT MBX and confirm with OK Select a free MBX out of the 31 MBX or enter the number of a free MBX directly 1 31 The document is plac...

Page 81: ...ed in the memory and sent at the requested time 0 SROOLQJ IURP D UHPRWH ID M 36 OK FAX MBX POLLING Enter your subscriber s number for MBX deposit or choose your dialing mode refer to paragraph Dialling page 5 2 and validate OK Enter the subscriber MBX number and press OK Enter this MBX access code and press OK If you wish to delay the poll time enter the departure time next to the current time Con...

Page 82: ...s Never leave the cover open unless required Protect the machine from direct sunlight Do not attempt to oil the machine Always gently close the cover and avoid vibrations Do not open the cover while printing Never try to dismantle the machine Do not use paper that has stayed in the paper tray for a long time Look at the safety rules in the Safety chapter at the end of this booklet ...

Page 83: ...he printer you need to inform the machine about its features For this purpose the chip card supplied with each toner cartridge must be read by the machine each time a new consumable item is installed 5HSODFLQJ FDUWULGJHV 5HSODFLQJ WKH WRQHU FDUWULGJH To replace the toner cartridge proceed as shown below When the display shows 1 Press the cover release button on the upper left part of the machine t...

Page 84: ...g unit located inside the printer may become very hot during operation To avoid injury do not touch 2 Remove the old toner cartridge Caution In order to protect the environment do not throw away the used toner cartridge Used cartridges should be disposed of in accordance with local regulations concerning waste materials Fusing unit ...

Page 85: ...ding the cartridge by its handle slide it into the printer Ensure that the four pins two on either side are properly aligned with the grooves in the printer Remark Use the colour coded stickers marked 2 which are located both on the toner cartridge and the inside of the printer for proper positioning These two stickers should line up while installing the toner cartridge ...

Page 86: ...Maintenance Safety Contents Installation The cartridge will click into position once it is correctly installed 5 Shut the upper cover by pressing it down gently but firmly until it locks into position Turn the printer back on using the switch located on its left hand side 2 ...

Page 87: ...ontrol panel screen Press OK Once the chip card has been read the display shows Remove the card Caution If the following is displayed check that you have inserted the chip card the right way up 5HSODFLQJ WKH GUXP FDUWULGJH To replace the drum cartridge proceed as shown below When the display shows TUE 02 APR 13 39 INSERT GAUGECARD CHANGE TONER YES OK NO C TONER OK REMOVE CARD CANNOT READ CARD REMO...

Page 88: ...e upper cover to open it Caution The fusing unit located inside the printer may become very hot during operation To avoid injury do not touch 2 The drum cartridge is under the toner cartridge Remove the toner cartridge from its housing and place it safely out of the way 3 Remove the used drum cartridge and take the new one out of its package 2 1 ...

Page 89: ... 8 Maintenance Caution In order to protect the environment do not throw away the used drum cartridge Used cartridges should be disposed of in accordance with local regulations concerning waste materials ...

Page 90: ...o the printer ensuring that the pins on the cartridge are aligned with the grooves in the printer Remark Use the colour coded stickers marked 1 which are located both on the drum cartridge and the inside of the printer for proper positioning the stickers should line up Ensure that you insert the drum cartridge as far as possible into the printer ...

Page 91: ...ns two on either side of the cartridge are properly aligned with the grooves in the printer Remark Use the colour coded stickers marked 2 which are located both on the toner cartridge and the inside of the printer for proper positioning These two stickers should be aligned while installing the toner cartridge 2 ...

Page 92: ...fety Contents Installation The toner cartridge will click into position once it is correctly installed 6 Shut the upper cover by pressing it down gently but firmly until it locks into position Press the OK key on the scanner control panel The display shows TUE 02 APR 13 39 INSERT GAUGE CAR ...

Page 93: ...the drawing below The following is displayed on the scanner control panel screen Press OK Once the chip card has been read the display shows Remove the card Caution If the following is displayed check that you have inserted the chip card the right way up CHANGE DRUM YES OK NO C DRUM OK REMOVE CARD CANNOT READ CARD REMOVE CARD green arrow ...

Page 94: ...loth to clean the printer Never use abrasive or corrosive detergents The fusing unit can become very hot during operation To avoid injury do not touch Wait for at least 10 minutes after the printer has been turned off and make sure that the fusing unit has cooled before cleaning the interior of the printer OHDQLQJ WKH RXWVLGH RI WKH SULQWHU Clean the outside of the printer with a smooth duster Ope...

Page 95: ...dge and the drum cartridge 4 Use a soft cloth to clean the paper feed roller Caution The fusing unit inside the printer can become very hot during operation To avoid injury do not touch 5 Reinstall the drum cartridge and the toner cartridge refer to paragraph Replacing cartridges page 6 2 6 Close the upper cover and press it down gently but firmly until it locks into place Fusing unit ...

Page 96: ...nto the sheet fed scanner and press OK to confirm Remark Since the page you insert will be used to define the quality of subsequent copies it must be free from any visible defects 1 176 20081 7 21 55256 If the communication fails the fax advises you of an automatic retry later Example of what is displayed 7UDQVPLVVLRQ IURP WKH IHHGHU You have the choice between waiting until the transmission takes...

Page 97: ...number is not valid check it Example a delayed transmission was programmed with a one touch key and this key has been deleted in the meantime Code 05 Scanning default An incident occurred with the scanner for example the sheet is jammed Code 06 Printer default An incident occurred in the printer no paper paper jam opened cover In the reception mode this incident appears only if the reception param...

Page 98: ...stopped The communication has been stopped by your subscriber Example a fax wanted to poll your fax but there is no document deposited Code 1A Disconnected The transmission has not started The telephone line is busy Code 1B Transmission failed During transmission start again During reception ask your subscriber to resend the document QWHUQHW FRGHV Codes 40 and 41 No reply from supplier The modem c...

Page 99: ...HV If the printer has one of the problems described below the signal On flashes red and you can t use your machine temporarily The corresponding message is displayed on the screen 0HVVDJH FWLRQ CHANGE TONER OK TO CONFIRM Replace the toner cartridge Proceed as indicated Replacing the toner cartridge page 6 2 CHANGE DRUM OK TO CONFIRM Replace the drum cartridge Proceed as indicated Replacing the dru...

Page 100: ...h Press the upper cover release button and open the upper cover Remove the toner cartridge and the drum cartridge Clear the paper misfeed using one of the following procedures depending upon the location of the paper misfeed PAPER JAM INTERNAL TRAY Open the cover Remove the jammed sheet from between the tray and the fusing unit PRINTER ERROR XX Disconnect and reconnect the terminal If the problem ...

Page 101: ...rk Do not touch the image transfer roller black roller at the bottom of the printer Reinstall the drum cartridge and the toner cartridge refer to paragraph Replacing cartridges page 6 2 Close the upper cover and press it down gently but firmly until it locks into place ...

Page 102: ...DP DW WKH IHHGHUV DQG WUD V The figures below show different type of paper jam you might experience when using your machine Remove any stuck sheets as shown by the arrow depending on where the paper jam occurs At the printer output stacker At the paper tray At the manual feed tray Second cassette unit and paper tray option ...

Page 103: ...ing message appears on the control panel screen REMOVE DOCUMENT If jams often occur in a specific part of the unit the latter needs to be checked cleaned or repaired Open the scanner cover by pressing key A Remove the jammed paper B without tearing it Then close the scanner cover A B ...

Page 104: ... is correctly plugged in and that there is a tone signal on the telephone line by means of the key You receive a blank page Make a photocopy of a document if it is correct then your fax is functioning normally Call back the subscriber and have him resend the document It was probably sent with the sheet inserted backwards You cannot send a fax Check that the telephone line cable is correctly plugge...

Page 105: ...he machine in the plastic bag and then in the original package with all the original packing material Put all the documentation User s Manual and printed documents in the shipping box Close the shipping box with adhesive tape ...

Page 106: ...dth 216 mm max Height 297 mm Thickness 0 05 to 0 15 mm Document feeder Max capacity sheet stack height 3 mm ie a normal capacity of 30 pages 80 g m2 Reception size A4 size Width 210 mm max Length 297 mm Reception paper Plain paper copier type 80 g m2 Paper tray capacity 250 pages max 80 g m2 Second paper tray option Second paper tray 500 pages 80 g m2 Transmission procedures In accordance with UIT...

Page 107: ...fied Read JBIG depending on model Internet general specifications V90 modem up to 56 kbps s TCP IP PPP protocols SMTP POP3 MIME protocols for E mails TIFF F file format black white documents JPEG file format colour documents Specifications may change for improvement without prior notice ...

Page 108: ...cturer s instructions Depending on the model the unit s mains plug may be the only way to disconnect the unit from the power network Therefore you must respect the following Your unit must be connected to a mains outlet located nearby The mains outlet must remain easily accessible Your unit is delivered with a power cord including a plug which depending on the model may be without earth the symbol...

Page 109: ...7 2 Safety ...

Page 110: ...http www triumph adler com 251259240 Data subject to change without notice User Manual Ind A ...

Reviews: