3NB/3ND/3N0/3NK-2
1-5-6
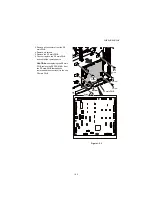
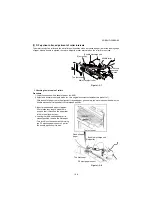
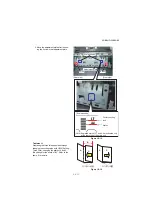
(3) DF ejection roller, adjustment of roller intervals
The main tray ejection roller and the exit roller positioned too close will cause a paper jam at the leading edge
of paper when a bundle is ejected, therefore, adjust the roller interval when the roller are too close.
Figure 1-5-7
1. Checking the intervals of rollers
Procedure
1. Load the cassette with a sheet of paper (ex. A4E)
2. Select and execute the staple mode (ex. two original documents stapled at two preset to 1)
With a sheet of paper fed in the alignment tray and paper gone empty, the machine should halt with the
bundle ejection unit released at the first release position.
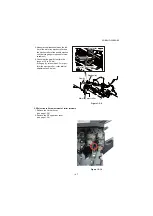
3. Insert a reed-shaped paper of approx.
60 mm wide (any length, prepared in
prior) so that it stacks on the paper that
is fed in the alignment tray.
4. Leaving the reed-shaped paper at its
present position, remove the first paper.
*: This is to block the sensor as the turning
the DF ejection paper sensor ok will let
the bundle ejection unit to drop.
Figure 1-5-8
Main tray eject roller
The second
sheet and
owards
Bundle discharge unit
Middle roller
Eject pulley
The first sheet
The first sheet
Bundle discharge unit
Eject pulley
DF eject paper sensor
Reed-shaped
paper
1
2
The first sheet
Summary of Contents for UTAX AK 730
Page 5: ...This page is intentionally left blank ...
Page 11: ...This page is intentionally left blank ...
Page 15: ...3NB 3ND 3N0 3NK This page is intentionally left blank ...
Page 25: ...3NB 3ND 3N0 3NK 1 1 10 This page is intentionally left blank ...
Page 43: ...3NB 3ND 3N0 3NK 1 2 18 3 Remove tape and pad Figure 1 2 23 Tape Pad ...
Page 45: ...3NB 3ND 3N0 3NK 1 2 20 This page is intentionally left blank ...
Page 81: ...3NB 3ND 3N0 3NK 1 3 36 This page is intentionally left blank ...
Page 157: ...3NB 3ND 3N0 3NK 1 4 76 This page is intentionally left blank ...
Page 169: ...3NB 3ND 3N0 3NK 1 5 12 This page is intentionally left blank ...
Page 206: ...3NB 3ND 3N0 3NK 2 2 11 This page is intentionally left blank ...
Page 246: ...1 1 INSTALLATION GUIDE INSTALLATION GUIDE FOR 4000 SHEETS FINISHER ...
Page 269: ...INSTALLATION GUIDE FOR FINISHER ATTACHMENT KIT MFP A ...
Page 283: ...INSTALLATION GUIDE FOR FINISHER ATTACHMENT KIT MFP B ...
Page 284: ...E F A H G I J B D C ...
Page 291: ...INSTALLATION GUIDE FOR FINISHER ATTACHMENT KIT PRINTER ...
Page 295: ...INSTALLATION GUIDE FOR CENTER FOLDING UNIT ...
Page 312: ...INSTALLATION GUIDE FOR MULTI TRAY ...
Page 326: ...INSTALLATION GUIDE FOR MULTI TRAY ATTACHMENT KIT PRINTER ...
Page 330: ...INSTALLATION GUIDE FOR PUNCH UNIT ...

