8
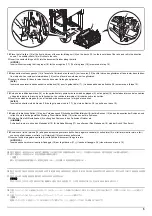
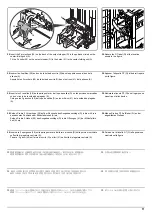
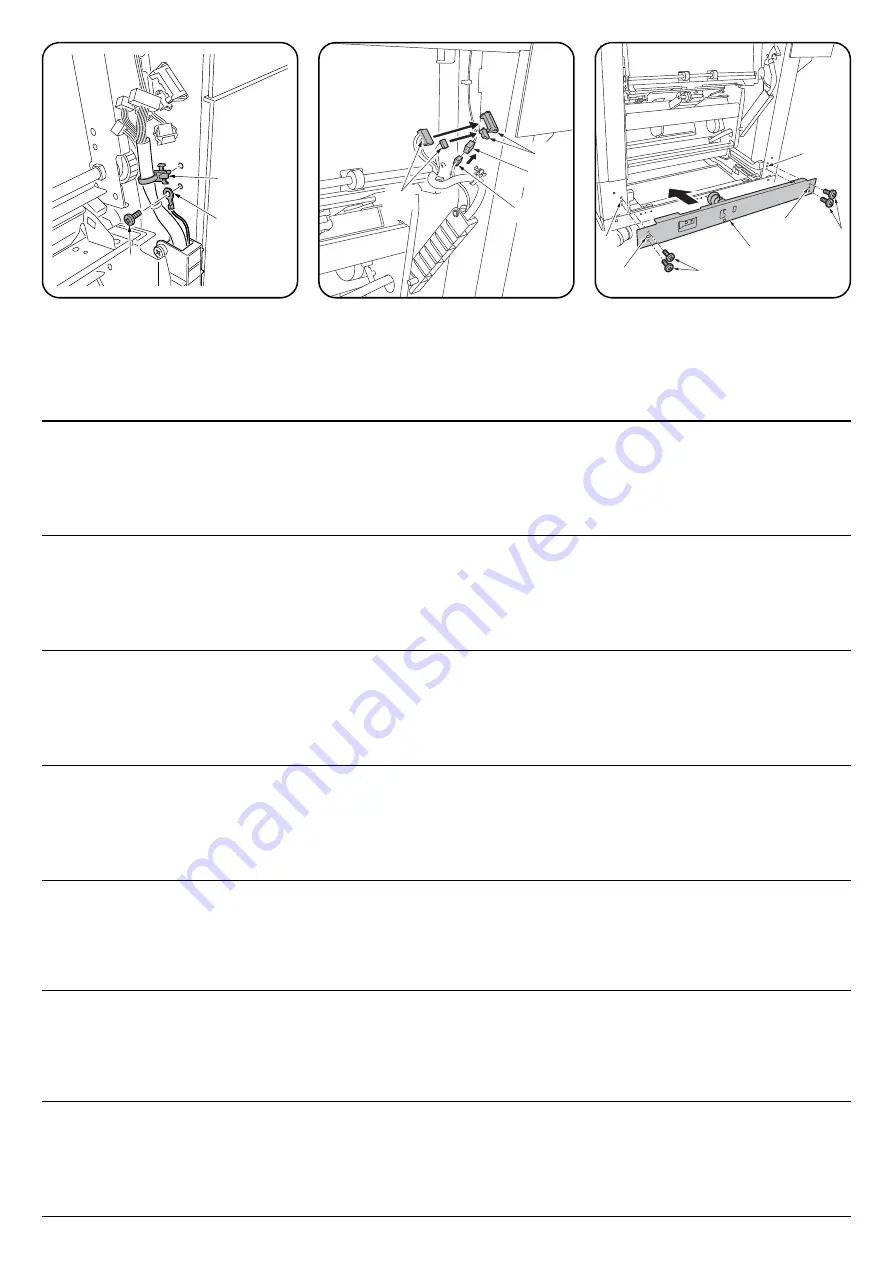
K
P
32
32
31
K
31
27
28
30
29
26
K
O
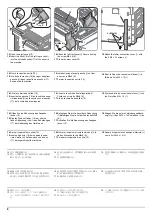
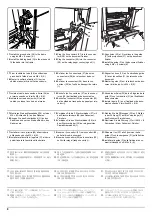
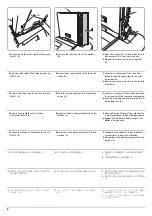
17.
Install the ground wire (26) to the frame
using an M4 × 8 screw (K).
18.
Install the binding band (O) to the wires and
fit the band into the frame.
19.
Plug the 2 connectors (27) into the connec-
tors (28) on the document finisher.
20.
Plug the connector (29) into the connector
(30) on the relay paper conveying unit (I).
21.
Align holes (32) at 2 locations in the guide
(P) with projections (31) on the document
finisher.
22.
Install the guide (P) on the document finisher
using 4 M4 × 8 screws (K).
17.
Fixer le câble de terre (26) au châssis en
procédant à l'aide d'une vis M4 × 8 (K).
18.
Monter le collier de fixation (O) sur les
câbles et assujettir le collier au châssis.
19.
Enficher les 2 connecteurs (27) dans les
connecteurs (28) du retoucheur de docu-
ment.
20.
Enficher le connecteur (29) dans le con-
necteur (30) de l'unité de transport de relais
(I).
21.
Aligner les trous (32) en 2 endroits du guide
(P) avec les saillies (31) du retoucheur de
document.
22.
Monter le guide (P) sur le retoucheur de doc-
ument à l'aide de 4 vis M4 × 8 (K).
17.
Instale el cable de conexión a tierra (26) en
el marco usando un tornillo M4 × 8 (K).
18.
Instale la correa de sujeción (O) en los
cables y coloque la correa en el marco.
19.
Enchufe los 2 conectores (27) en los conec-
tores (28) del finalizador de documentos.
20.
Enchufe el conector (29) en el conector (30)
de la unidad de transporte de papel por rele-
vador (I).
21.
Alinee los orificios (32) de los 2 lugares de la
guía (P) con los resaltos (31) del finalizador
de documentos.
22.
Instale la guía (P) en el finalizador de docu-
mentos usando 4 tornillos M4 × 8 (K).
17.
Montieren Sie das Massekabel (26) mit einer
M4 × 8 Schraube (K) an den Rahmen.
18.
Bringen Sie das Schellenband (O) an den
Kabeln an und setzen Sie das Band in den
Rahmen ein.
19.
Verbinden Sie die 2 Steckverbinder (27) mit
den Steckverbindern (28) des Dokument-
Finishers.
20.
Verbinden Sie den Steckverbinder (29) mit
dem Steckverbinder (30) der eingesetzten
Papierfördereinheit (I).
21.
Richten Sie die Öffnungen (32) an 2 Stellen
in der Führung (P) auf die Vorsprünge (31)
des Dokument-Finishers aus.
22.
Montieren Sie die Führung (P) mit 4 M4 × 8
Schrauben (K) am Dokument-Finisher.
17.
Installare il cavo di terra (26) alla struttura
utilizzando una vite M4 × 8 (K).
18.
Installare la fascetta di legatura (O) ai cavi e
quindi fissare la fascetta nella struttura.
19.
Inserire i 2 connettori (27) nei connettori (28)
sulla finitrice di documenti.
20.
Inserire il connettore (29) nel connettore (30)
sull'unità relay di trasporto carta (I).
21.
Allineare i fori (32) alle 2 posizioni nella
guida (P) con le sporgenze (31) sulla finitrice
di documenti.
22.
Installare la guida (P) sulla finitrice di docu-
menti utilizzando 4 viti M4 × 8 (K).
17.
ビス M4×8(K) でアース線 (26) をフレーム
に取り付ける。
18.
電線に結束バンド (O) を取り付け、フレーム
に結束バンド (O) をはめ込む。
19.
コネクター(27)2 個をドキュメントフィ
ニッシャーのコネクター(28) に接続する。
20.
コネクター(29) を中継搬送ユニット (I) の
コネクター(30) に接続する。
21.
ドキュメントフィニッシャーの突起 (31)2
箇所にガイド (P) の穴 (32) に合わせる。
22.
ビス M4×8(K)4 本でドキュメントフィニッ
シャーにガイド (P) を取り付ける。
17.
使用 M4×8(K) 螺钉将装接地线 (26) 安装到
框架上。
18.
在电线上安装束线带 (O),将束线带 (O) 嵌入
到框架上。
19.
将 2 个连接器 (27) 与装订器的连接器 (28)
相连接。
20.
将连接器 (29) 与中间搬运单元 (H) 的连接器
(30) 相连接。
21.
将装订器的 2 处突出部 (31) 与导板 (P) 的孔
(32) 对齐。
22.
使用 4 颗螺钉 M4×8(K) 将导板 (P) 安装到装
订器上。
17.
나사 M4×8(K) 로 접지선 (26) 을 플레임에
장착합니다 .
18.
전선에 결속 밴드 (O) 를 장착하고 플레임에
결속 밴드 (O) 를 꽂습니다 .
19.
커넥터 (27) 2 개를 문서 피니셔의 커넥터
(28) 에 접속합니다 .
20.
커넥터 (29) 를 중계 유니트 (I) 의 커넥터
(30) 에 접속합니다 .
21.
문서 피니셔의 돌기 (31) 2 곳을 가이드 (P)
의 구멍 (32) 에 맞춥니다 .
22.
나사 M4×8(K) 4 개로 문서 피니셔에 가이드
(P) 를 장착합니다 .
Summary of Contents for UTAX AK 730
Page 5: ...This page is intentionally left blank ...
Page 11: ...This page is intentionally left blank ...
Page 15: ...3NB 3ND 3N0 3NK This page is intentionally left blank ...
Page 25: ...3NB 3ND 3N0 3NK 1 1 10 This page is intentionally left blank ...
Page 43: ...3NB 3ND 3N0 3NK 1 2 18 3 Remove tape and pad Figure 1 2 23 Tape Pad ...
Page 45: ...3NB 3ND 3N0 3NK 1 2 20 This page is intentionally left blank ...
Page 81: ...3NB 3ND 3N0 3NK 1 3 36 This page is intentionally left blank ...
Page 157: ...3NB 3ND 3N0 3NK 1 4 76 This page is intentionally left blank ...
Page 169: ...3NB 3ND 3N0 3NK 1 5 12 This page is intentionally left blank ...
Page 206: ...3NB 3ND 3N0 3NK 2 2 11 This page is intentionally left blank ...
Page 246: ...1 1 INSTALLATION GUIDE INSTALLATION GUIDE FOR 4000 SHEETS FINISHER ...
Page 269: ...INSTALLATION GUIDE FOR FINISHER ATTACHMENT KIT MFP A ...
Page 283: ...INSTALLATION GUIDE FOR FINISHER ATTACHMENT KIT MFP B ...
Page 284: ...E F A H G I J B D C ...
Page 291: ...INSTALLATION GUIDE FOR FINISHER ATTACHMENT KIT PRINTER ...
Page 295: ...INSTALLATION GUIDE FOR CENTER FOLDING UNIT ...
Page 312: ...INSTALLATION GUIDE FOR MULTI TRAY ...
Page 326: ...INSTALLATION GUIDE FOR MULTI TRAY ATTACHMENT KIT PRINTER ...
Page 330: ...INSTALLATION GUIDE FOR PUNCH UNIT ...


