background image

Scooter Service Sheet No. 1054 (contd.)

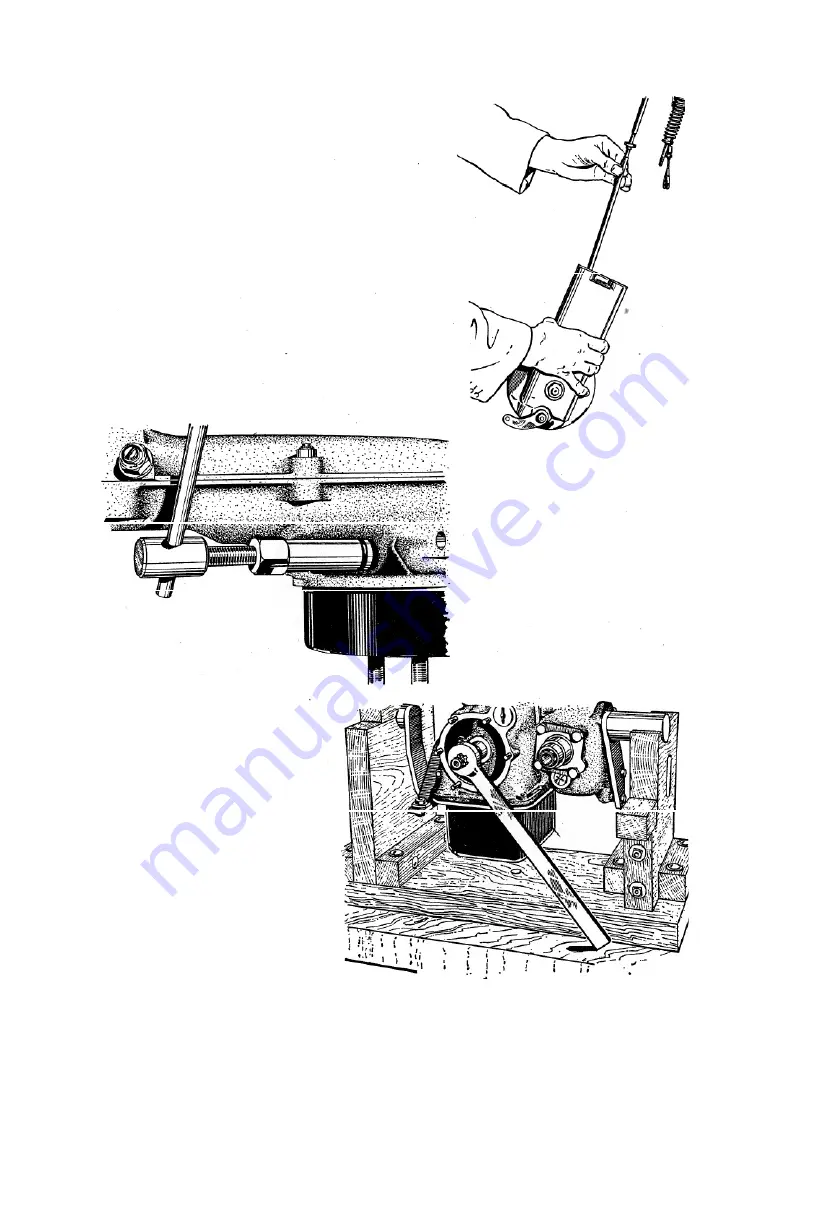
Feeding   the   Front   Fork 

Damper   Rod   through   the 

Sliding   Member   using   tool 

number 

6Z-5o18 (175 

and

25o c.c.}.

Holding   the   Crankshaft 

with   tool   number   61

-5022 

(175 

and 

25o c.c.).


Drawing   out   the   Speedo-

meter Drive Bush with tool 

number 

6i-5019 (175 

and

25o c.c.).

Summary of Contents for TW2

Page 1: ......

Page 2: ...carrier and take off the spare wheel Then take out the two bolts at the sides of the dual seat and remove the carrier complete with number plate Remove the two 5 16 in bolts at the middle rear of the...

Page 3: ...r head There is no need to disturb the connection between the carburetter and its manifold All that is necessary is to take off the two nuts securing the manifold to the cylinder head and the carburet...

Page 4: ...overdone or in time valve pocketing with consequent lack of efficiency will develop If considerable pitting of the seats is evident they must be recut and the valves either reground or replaced This i...

Page 5: ...ars of the frame and is immediately below the petrol tank Disconnect the sparking plug leads Now prise off the lug securing the air duct on the left hand stud and lift the air ducting complete with th...

Page 6: ...left hand vertical column of the frame Unscrew the three nuts at the rear of the curved arm which secure it to the rear drive and remove the hollow bolt at the front end of the curved support arm thi...

Page 7: ...th an accumulation of road dust Where the unit is heavily coated with dust and oil it is as well to wash it comparatively clean before dismantling During the actual dismantling care should be taken to...

Page 8: ...t is the most suitable tool to use on these nuts Take off the cylinder head and in this case although the gasket may appear to be in good condition since it is a comparatively cheap and certainly an i...

Page 9: ...gear by operating the gearchange spindle and the brake applied with a suitable length of tube over the brake lever Now unscrew the three clutch pressure spring nuts To avoid tilting the plate and lock...

Page 10: ...ment bearing is cold There is also an oil seal in the cover which is fitted from the inside i e the clutch side with the lip towards the bearing Behind the primary drive inner cover there is a rubber...

Page 11: ...ter drive After the bearing lock ring has been removed the case should be heated in boiling water and the bearing dropped out in the manner previously described and the replacement if necessary fitted...

Page 12: ...r primary drive side is now completed and attention can be given to the right hand side of the unit If the fan cowl has not already been removed unscrew the three small Phillips head screws If the fan...

Page 13: ...val of the end cover will expose the outer portion of the cam plate and the selector quadrant together with its scissor spring the spring being retained in the inner cover by a large hexagon headed bo...

Page 14: ...e a wise precaution to replace the two nuts on to this stud so that it is retained in position The only parts now left in the gearbox are the pinion sleeve and the main bearing The pinion sleeve can b...

Page 15: ...aft retaining in position the 25T pinion The mainshaft 16T and 25T pinions are selectively assembled during manufacture and if any one of these parts has to be replaced the complete assembly under par...

Page 16: ...unit upside down again and remove the twelve Phillips head screws retaining the sump cover The cover can then be taken away together with the baffle plate and the oil pump filter which is fitted over...

Page 17: ...cilitate reassembly If the wrong nut is fitted to a bolt it will affect its position and may make it difficult to secure by the tab washers If the unit has covered a considerable mileage there may be...

Page 18: ...nner on the lower of the two nuts A new stud can be replaced in similar manner this time using the spanner on the top of the two nuts When the replacement stud has been screwed home simply unlock the...

Page 19: ...er in a clockwise direction High speed will not be necessary and if the pump is satisfactory oil will be drawn up and ejected through the oilways of the crankshaft main bearing bush If the oil pump fa...

Page 20: ...ng the pump insert the thrust washer over the camshaft and against the elongated brass plate then refit the camshaft pinion with the timing mark on the outside and meshed with the timing mark on the c...

Page 21: ...ole in the cam plate and insert a new split pin opening out the ends Now take the 29 tooth ratchet pinion A Fig 16 place the thin steel washer B inside and then fit the kick starter spindle complete w...

Page 22: ...be experienced in meshing the plungers but this can be facilitated by placing a thin strip of steel between the two plungers and the cam plate thus compressing both plungers When the shaft of the gear...

Page 23: ...the end of the speedometer drive is in posi tion in the case and replace the speedometer drive spindle and bush This can be carried out by screwing on service tool No 61 5019 and then driving in the...

Page 24: ...of the retainer the longest portion dropping into the cut away After the four bolts have been secured the tab washers should be turned up on to one flat of each bolt The oil seal behind the main beari...

Page 25: ...the spring and nut which was placed over one of the studs to hold the clutch assembly insert the three nuts into the spring plate place the springs over the studs and screw on the three nuts an equal...

Page 26: ...in Service Sheet No 1006 prepare to replace together with the four push rods The simplest method of carrying this out is to apply a dab of grease to the cup of each push rod then press each rod on to...

Page 27: ...l No 61 5036 and the valve re faced by a Dealer If a valve guide is worn as shown by excessive side clearance between stem and guide it can be pressed out from the combustion chamber side after the cy...

Page 28: ...haft through towards the right hand side there is no need to disturb the stud on the right hand post There is a thick washer against each outside post with a spring washer between thrust washer and ro...

Page 29: ...inally refit the hollow bolt which also carries a grease nipple Now pick up the speedometer cable and carefully engage the squared end of the inner cable in the speedometer drive and screw the cable u...

Page 30: ...ghtened down too much it is liable to distort the wheel on its seating on the stub axle Make sure that the nuts are securely tightened after the wheel is on the ground Now re connect the kick starter...

Page 31: ...the points are fully open slacken the small circular nut B which will be seen inside the C shaped coil of the spring and the fixed contact point can then be moved in or out as necessary This is the c...

Page 32: ...in Fig 22 The inner cable must be quite free and not binding due to frayed wire or other causes To adjust the clutch springs take out the oil level and filler plug and turn the engine gently until one...

Page 33: ...it is necessary to place the lamp to one side it can be disconnected by twisting the black bakelite retainer anti clockwise and by taking out the small parking light bulb which is a press fit into th...

Page 34: ...t undo the locknut and screw the adjuster in or out as necessary bearing in mind that screwing out will take up the slack in the cable and screwing in will provide more slack Do not omit to re tighten...

Page 35: ...ttle at a time Do not tighten one nut completely since this is liable to tilt the wheel on the stub axle Always make sure that the three nuts are securely tightened In the case of the front wheel the...

Page 36: ...lacing the cover Use a new J if in doubt Carefully locate the cover over the two rocker box studs and press it gently down making sure that the washer has not been misplaced Place the two fibre washer...

Page 37: ...r Be very careful lifting the screw out nOVl lose the washers each sjde of the banjo uniorf anQ not to damage or drop the cylindr cal gauze filter inside the union Place the screw washers and filter c...

Page 38: ...ith a new one Place the gasket in position see that the nylon float is correctly positioned in the float chamber and replace the chamber screwing in the two small screws Make sure that these are tight...

Page 39: ...ht hand chrome beadings take out the screws holding the mudguard and mudguard extensions to the legshield and foot boards and remove the mudguard and extensions Remove the brake and gear change pedals...

Page 40: ...arefully prise out the long key D from the column Now draw the fork down at the same time holding a piece of clean rag to catch the balls which will be released from the lower race To withdraw the fro...

Page 41: ...complete with the bottom and the top scrolls To take out the damper unscrew the disc valve G in the end of the tube and draw the damper out complete with washer and nut at the top The dust cover can b...

Page 42: ...ead of the brake cam place the brake lever on the outside and screw on the washer and nut Pass the main spindle if removed through the lower member having first heated the member in hot water and loca...

Page 43: ...foul the stop plate Connect the front brake by screwing the cable adjuster into the lower member and refit the clevis pin in the brake lever Do not forget the split pin and do not omit to re tighten...

Page 44: ...slip the loop of cord over the lower end of the spring and using a screwdriver as a lever through the other end of the loop expand the spring until the end can be pressed into the hole in the lower or...

Page 45: ...vers prise the shoes up and away from the pivot bolt and brake cam To re fit Hold the two shoes with the springs fitted open them to form a V and press them down and over the pivot pin and brake cam m...

Page 46: ...ich is still attached does not hook itself round the frame cross members Replacement The procedure for refitting the petrol tank is the reverse of removal but first place the tank in position undernea...

Page 47: ...the two screws at each side of the instrument panel these being just underneath the panel in the rear portion of the leg shield With a Phillips screwdriver take out the two small Phillips screws in th...

Page 48: ...heads of the screws See that all the cables are located down the front of the steering column and that there is not any excess loop in the cables which might foul the stop plate on the steering colum...

Page 49: ...external surface while an inertia ring is screwed to its periphery When the engine is fitted with an electric starting motor a starter ring gear is substituted for the inertia ring There is a 6 volt a...

Page 50: ...rably increase the charging rate in these switch positions and the connections should be returned to standard for normal conditions of use or long runs Owing to the effects of the above modifications...

Page 51: ...ese Tests Test 1 If meter readings are as stated the charging circuit and alternator are satisfactory No reading check the generator A low reading can be caused by a faulty battery Proceed with Test 2...

Page 52: ...tion of rotor may have occurred as a result of faulty rectifier Check rectifier and battery earth polarity before replacing rotor A reading between any one lead and the generator stator indicates an e...

Page 53: ...est 2 Proceed as for Test 1 and test each cell in turn but reverse the test leads Reading on V 1 should not be less than 2 volts below the open circuit reading on voltmeter No 2 i e 10 volts Conclusio...

Page 54: ...revious tests have been carried out and all is in order It is important that both the ignition timing and the rotor timing is correct for efficient operation of Emergency Start Testing the Low Medium...

Page 55: ...SERVICE SHEET No 1050 contd Wiring Diagram 6 Volt Model...

Page 56: ...ctifiers the terminals are not numbered so connect the alternator leads to the outer cranked terminals Connect the test leads which must have a D C voltmeter with 1 ohm load shunted across between ear...

Page 57: ......

Page 58: ...i SERVICE SHEET No 1050 contd...

Page 59: ...ar them with petroleum jelly No periodic lubrication is necessary but at a general overhaul the starter motor should be removed and given a thorough examination on the bench PERFORMANCE DATA The follo...

Page 60: ...ow Armature does not rotate no current con sumption Armature does not rotate high current con sumption Excessive brush movement causing arcing at commutator 8 Excessive arcing at the commutator High r...

Page 61: ......

Page 62: ...on one cylinder only utilising one of the ignition coils and its associated contact breaker In the combination used the L H cylinder the coil has two cables each coloured black with white tracer conn...

Page 63: ...eir primary windings are being fed in opposite directions The No 1 coil is receiving pulses from the alternator via the battery the insulated side of the circuit through the primary from SW to CB and...

Page 64: ...adjusted to the required gap i e 020 025 It is also very important that the external insulator is kept clean and dry Plugs should be replaced if the electrodes are badly worn Faulty Rectifier A recti...

Page 65: ...EMERGENCY STARTING CIRCUIT GREEN WHITE 0 No CIRCUIT WITH No 1 CONTACTS CLOSED f E CIRCUIT WITH CONTACTS No l OPEN 7 111 FRAME OF MACHINE EARTH 0 N 0 EMG CONTACTS...

Page 66: ......

Page 67: ...using Spring Compressor 61 5001 250 c c Replacing a Piston is made easier using Slipper 61 500 4 250 c c or 61 5051 175c c Pulling off the Flywheel with Extractor 6 1 5040 175 or 250 c c 61 5002 is si...

Page 68: ...ving the Auto Advance and Cam with Extractor 61 5005 250c c Removing the Clutch Centre with Extractor 61 5007 175 and 250 c c Pulling off the Crankshaft Pinion 250c c with Ex tractor 61 5025 Similar t...

Page 69: ...g the Front Fork Damper Rod through the Sliding Member using tool number 6Z 5o18 175 and 25o c c Holding the Crankshaft with tool number 61 5022 175 and 25o c c Drawing out the Speedo meter Drive Bush...

Page 70: ...Sheet No 1054 contd with tool number 61 5035 250 c c Pulling off the Front Brake Drum with Extractor number 61 5033 I75 250 c c Unscrewing the Rear Spindle Bearing Lock Ring with tool number 61 5026...

Page 71: ...ooter Service Sheet No 1054 contd Driving in an Inlet Valve Guide using Punch 61 3382 250 c c Re cutting a Valve Seat with Cutter number 61 5036 250 c c Engine Assembly jig number 61 5046 175and250 c...

Page 72: ...ice Sheet No 1054 contd Parting the Flywheels 175 c c using Bolster 61 3207 Stripping Bars 61 3208 2 Dismantling Punch 61 3209 Assembling the Flywheels I75 c c using Bolster 61 3207 Adapter 6I 5047 Br...

Page 73: ......

Page 74: ......

Page 75: ......

Reviews: