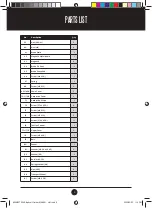
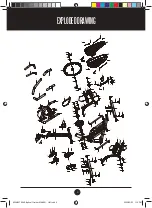
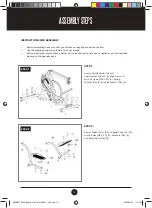
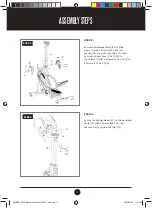
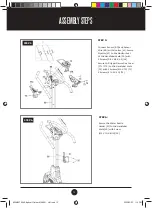
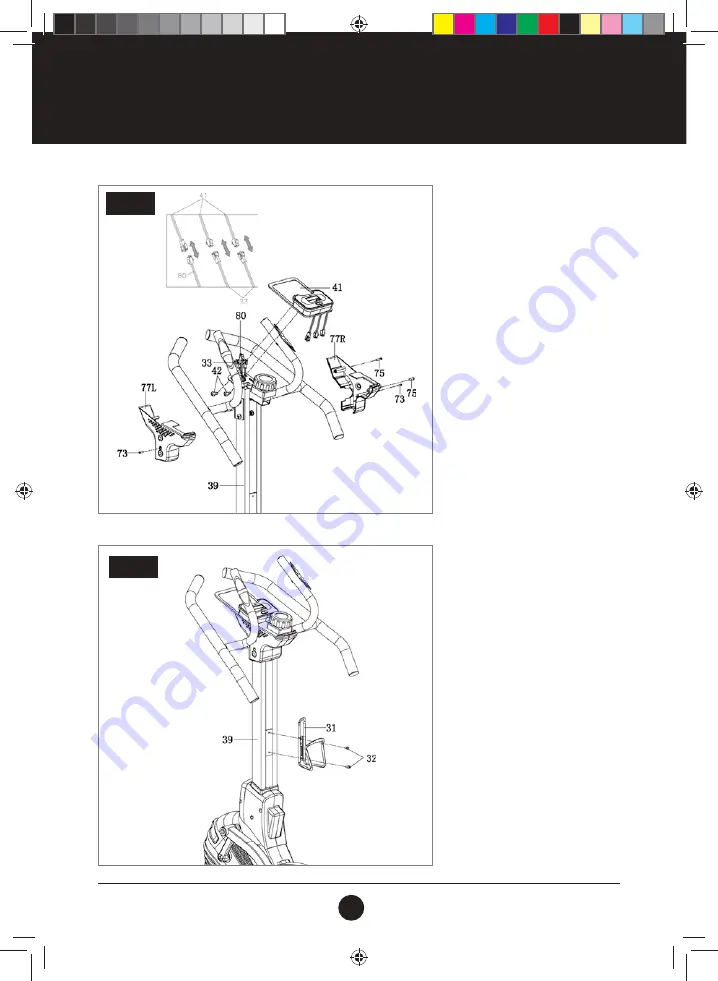
background image

12


STEP 5: 

Connect Sensor (80) and Sensor 
Wire (80) with Monitor (41). Secure 
Monitor (41) to the Monitor Seat 
of Mid Handlebar Weld (39) with 
2 Screws (D8 X 

ø

28 X 2) (42). 

Secure L&R Upper Decorative Cover 
(77L / 77R) to Mid Handlebar Weld 
(39) with 2 Screws (M4 X 10) (73),
2 Screws (ST4.2 X 20) (75).

STEP 5

ASSEMBLY STEPS

STEP 6: 

Secure the Water Bottle 
Holder (31) to Mid Handlebar 
Weld (39) with Screw 
(M5 X 10 X 

ø

10) (32).

STEP 6


#20M02T004 Elliptical Climber MAKRO - UM.indd   12

2020/03/23   1:18 PM

Summary of Contents for ELLIPTICAL CLIMBER

Page 1: ...tagram com trojanhealth CAUTION READ ALL PRECAUTIONS AND INSTRUCTIONS IN THIS MANUAL BEFORE USING THIS EQUIPMENT KEEP THIS MANUAL FOR FUTURE REFERENCE ELLIPTICALCLIMBER MAGNETIC RESISTANCE CARDIO 7KG...

Page 2: ...___________________________________ 10 Console Functions ____________________________________________ 13 Fitness Tips Techniques _____________________________________ 14 Conditioning Guidelines ______...

Page 3: ...d muscular pain and strain begin each workout by stretching and warming up and end each session by cooling down and stretching INSTALLATION Trojan recommends that all equipment Be secured to or set up...

Page 4: ...pt to use or repair the equipment yourself Please contact our service department on 0861 TROJAN 0861 876526 to arrange a repair Customers residing outside South Africa can contact us on 27 10 206 4405...

Page 5: ...ptical Climber provides a convenient and simple method to begin your assault on getting your body in shape and achieving a healthier lifestyle Before reading further please review the drawing below an...

Page 6: ...tools such as spanners will be provided for assembly 4 M8 x 55 mm 8 PCS 5 D8 8 PCS 6 D8 20 PCS 7 M4 X 10 mm 2 PCS 11 M8 X 50 mm 4 PCS 12 M5 X 10 mm 2 PCS 25 M8 X 50 mm 2 PCS 26 M8 X 35 mm 4 PCS 32 M5...

Page 7: ...26 Screw M8 X 35 4 27 Sensor Seat 1 28 Anti Tube Cap 1 29 Screw 4 2 X 18 2 No Description Qty 30 Flat Washer D5 2 31 Water Bottle Holder 1 32 Screw M5 X 10 X 10 2 33 Handle Pulse 2 34 Foam 2 35 Tube C...

Page 8: ...Cover 2 70L 70R Decorative Cover 2 71 Decorative Stripe 1 72 Screw ST4 2 X 20 9 73 Screw M4 X 10 2 74 Screw M5 X 10 2 75 Screw ST4 2 X 20 11 76 Tension Control 1 77L 77R Upper Cover 2 78 Screw M5 X 20...

Page 9: ...13 13 13 9R 9L 10R 88 24 4 6 6 5 7 7 3 85 85 8 8 10L 19 19 18 20 19 28 19 18 20 21 22 21 22 12 12 6 51 51 75 70L 70R 73 72 72 7 7 87 87 86 86 85 15 15 15 15 23 23 16 16 16 16 17 17 1 11 14 14 85 8 8...

Page 10: ...2 Bolts M8 X 50 11 Washers D8 6 and Nylon Nuts M8 12 INSTRUCTIONS FOR ASSEMBLY Before assembling make sure that you will have enough space around the item Use the supplied parts and hardware for the...

Page 11: ...lon Nut M8 12 Then Secure the Down Cover 70L 70R to Main Frame 1 with 2 Screws ST4 2 x 20 72 4 Screws ST4 2 X 20 75 STEP 3 STEP 4 Secure the Mid Handlebar 37 to Mid Handlebar Weld 39 with 4 Screws M8...

Page 12: ...th 2 Screws D8 X 28 X 2 42 Secure L R Upper Decorative Cover 77L 77R to Mid Handlebar Weld 39 with 2 Screws M4 X 10 73 2 Screws ST4 2 X 20 75 STEP 5 ASSEMBLYSTEPS STEP 6 Secure the Water Bottle Holder...

Page 13: ...or a signal input from the sensor in the system sleep mode SCAN Display automatically changes according to the next diagram every 6 seconds TIME SPEED DIST CALORIES CAL ODO if have RPM if have PULSE R...

Page 14: ...tore weight training is an essential part of the exercise routine process Weight training helps tone build and strengthen muscle If you are working above your target zone you may want to do a lesser a...

Page 15: ...d because your heart rate will drop rapidly when you stop exercising Adjust the intensity of your exercise until your heart rate is at the proper level CONDITIONINGGUIDELINES How you begin your exerci...

Page 16: ...rs to relax as you reach down toward your toes as far as possible Hold for 15 counts and then relax Repeat 3 times Stretches Hamstrings back of knees and back 2 HAMSTRING STRETCH Sit with 1 leg extend...

Page 17: ...moisture on the Console display panel as this might cause an electrical hazard or electronics to fail Please keep The Trojan Elliptical Climber especially the Console out of direct sunlight to preven...

Page 18: ...ss or damage direct indirect or consequential arising out of the use of or inability to use this product and whether or not occasioned by the Manufacturer s negligence or any act or omission on its pa...

Page 19: ...aired free of charge as long as it complies with the terms and conditions of the warranty refer to warranties section in this manual Any items that need to be repaired that are NOT covered in the warr...

Reviews: