1061M-11
ASSEMBLY STEPS
STEP 05
How to assemble the Pulleys
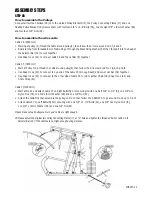
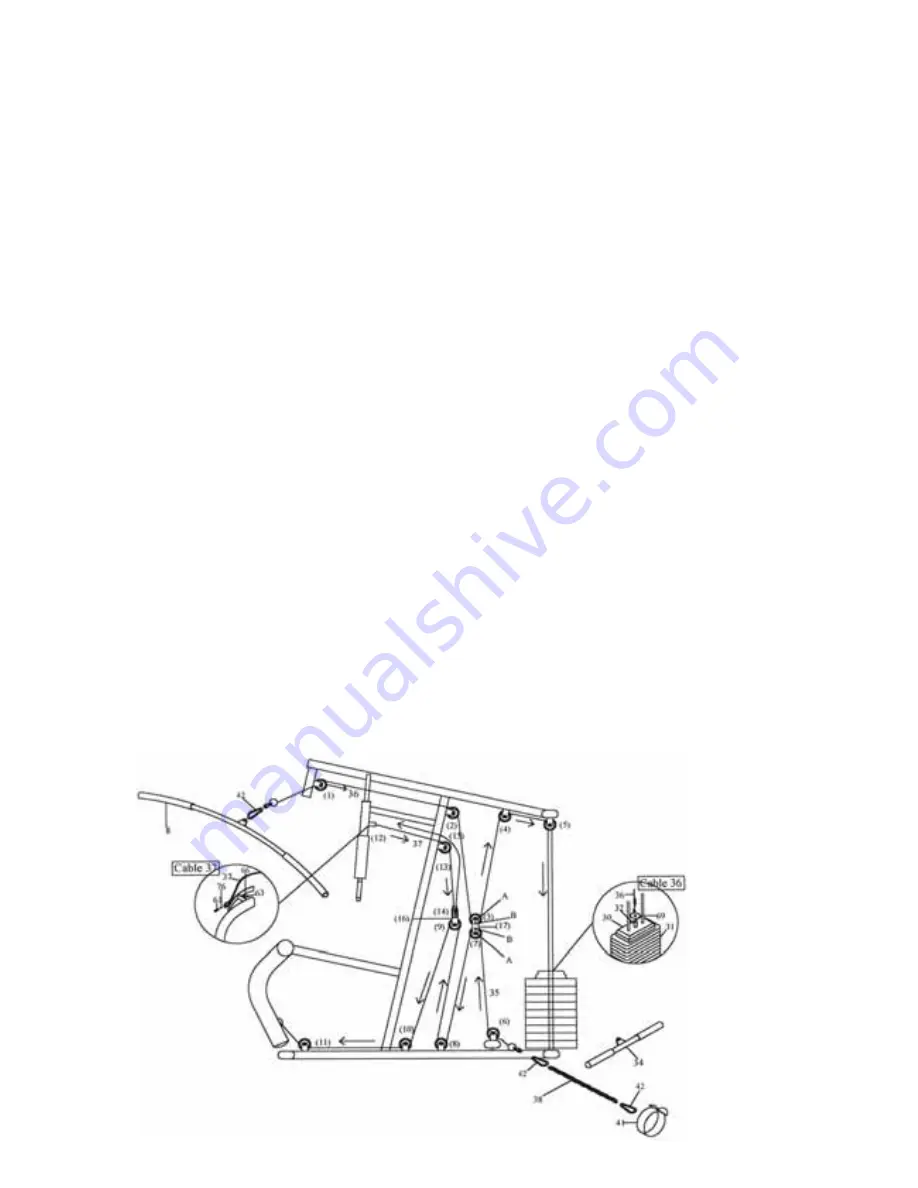
Connect all fourteen Pulleys (18) onto the welded Pulley Brackets (l5), two Pulley Connecting Plates (17) and one
Floating Pulley Bracket (16). Secure them with fourteen 3/8” x l-3/4” Bolts (56), twenty eight 3/8” x l9mm Washer (66)
and fourteen 3/8” Nuts (63).
How to assemble the wires cable
Cable 36 (3305mm)
• Starting at pulley (1), thread the cable around pulley(1), then follow the Arrows around no. 2,3,4 and 5.
• Finally let the front threaded bolt of cable 36 go through the Black Fixing Washer (69) then thread it into the head of
the Selector Bar (32) to lock together.
• Use Snap Hook (42) to connect cable 36 and Top Lat Bar (8) together.
Cable 35 (3930mm)
• Start at Pulley No. 6 thread the cable around pulley(6), then follow the Arrows around No. 7,8,9, 10 and II.
• Use Snap Hook (42) to connect to eye end of the cable 35 (On Leg Beam) and Lower Lat Bar (34) together.
• Use Snap Hook (42) to connect to the other side of cable 35 to join together Chain (38), Snap Hook (42) and
Ankle Strap (41).
Cable 37(2160mm)
• Start at No.12 and attach cable 37 on Right Butterfly Arm securing it with one Bolt 3/8” x l-1/4” (6l), one 3/8” w/o
Nylon Nut (76), one 3/8’ x l9mm Washer (66) and one 3/8” Nut (63).
• Attach the cable first then assemble the pulley on No.13 then follow the ARROWS to go around No.14 up to No.15
• Attach cable 37 on Left Butterfly Arm securing with one 3/8” x 1-1/4” Bolts (61), one 3/8” w/o Nylon Nut (l6),
one 3/8” x 19mm Washer (66) and one 3/8” Nut(63).
Please make sure all pulleys can turn and cable are tight enough.
PS: Please adjust the original two Pulley Connecting Plates (l7) at “A” hole and tighten the threaded bolt of cable 36 to
Selector Bar (32) if the cables are not tight enough during workout.
Summary of Contents for OLYMPIAD 300
Page 23: ...1061M 23 14 EXPLODED DRAWING GYM...
Page 24: ...1061M 24 15 EXPLODED DRAWING BENCH...
Page 28: ...1061M 28...


