background image

15

PROX470-SB

SPINNING BIKE SET-UP

SPINNING BIKE SET-UP

• 

Stand next to the Spinning Bike’s seat (also known as the saddle). The seat height should be about 
level with your hips when you are standing next to it.

• 

Turn the seat height adjustment Knob counter-clockwise. Pull the handle out to release the pin from 
the hole so you can adjust the seat height. Lower or raise the seat so it is approximately level with your 
hips as you stand next to the bike. 

• 

Insert the pin into the correct seat height hole and turn the handle clockwise to lock it in place.

• 

Get on the bike.

• 

Take one pedal all the way down to the bottom of your pedal stroke. You should have a full extension 
in your leg without locking out your knee. The full extension should allow for a soft knee or even a 
very slight bend.

• 

Bring one pedal forward and one pedal back so they are in a straight line (the front pedal should be in 
the 3 o’clock position and the back in the 9 o’clock position). If you drop a straight line down from your 
forward knee, it should fall directly over the centre of your front foot. If this does not happen, you 
need to move the seat either forward or backward. The forward knee should be at a 90 degree angle. 
You should also be able to comfortably rest your hands on the handlebars. If you feel you are really 
stretching to reach the handlebars, you need to move your seat or handlebars backwards or forwards 
until you are in your most comfortable riding position.

• 

Dismount the bike and adjust the forward/backward seat or handlebars position. Again, turn the handle 
counter-clockwise, pull the pin out and move the seat to the desired position. Place the pin in the 
chosen hole and turn the handle clockwise to secure the position.

• 

Move to the front of the bike and adjust the handlebar height. The height of the handlebars is more 
a matter of preference. Comfort should be the main key. Some experienced riders choose to keep 
the handlebars low to replicate outdoor riding. Many riders choose a higher handlebar height for more 
comfort.

Summary of Contents for PRO-X 470

Page 1: ...BIKE 21KG FLYWHEEL CARDIO USERMANUAL Visit facebook com trojanhealth www trojanhealth co za CAUTION READ ALL PRECAUTIONS AND INSTRUCTIONS IN THIS MANUAL BEFORE USING THIS EQUIPMENT KEEP THIS MANUAL FO...

Page 2: ...______ 13 Console Functions____________________________________________ 14 Spinning Bike Set Up __________________________________________ 15 Exercise Instructions ____________________________________...

Page 3: ...d consult your physician To avoid muscular pain and strain begin each workout by stretching and warming up and end each session by cooling down and stretching INSTALLATION Trojan recommends that all e...

Page 4: ...appear damaged or worn do not attempt to use or repair the equipment yourself Please contact our service department on 0861 TROJAN 0861 876526 to arrange a repair Customers residing outside South Afr...

Page 5: ...y to exercise The Trojan Pro X 470 Spinning Bike provides a convenient and simple method to begin your assault on getting your body in shape and achieving a healthier lifestyle Before reading further...

Page 6: ...e hardware packaging to make sure all parts are included Basic tools such as spanners will be provided for assembly 9 8 7 6 5 4 3 2 1 0 24 23 22 21 20 19 18 17 16 15 14 13 12 11 10 9 8 7 6 5 4 3 2 1 0...

Page 7: ...lat Washer 3 16 x 10 2 x T1 5 1 26 Elastic Washer 1 GB T 859 1987 8 4 27 Bolt 2 GB T 70 3 2000 M8 x 18 4 28 Hex Flange Surface Nut 1 GB T 6177 2 2000 M10 x 1 25 2 29 Crank End Cap 23 x 7 5 2 No Descri...

Page 8: ...Spring 3 2 2 1 70 Brake Block 200 x 47 x 30 1 71 Brake Plug 114 x 9 x 14 1 72 Flat Washer 6 45 x 10 5 x 5 2 No Description 73 Woolly Block 113 x 25 x 8 p 0 41 1 74 Bolt 4 GB T 5780 2000 M5 x 30 2 75 B...

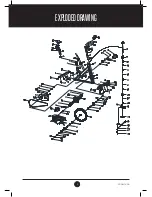
Page 9: ...9 PROX470 SB EXPLODEDDRAWING...

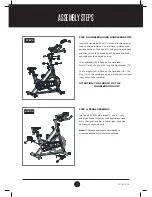
Page 10: ...at Washer 5 M8 Domed Nut 6 and M8 x 52 Carriage Bolt 3 Attach the Rear Stabiliser 4 to the Main Frame 16 with two sets of 8 Flat Washer 5 M8 Domed Nut 6 and M8 x 52 Carriage Bolt 3 STEP 2 SEAT ASSEMBL...

Page 11: ...the Handlebar Post 17 with the Knob 65 and the Flat Washer 72 The Computer 45 is fixed on the handlebar 18 The Plug A1 of the sensing line plug into the sensor signal input hole of the computer ATTEN...

Page 12: ...e resistance requiring less strength to pedal turn the Emergency Brake Resistance Control Knob 30 to the left STEP 6 USING THE EMERGENCY BRAKE FUNCTION The Emergency Brake Resistance Control Knob 30 c...

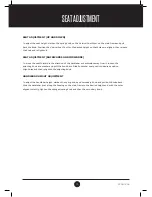
Page 13: ...in the direction of the handlebar or backwards away from it loosen the adjusting Knob and washer and pull the Knob back Slide horizontal seat post into desired position Align holes and then retighten...

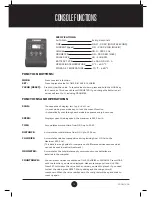
Page 14: ...aining from 0 0 Cal to the Maximum 999 9 Cal This data is a rough guide for comparison of different exercise sessions which can not be used in medical treatment ODOMETER Accumulates the total distance...

Page 15: ...on and the back in the 9 o clock position If you drop a straight line down from your forward knee it should fall directly over the centre of your front foot If this does not happen you need to move th...

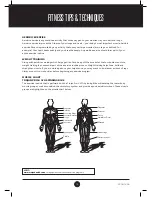
Page 16: ...ry It is advisable to do a few stretching exercises as shown below Each stretch should be held for approximately 30 seconds do not force or jerk your muscles into a stretch If it hurts STOP THE EXERCI...

Page 17: ...is will put more strain on our leg muscles and may mean you cannot train for as long as you would like If you are also trying to improve your fitness you need to alter your training program You should...

Page 18: ...o not use abrasives or solvents on plastic parts Please wipe your perspiration off the Trojan Pro X 470 Spinning Bike after each use Please inspect all assembly bolts and pedals on the machine for pro...

Page 19: ...Your heart beats quickly and you breathe deeply An aerobic exercise should form part of your entire exercise routine WEIGHT TRAINING Along with aerobic exercising which helps get rid of and keep off t...

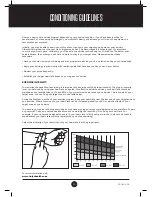
Page 20: ...d count is used because your heart rate will drop rapidly when you stop exercising Adjust the intensity of your exercise until your heart rate is at the proper level For more information visit www tro...

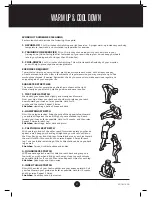
Page 21: ...rd from your hips Allow your back and shoulders to relax as you reach down toward your toes as far as possible Hold for 15 counts and then relax Repeat 3 times Stretches Hamstrings back of knees and b...

Page 22: ...ufacturer in respect of any injury loss or damage direct indirect or consequential arising out of the use of or inability to use this product and whether or not occasioned by the manufacturer s neglig...

Page 23: ...try identify the fault and will book a service team call out The service team will endeavour to fix the problem in your home on an agreed date and time Only if the fault cannot be repaired in the con...

Page 24: ...24 PROX470 SB NOTES...

Reviews: