background image

16

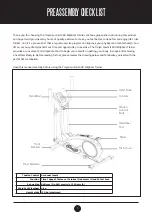
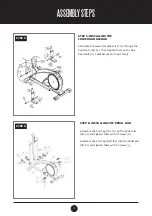
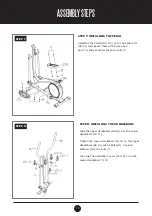
STEP 9: INSTALLING THE
MIDDLE HANDLEBAR

Attach the Middle Handlebar (5) to the Front Post (4) 
and tighten them with 2 Spring Washers (P)
and 2 Bolts (Q).

ASSEMBLY STEPS

STEP 9

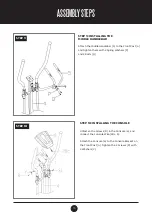
STEP 10: INSTALLING THE CONSOLE

Unfasten the Screws (R) in the Console (6), and 
connect the Console Wire (28c, b).

Attach the Console (6) to the Console Bracket on 
the Front Post (4). Tighten the 2 Screws (R) with
2 Washers (Y).

STEP 10

Summary of Contents for SUMMIT 280

Page 1: ...MANUAL LEVELS CARDIO Visit facebook com trojanhealth www trojanhealth co za www instagram com trojanhealth CAUTION READ ALL PRECAUTIONS AND INSTRUCTIONS IN THIS MANUAL BEFORE USING THIS EQUIPMENT KEEP...

Page 2: ..._ 12 Console Functions ____________________________________________ 18 Exercise Instructions _________________________________________ 20 Fitness Tips Techniques _____________________________________...

Page 3: ...nsult your physician To avoid muscular pain and strain begin each workout by stretching and warming up and end each session by cooling down and stretching INSTALLATION Trojan recommends that all equip...

Page 4: ...amaged or worn do not attempt to use or repair the equipment yourself Please contact our service department on 0861 TROJAN 0861 876526 to arrange a repair Customers residing outside South Africa can c...

Page 5: ...0 Elliptical Trainer provides a convenient and simple method to begin your assault on getting your body in shape and achieving a healthier lifestyle Before reading further please review the drawing be...

Page 6: ...e packaging to make sure all parts are included Basic tools such as spanners will be provided for assembly 1 PC A M8 x 45 mm 4 PCS C M8 x 16 mm 6 PCS H M8 x 75 mm 2 PCS L M8 x 45 mm 4 PCS D M8 x 15 mm...

Page 7: ...RDWARE TOOLSLIST 2 PCS I M8 10 PCS F M10 2 PCS O D8 5 x 20 x R30 mm 2 PCS N D8 5 x 20 x R16 mm 4 PCS S D19 4 x 24 mm 4 PCS G D10 5 x 32 mm 2 PCS E D8 5 x 32 mm 2 PCS B D8 5 x 16 mm 14 PCS P D8 2 mm 4...

Page 8: ...h S13 14 15 1 X Wrench S13 14 1 Y Washer ID4 2 Z Wrench S5 1 1 Main Frame 1 2 Front Stabiliser 1 3 Rear Stabiliser 1 No Description Qty 4 Front Post 1 5 The Middle Handlebar 1 6 Console 2 7 R L Lower...

Page 9: ...hain Cover R L 2 46 Screw ST4 0 x 12 mm 14 47 Nut 4 48 Shaft 1 49 Belt Roller 1 50 Bolt 4 51 Sleeve 1 52 Bolt 1 No Description Qty 53 Bolt 1 54 Bolt 1 55 Screw M3 x 10 mm 2 56 Cycle Body 1 57 Pulley 2...

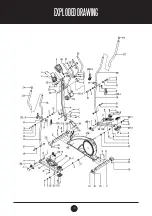
Page 10: ...10 EXPLODEDDRAWING...

Page 11: ...11 EXPLODEDDRAWING...

Page 12: ...ALLATION Assemble the Front Stabiliser 2 and Rear Stabiliser 3 to the Main Frame 1 with 2 Bolts A and 2 Washers B STEP 2 INSTALLING THE UP RIGHT POST Slide the Front Post Cover 29 on to the Front Post...

Page 13: ...ebar 7R 7L over the Front Post 4 Then tighten the Lower Handle 7R 7L with 1 Hex Head Bolt D 1 Spring Washer P and 1 Washer E STEP 3 STEP 4 INSTALLING THE PEDAL ARMS Slide the Plastic Spacers 13 1 Wash...

Page 14: ...9L Then tighten them with 1 Hex Head Bolt H 1 Washer B and 1 Nut M8 I ASSEMBLYSTEPS STEP 5 STEP 6 INSTALLING THE PEDAL BAR Assemble the End Cap 11R 11L on the Pedal Arm 9R 9L and tighten them with 3 S...

Page 15: ...Bolts L and 2 Washers B and 2 Nuts I STEP 7 STEP 8 INSTALLING THE HANDLEBARS Slide the Upper Handlebars 8R 8L into the Lower Handlebars 7R 7L Tighten the Lower Handlebars 7R 7L on the Upper Handlebars...

Page 16: ...and tighten them with 2 Spring Washers P and 2 Bolts Q ASSEMBLYSTEPS STEP 9 STEP 10 INSTALLING THE CONSOLE Unfasten the Screws R in the Console 6 and connect the Console Wire 28c b Attach the Console...

Page 17: ...7 ASSEMBLYSTEPS STEP 11 INSTALLING THE CONSOLE Fit the Front Post Cover 4 and tighten with 2 Screws J and 1 Screw T Connect the Handle Pulse Wire 31 to the socket at the bottom of the Console 6 STEP 1...

Page 18: ...Put 2 AA batteries into the console which will provide an activation beep and the LCD displays all functions for approximately 2 seconds SCAN Press MODE button until appears on SCAN At this setting th...

Page 19: ...this setting the total distance travelled after the batteries were installed will be displayed PULSE Press MODE button until appears at PULSE At this setting the console will display your current hea...

Page 20: ...rcises as shown below Each stretch should be held for approximately 30 seconds do not force or jerk your muscles into a stretch If it hurts STOP THE EXERCISE PHASE This is the stage where you put the...

Page 21: ...cal Trainer you will need to have the resistance set quite high This will put more strain on your leg muscles and may mean you cannot train for as long as you would like If you are also trying to impr...

Page 22: ...TRAINING Along with aerobic exercising which helps get rid of and keep off the excess fat that our bodies can store weight training is an essential part of the exercise routine process Weight training...

Page 23: ...SITY To maximise the benefits of exercising it is important to exercise with the proper intensity The proper intensity level can be found by using your heart rate as a guide For effective aerobic exer...

Page 24: ...your back and shoulders to relax as you reach down toward your toes as far as possible Hold for 15 counts and then relax Repeat 3 times Stretches Hamstrings back of knees and back 2 HAMSTRING STRETCH...

Page 25: ...n Summit 280 Elliptical Trainer in a clean and dry environment away from children PROBLEM SOLUTION There is no display on the Console 1 Remove the Console and verify the wire that comes from the Conso...

Page 26: ...urer in respect of any injury loss or damage direct indirect or consequential arising out of the use of or inability to use this product and whether or not occasioned by the Manufacturer s negligence...

Page 27: ...still under warranty will be repaired free of charge as long as it complies with the terms and conditions of the warranty refer to warranties section in this manual Any items that need to be repaired...

Reviews: