background image

USER MANUAL

Visit facebook.com/trojanhealth

www.trojanhealth.co.za

www.instagram.com/trojanhealth

CAUTION

READ ALL PRECAUTIONS AND 

INSTRUCTIONS IN THIS MANUAL 

BEFORE USING THIS EQUIPMENT.  

KEEP THIS MANUAL FOR 

FUTURE REFERENCE.

VISION 360

HOME GYM

COMPLETE

BODY WORKOUT

CARDIO

Summary of Contents for VISION 360

Page 1: ...nhealth www trojanhealth co za www instagram com trojanhealth CAUTION READ ALL PRECAUTIONS AND INSTRUCTIONS IN THIS MANUAL BEFORE USING THIS EQUIPMENT KEEP THIS MANUAL FOR FUTURE REFERENCE VISION360 H...

Page 2: ...__ 11 Assembly Steps ______________________________________________ 12 Exercise Instructions _________________________________________ 20 Fitness Tips Techniques _____________________________________...

Page 3: ...nce pain stop exercising immediately and consult your physician To avoid muscular pain and strain begin each workout by stretching and warming up and end each session by cooling down and stretching IN...

Page 4: ...ear damaged or worn do not attempt to use or repair the equipment yourself Please contact our service department on 0861 TROJAN 0861 876526 to arrange a repair Customers residing outside South Africa...

Page 5: ...al health Too often our busy lifestyles limit our time and opportunity to exercise The Trojan Vision 360 Home Gym provides a convenient and simple method to begin your assault on getting your body in...

Page 6: ...Rod 2 PCS 6 Butterfly Extension 1 PC 9 Seat Cushion Support 1 PC 10 Seat Support Post 1 PC 11 Leg Extension 1 PC 12 Arm Curl Frame 1 PC 13 Bench Press Arm 1 PC 14 Solid Handle 2 PCS 15 Left Adjustabl...

Page 7: ...59 Handle Tube Short PT 1B 2 PCS 66 Oil Bushing 10 PCS 32 Weight Base Plate 1 PC 38 Oval End Plug 40 x 80 mm 5 PCS 45 Plastic Dome Cap 1 2 2 PCS 52 Hook 5 PCS 60 Taper End Plug 1 PC 67 Oil Bushing 44...

Page 8: ...olt 1 2 x 3 3 8 1 PC 82 Screw M8 x 60 mm 2 PCS 87 Locknut 5 8 4 PCS 93 Washer T3 0 x 11 x 36 2 PCS 99 Busing 13 x T1 0 x 17 2 PCS 73 Hex Bolt 3 8 x 1 1 4 2 PCS 78 Hex Bolt 3 8 x 3 3 4 2 PCS 83 Screw 3...

Page 9: ...2 24 Pulley Bracket Piece 2 25 Intersect Pulley Bracket 1 26 Arm Curl Cushion 1 27 Seat Cushion 1 28 Backrest Cushion 1 No Description Qty 29 Weight Selection Rod 1 30 Top Plate 1 31 Weight Plate 10...

Page 10: ...ex Bolt 3 8 X 1 6 77 Hex Bolt 1 2 X 3 3 8 1 78 Hex Bolt 3 8 X 3 3 4 2 79 Hex Bolt 3 8 X 3 1 80 Screw M10 X 25 mm 2 No Description Qty 81 Hex Bolt M8 X 16 mm 6 82 Hex Bolt M8 X 42 mm 2 83 Hex Bolt M8 X...

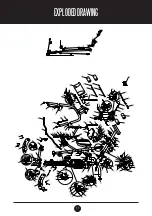
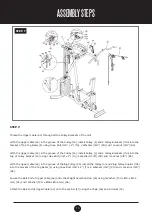
Page 11: ...11 EXPLODEDDRAWING 10230 25...

Page 12: ...ts 3 8 x 4 1 8 94 4 Washers 3 8 90 and 2 Locknuts 3 8 85 STEP 2 Slide 2 Round Bumpers 47 onto the 2 Guide Rods 4 Insert 2 Guide Rods 4 into the 2 holes of the Rear Base 2 and secure using 2 Hex Bolts...

Page 13: ...3 8 85 Attach the Top Beam 5 to the top of the Guide Rods 4 using 2 Hex Bolts 3 8 x 1 16 and 2 3 8 Washers 90 Place the Top Beam 5 onto the Vertical Post 3 Attach 2 Plirtes 62 to the Top Beam 5 using...

Page 14: ...SEMBLYSTEPS STEP 5 STEP 6 Attach the Butterfly Extension 6 to the Vertical Post 3 using 2 Hex Bolts 3 8 x 3 3 4 78 4 Washers 3 8 90 and 2 Locknuts 3 8 85 Insert the shaft of the Left Butterfly Arm 7 t...

Page 15: ...Pulley Brackets 104 into the top of Pulley Bracket 24 using 1 Hex Bolt 3 8 x 2 74 2 Washers 3 8 90 and 1 Locknut 3 8 85 With the Upper Cable 63 in the groove of the Big Pulley 55 install the Pulley 4...

Page 16: ...ers 3 8 90 and 1 Locknut 3 8 85 With the Butterfly Cable 65 in the groove of the Pulley 54 install Pulley 6 with 2 Pulley Brackets 104 into the top of the Intersect Pulley Bracket 25 using 1 Hex Bolt...

Page 17: ...nd 1 Locknut 3 8 85 With the Low Cable 64 in the groove of the Pulley 54 install Pulleys 10 12 with 4 Pulley Brackets 104 into the brackets of the Bench Press Arm 13 using 1 Hex Bolt 3 8 x 3 3 8 70 2...

Page 18: ...ey 15 with 2 Pulley Brackets 104 into the bracket of the Main Base 1 using 1 Hex Bolt 3 8 x 2 74 2 Washers 3 8 90 and 1 Locknut 3 8 85 With the Low Cable 64 in the groove of the Pulley 54 install the...

Page 19: ...89 STEP 11 Attach the Arm Curl Cushion 26 onto the Arm Curl Frame 12 using 2 Hex Bolts M8 x 16 mm 81 and 2 Washers M8 89 Insert the Arm Curl Frame 12 into the Seat Support Post 10 and secure with the...

Page 20: ...put the effort in After regular use the muscles in your legs will become stronger Work at your own pace but it is very important to maintain a steady tempo throughout The rate of work should be suffic...

Page 21: ...o trying to improve your fitness you need to alter your training program You should train as normal during the warm up and cool down phases but towards the end of the exercise phase you should increas...

Page 22: ...hich helps get rid of and keep off the excess fat that our bodies can store weight training is an essential part of the exercise routine process Weight training helps tone build and strengthen muscle...

Page 23: ...SITY To maximise the benefits of exercising it is important to exercise with the proper intensity The proper intensity level can be found by using your heart rate as a guide For effective aerobic exer...

Page 24: ...your back and shoulders to relax as you reach down toward your toes as far as possible Hold for 15 counts and then relax Repeat 3 times Stretches Hamstrings back of knees and back 2 HAMSTRING STRETCH...

Page 25: ...t use abrasives or solvents on plastic parts Please wipe your perspiration off the Trojan Vision 360 Home Gym after each use Please inspect all assembly bolts and pedals on the machine for proper tigh...

Page 26: ...urer in respect of any injury loss or damage direct indirect or consequential arising out of the use of or inability to use this product and whether or not occasioned by the Manufacturer s negligence...

Page 27: ...still under warranty will be repaired free of charge as long as it complies with the terms and conditions of the warranty refer to warranties section in this manual Any items that need to be repaired...

Reviews: