


12
EN
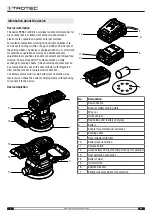
Cordless random orbital sander PESS 10-20V
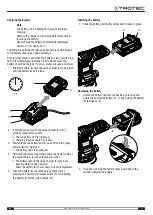
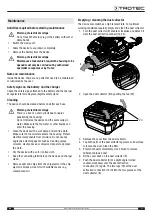
Checking the battery charging status
The battery comes with an integrated battery level indication.
The battery status is displayed as follows by the three LEDs of
the battery level indication (
10
):
LED colour
Meaning
Green – Orange – Red
maximum charge / power
Orange – Red
medium charge / power
Red
weak charge – recharge the
battery
1. Press on the battery icon (
18
) on the battery (
6
).
ð
You can read the battery status from the battery level
indication (
10
).
18
10
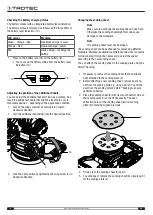
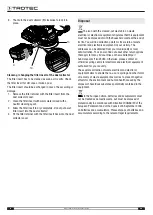
Adjusting the position of the additional handle
You can adjust the additional handle (
16
) in six positions. As a
result the additional handle (
16
) might be located in a more
favourable position – depending on the application condition.
1. Loosen the wing screw (
3
) by turning it in counter-
clockwise direction.
2. Turn the additional handle (
16
) into the desired position.
16
3
3. Lock the new position by tightening the wing screw (
3
) in
clockwise direction.
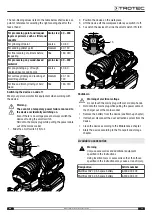
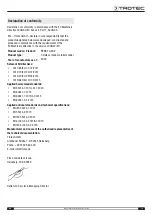
Changing the sanding sheet
Note
Make sure to exchange the sanding sheet in due time.
Otherwise the sanding sheet might tear and cause
damage to the workpiece.
Note
The sanding sheet must not be kinked.
The sanding sheet can be exchanged for processing different
materials. Moreover available are different grain sizes for coarse
to fine sanding. It might be necessary to adjust the speed
according to the new sanding sheet.
You can attach the sanding sheet to the sanding plate using the
Velcro
®
backing.
1. If necessary, remove the sanding sheet that had already
been attached to the sanding plate (
2
).
2. Before attaching a new sanding sheet, remove dust and
dirt from the sanding plate e.g. using a brush. Tap off the
dust from the sanding plate's Velcro
®
backing to ensure
optimum adhesion.
3. Place the sanding sheet (
8
) with its smooth bottom side on
the sanding plate (
2
) so that it fits exactly. The dust
extraction holes of the sanding sheet (
8
) and sanding
plate (
2
) should be aligned precisely.
8
2
4. Firmly press the sanding sheet (
8
) down.
5. To exchange or remove the sanding sheet (
8
), simply pull it
off the sanding plate (
2
).


