background image

EN

10

Operating manual – 3-in-1 multi-function sander PMSS 10-200

ü

Use tools suitable for the intended task.

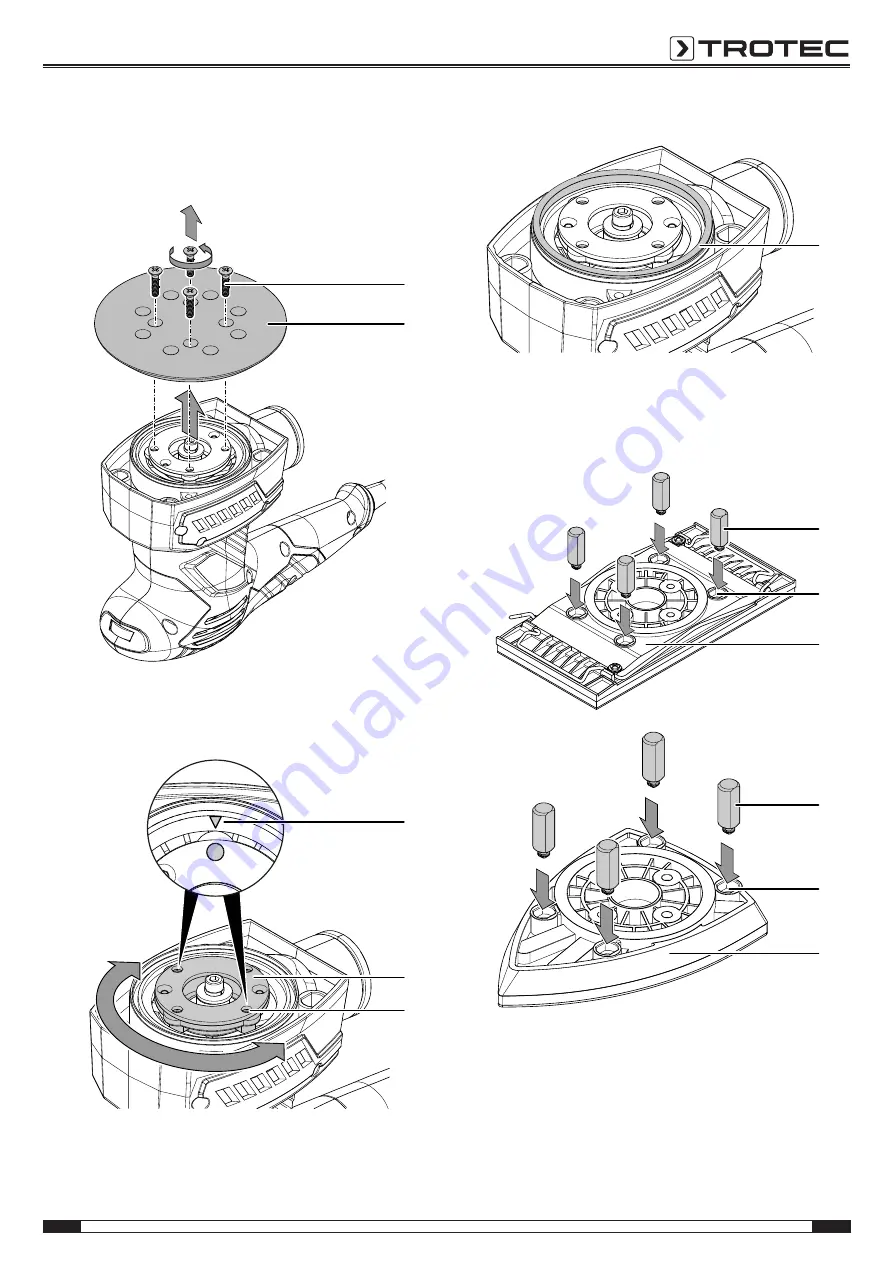
1. Loosen the four screws (9) at the sanding plate (3).

ð

The sanding plate is now loosened.

2. Remove the sanding plate (3) from the device.

9

3

3. Adjust the flange (16) for the selected sanding plate. The

threaded holes (17) for the screws must be aligned with
the marks (18) on the device.

16

17

18

4. Check the felt ring (21) for correct fit.

21

5. When mounting the orbital sanding plate (6) or the delta

sanding plate (14), insert the four rubber pins (10) into the
sanding plate so that the latching noses sit in the
recesses (19).

10

19

6

14

19

10

6. Place the orbital sanding plate (6) or delta sanding

plate (14) onto the flange (16). When mounting the orbital
sanding plate, the arrow (20) must point to the front. When
mounting the delta sanding plate, the tip must point to the
front.

7. Pay attention that the rubber pins (10) are positioned in the

recesses (19) in the device. The rubber pins ensure that
the sanding plate is fixed in position.

Summary of Contents for EdgeProtect 4550

Page 1: ...TRT BA PMSS10 200 TC 001 EN PMSS 10 200 EN OPERATING MANUAL 3 IN 1 MULTI FUNCTION SANDER...

Page 2: ...ndicates a hazard with a low risk level which if not avoided can result in minor or moderate injury Not permissible for wet grinding Information marked with this symbol indicates that wet grinding is...

Page 3: ...rounded power tools Unmodified plugs and matching outlets will reduce risk of electric shock Avoid body contact with earthed or grounded surfaces such as pipes radiators ranges and refrigerators There...

Page 4: ...king conditions and the work to be performed Use of the power tool for operations different from those intended could result in a hazardous situation General Power Tool Safety Warnings Service Have yo...

Page 5: ...at you stand firmly on the ground It is safer to handle the power tool with two hands Never touch the abrasive belt while it is in motion Risk of injury Do not use worn torn or heavily contaminated ab...

Page 6: ...sure that no water or other liquids can enter the housing Warning of explosive substances Fine dust produced during grinding is highly flammable Risk of fire and explosion Use a dust or chip bag or a...

Page 7: ...f the mains socket 3 Do not reconnect a defective device to the mains Information about the device Device description The device PMSS 10 200 is a 3 in 1 multi function sander for dry sanding The devic...

Page 8: ...ter 12 Tab 13 Dust box release button 14 Delta sanding plate 15 Setting wheel for oscillation rate selection Scope of delivery 1 x Device PMSS 10 200 1 x Dust collector 1 x Reducer 1 x Orbital sanding...

Page 9: ...tion The vibration level specified in these instructions was determined by means of a measuring method standardized in EN 60745 and can be used for a device comparison The specified vibration emission...

Page 10: ...storage conditions dry and protected from frost and heat ambient temperature below 40 C protected from dust and direct sunlight inside the transport case Start up Unpacking the device Take the transp...

Page 11: ...ing 21 for correct fit 21 5 When mounting the orbital sanding plate 6 or the delta sanding plate 14 insert the four rubber pins 10 into the sanding plate so that the latching noses sit in the recesses...

Page 12: ...sanding sheet can be exchanged for processing different materials Moreover available are different grain sizes for coarse to fine sanding It might be necessary to adjust the speed according to the ne...

Page 13: ...the orbital sanding plate Otherwise you cannot fix the sanding sheet in the clamping bracket Proceed as follows 1 Fold down the locking lever 5 on one side of the device to open the corresponding clam...

Page 14: ...it into the two grooves of the dust collector 11 The dust collector 11 must lock into place in the device 2 11 22 Mounting the external dust extraction system Alternatively you can also connect the du...

Page 15: ...tear and cause damage to the workpiece Exchange sanding sheets in due time Clamp the workpiece unless it is firmly and safely positioned by its own weight Do not overload the device so that it comes...

Page 16: ...medium 80 100 120 For fine and finish grinding of hard wood fine 180 240 Switching the device on and off Wear your personal protective equipment when working with the device 1 Slide the on off switch...

Page 17: ...e is suitable for the tasks to be carried out The surface of the workpiece is not smooth or the grinding performance is insufficient Check whether the selected sanding sheet is suitable for the materi...

Page 18: ...soft damp and lint free cloth Ensure that no moisture enters the housing Protect electrical components from moisture Do not use any aggressive cleaning agents such as cleaning sprays solvents alcohol...

Page 19: ...ack into the dust collector cover Disposal The icon with the crossed out waste bin on waste electrical or electronic equipment stipulates that this equipment must not be disposed of with the household...

Page 20: ...Trotec GmbH Co KG Grebbener Str 7 D 52525 Heinsberg 49 2452 962 400 49 2452 962 200 info trotec com www trotec com...

Reviews: