background image

6

EN

radiant heater IR 2010 S

Assembly and start-up

Scope of delivery

1 x Device

4 x Mounting bracket

2 x Wing nut

2 x Screw

4 x Washers

4 x Fastening screws

4 x Wall plug

1 x remote control

1 x manual

Unpacking the device

1. Open the cardboard box and take the device out.
2. Completely remove the packaging.
3. Remove the transport protection (

7

) from the grille of the

radiant heater.

7

4. Fully unwind the power cable. Make sure that the power

cable is not damaged and that you do not damage it during
unwinding.

Assembly

Warning of electrical voltage

Risk of injury due to incorrect assembly!
Local or national regulations may apply for installation.
We recommend to have the installation carried out by a
qualified electrician.

Warning

Risk of fire due to improper installation!
There is a risk of fire if the required minimum
distances are not observed.
Observe the “Installation” section in the “Assembly and
start-up” chapter and the technical data in the
“Technical annex” chapter.

Mounting the wall holder

ü

Use tools suitable for the intended task.

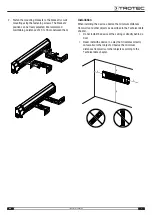
1. Fasten two mounting brackets in each case using two

washers, one wing nut and one screw.

Summary of Contents for IR 2010 S

Page 1: ...TRT BA IR2010S TC210914TTRT04 002 EN IR 2010 S EN OPERATING MANUAL RADIANT HEATER ...

Page 2: ... the manual in the immediate vicinity of the device or its site of use Warning Read all safety warnings and all instructions Failure to follow the warnings and instructions may result in electric shock fire and or serious injury Save all warnings and instructions for future reference This appliance can be used by children aged from 8 years and above and persons with reduced physical sensory or men...

Page 3: ...of at least 1 m between the device s radiator side and all combustible materials such as textiles curtains beds and sofas Allow the device to cool down before transport and or maintenance work The device must not be installed directly beneath a socket The device must be set up in a way that the switches and controllers cannot be touched by a person in a bathtub or shower The device must not be use...

Page 4: ...ackaging lying around Children may use it as a dangerous toy Warning Improper installation entails a risk of fire Do not place the device on combustible ground Do not place the device on high pile carpets Warning Risk of injury due to infrared radiation Do not stay in the device s immediate vicinity for too long Do not look directly into the device for too long Observe the minimum distances Warnin...

Page 5: ...er cable out of the mains socket Do not use the power cable to drag the device Allow the device to cool down sufficiently Storage Before storing the device proceed as follows Hold onto the mains plug while pulling the power cable out of the mains socket Allow the device to cool down sufficiently When the device is not being used observe the following storage conditions dry and protected from frost...

Page 6: ... that you do not damage it during unwinding Assembly Warning of electrical voltage Risk of injury due to incorrect assembly Local or national regulations may apply for installation We recommend to have the installation carried out by a qualified electrician Warning Risk of fire due to improper installation There is a risk of fire if the required minimum distances are not observed Observe the Insta...

Page 7: ...m between them Installation When installing the device observe the minimum distances from walls and other objects as described in the Technical data chapter Do not install the device at the ceiling or directly behind a door Never install the device in a way that it radiates directly onto walls or other objects Observe the minimum distances from walls or other objects according to the Technical dat...

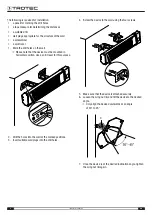
Page 8: ...hat the device must be mounted in horizontal position Use a spirit level for this purpose 2 Drill the holes into the wall at the marked positions 3 Insert suitable wall plugs into the drill holes 4 Screw the device to the wall using the four screws 5 Make sure that the device is attached securely 6 Loosen the wing nut 8 and tilt the device to the desired angle ð Only align the device downwards at ...

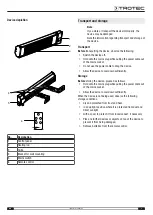
Page 9: ... standby mode P 1 heating capacity 650 W P 2 heating capacity 1350 W P 3 heating capacity 2000 W Indication of the number of hours during timer programming 10 Timer button Automatic switch off timer function in increments of 1 h up to 24 h Remote control All settings of the device can also be made using the remote control included in the scope of delivery 14 15 16 17 18 No Designation Meaning 14 P...

Page 10: ...f injury Designation Article number telescopic tripod 1 410 003 190 Errors and faults Warning of electrical voltage Tasks which require the device to be opened must only be carried out by authorised specialist companies or by Trotec The device has been checked for proper functioning several times during production If malfunctions occur nonetheless check the device according to the following list T...

Page 11: ...pair Maintenance Activities required before starting maintenance Warning of electrical voltage Do not touch the mains plug with wet or damp hands Switch the device off Hold onto the mains plug while pulling the power cable out of the mains socket Allow the device to cool down completely Warning of electrical voltage Tasks which require the device to be opened must only be carried out by authorised...

Page 12: ...municipality or local administration You can also find out about other return options that apply for many EU countries on the website https hub trotec com id 45090 Otherwise please contact an official recycling centre for electronic and electrical equipment authorised for your country The separate collection of waste electrical and electronic equipment aims to enable the re use recycling and other...

Page 13: ...Trotec GmbH Grebbener Str 7 D 52525 Heinsberg 49 2452 962 400 49 2452 962 200 info trotec com www trotec com ...

Reviews: