background image

10

EN

cordless portable circular saw PCSS 10-20V

Scope of delivery

1 x Cordless portable circular saw 

PCSS 10-20V

1 x Rechargeable battery

1 x Quick charger

1 x Carbide saw blade 18 teeth (for wood and plastic)

1 x Rip fence

1 x Adapter for dust extraction

1 x SW5 Allen wrench

1 x Transport case

1 x Manual

Technical data

Parameter

Value

Model

PCSS 10-20V

Nominal voltage

20 V 

Idle speed

3,800 min

-1

Max. saw blade diameter

150 mm

Laser

class 2

Cutting depth

max. 48 mm at 0°
max. 36 mm at 45°

Cutting angle

0° to 45°

Base plate dimensions

135 x 245 mm

Weight

2.6 kg

Saw blades (included in the scope of delivery)

Carbide saw blade for wood and
plastic

18 teeth

Idle speed saw blade

9,000 min

-1

Bore diameter

16 mm

Blade thickness

0.9 mm

Teeth thickness

1.6 mm

Battery

Multiflex 20 – 2.0 DC

Type

Li-ion

Nominal voltage

20 V 

Capacity

2.0 Ah

Quick charger

Multiflex 20 – 2.0 AC

Input

Nominal voltage

220 – 240 V / 50 Hz

Power consumption

65 W

Output

Nominal voltage

21.5 V 

Charging current

2.4 A

Fusing 

3.15 A (slow-blowing)

Charging time

1 h

Cable length

1.5 m

Protection class

II / 

Parameter

Value

Vibration information according to EN 62841

Total vibration emission value (for sawing wood):

Vibration emission value
Main handle a

h

Vibration emission value
Additinal handle a

h

Total vibration value
Uncertainty K

1.879 m/s²

2.213 m/s²

2.2 m/s²
1.5 m/s²

Sound values according to EN 62841

Sound pressure level L

pA

89 dB(A)

Sound power level L

WA

100 dB(A)

Uncertainty K

3 dB(A)

Wear hearing protection.

Excessive noise can lead to hearing loss.

Information on noise and vibration:

The specified total vibration 

and noise emission values

were measured by means of a test procedure standardized
in EN 62841 and can be consulted for the comparison of
one power tool with another.

The specified total vibration 

and noise emission values

can also be used for preliminary load assessment.

Caution

Vibration emissions can cause a health hazard if the
device is used for an extended period of time or if it is
not properly handled and maintained.

The actual vibration 

and noise emission

 may differ from

the stated values during operation of the power tool. This
depends on how the power tool is used and especially on
the type of workpiece being processed. Try to keep the
vibration load to a minimum. Exemplary measures for
reducing the vibration load include wearing gloves during
operation of the tool and the limitation of working hours.
All parts of an operating cycle must be considered for this
(e.g. times at which the power tool is switched off and
times when it is switched on but runs without load).

Summary of Contents for PCSS 15-20V

Page 1: ...TRT BA PCSS10 20V TC2017 55 006 EN PCSS 10 20V EN ORIGINAL INSTRUCTIONS CORDLESS PORTABLE CIRCULAR SAW...

Page 2: ...ord indicates a hazard with an average risk level which if not avoided can result in serious injury or death Caution This signal word indicates a hazard with a low risk level which if not avoided can...

Page 3: ...ed supply Use of an RCD reduces the risk of electric shock General Power Tool Safety Warnings Personal safety Stay alert watch what you are doing and use common sense when operating a power tool Do no...

Page 4: ...er Shorting the battery terminals together may cause burns or a fire Under abusive conditions liquid may be ejected from the battery avoid contact If contact accidentally occurs flush with water If li...

Page 5: ...ed by taking proper precautions as given below Maintain a firm grip with both hands on the saw and position your arms to resist kickback forces Position your body to either side of the blade but not i...

Page 6: ...an electric shock Do not operate the power tool stationary It is not designed for operation with a saw table Do not use high speed steel HSS saw blades Such saw blades can easily break Do not saw ferr...

Page 7: ...electrical voltage Before any work on the device remove the mains plug from the mains socket and the battery from the device Hold onto the mains plug while pulling the power cable out of the mains so...

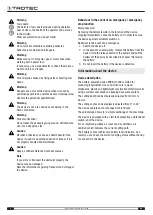
Page 8: ...torage of the device Behaviour in the event of an emergency emergency stop function Emergency stop Removing the battery results in the function of the device stopping immediately Leave the battery out...

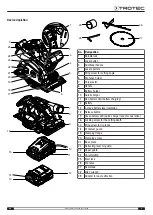
Page 9: ...tor 8 Handle 9 Battery holder 10 Quick charger 11 Red battery LED battery charging 12 Battery 13 3 stage battery level indication 14 Release button 15 Green battery LED quick charger ready for operati...

Page 10: ...emission value Main handle ah Vibration emission value Additinal handle ah Total vibration value Uncertainty K 1 879 m s 2 213 m s 2 2 m s 1 5 m s Sound values according to EN 62841 Sound pressure lev...

Page 11: ...ial requirements as to packaging and labelling must be observed This includes consulting a dangerous goods specialist when preparing the package Only ship batteries if their housing is undamaged Mask...

Page 12: ...delivery to avoid damage to the battery caused by a deep discharge Prior to initial start up and when the battery is low only the red LED in the battery level indication 13 is illuminated the battery...

Page 13: ...y level indication 13 LED colour Meaning Green Orange Red maximum charge power Orange Red medium charge power Red weak charge Recharge the battery 1 Press on the battery icon 30 on the battery 12 You...

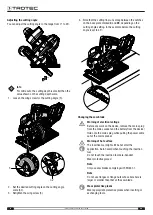
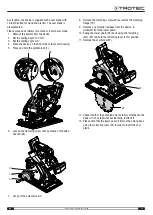
Page 14: ...mple below the cutting angle is set to 45 Changing the saw blade Warning of electrical voltage Before any work on the device remove the mains plug from the mains socket and the battery from the device...

Page 15: ...6 Loosen the clamping screw 20 by means of the Allen wrench 28 33 19 20 7 Let go of the spindle lock 1 8 Remove the clamping screw 20 as well as the clamping flange 19 9 Remove any material residues...

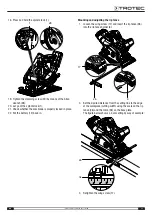
Page 16: ...ponds to that of the arrow on the device 33 22 27 15 Carefully swing the lower guard 18 back into its initial position with the retracting lever 22 16 Refit the clamping flange 19 on the saw blade cla...

Page 17: ...ocked in place 22 Put the battery 12 back in Mounting and adjusting the rip fence 1 Loosen the wing screw 17 and insert the rip fence 26 into the rip fence holder 6 17 26 6 2 Set the desired distance...

Page 18: ...erheating Only use intact flawless saw blades Saw blades can be damaged by shocks or impacts Bent blunt or otherwise damaged saw blades could break The sawing performance and cutting quality essential...

Page 19: ...arantees a clean cut and prevents the saw blade from getting jammed Only hold the power tool against the workpiece when the tool is switched on and running Start sawing carefully and with little forwa...

Page 20: ...he base plate on the workpiece 5 Align the device with the rip fence or the cutting line 6 Press the start lock 25 to be able to actuate the on off switch 24 I II 25 24 7 Press the on off switch 24 an...

Page 21: ...pecified in the instructions Using insertion tools or accessories other than those specified in the instructions may cause a risk of injury Designation Article number Multiflex 20V 2 0 Ah spare batter...

Page 22: ...ting The device still does not operate correctly after these checks Please contact the customer service If necessary bring the device to an authorised specialist electrical company or to Trotec for re...

Page 23: ...use recycling and other forms of recovery of waste equipment as well as to prevent negative effects for the environment and human health caused by the disposal of hazardous substances potentially cont...

Page 24: ...Trotec GmbH Grebbener Str 7 D 52525 Heinsberg 49 2452 962 400 49 2452 962 200 info trotec com www trotec com...

Reviews: