background image

EN

13

dehumidifier TTK 33 E

Maintenance

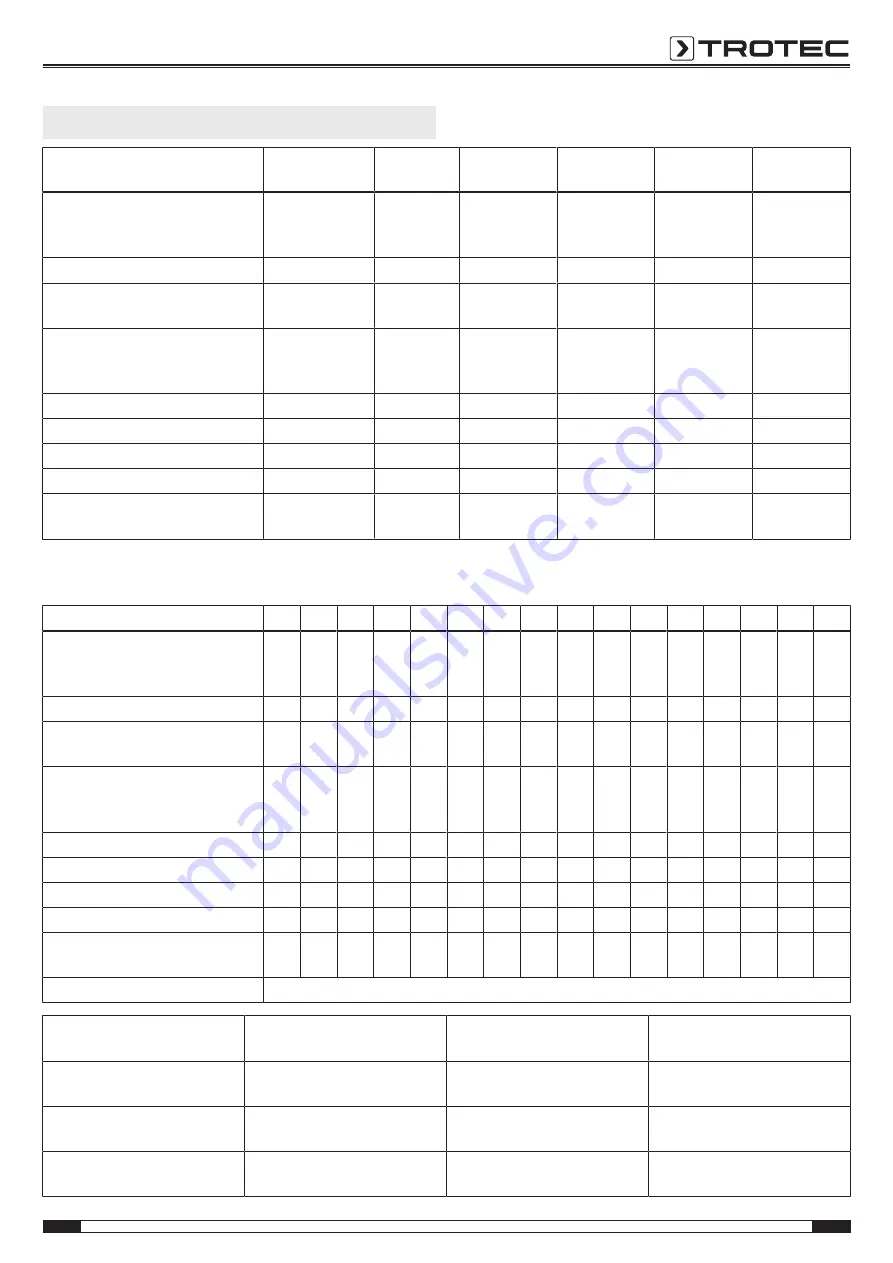
Maintenance intervals

Maintenance and care interval

before every
start-up

as needed

at least every
2 weeks

at least every
4 weeks

at least every
6 months

at least
annually

Check air inlets and outlets for dirt
and foreign objects and clean
if necessary

X

X

Clean the exterior

X

X

Visually check the inside of the
device for dirt

X

X

Check the air filter for dirt and
foreign objects and clean or
replace if necessary

X

X

Replace the air filter

X

Check for damage

X

Check attachment screws

X

X

Test run

X

Empty the condensation tank and/
or drain hose

X

Maintenance and care log

Device type: .............................................

Device number: ....................................

Maintenance and care interval

1

2

3

4

5

6

7

8

9

10

11

12

13

14

15

16

Check air inlets and outlets for dirt
and foreign objects and clean
if necessary

Clean the exterior

Visually check the inside of the
device for dirt

Check the air filter for dirt and
foreign objects and clean or
replace if necessary

Replace the air filter

Check for damage

Check attachment screws

Test run

Empty the condensation tank and/
or drain hose

Comments

1. Date:  ...................................
Signature: ................................

2. Date:  ....................................
Signature: .................................

3. Date:  ....................................
Signature: .................................

4. Date:  ....................................
Signature: .................................

5. Date:  ...................................
Signature: ................................

6. Date:  ....................................
Signature: .................................

7. Date:  ....................................
Signature: .................................

8. Date:  ....................................
Signature: .................................

9. Date:  ...................................
Signature: ................................

10. Date:  ..................................
Signature: .................................

11. Date:  ..................................
Signature: .................................

12. Date:  ..................................
Signature: .................................

13. Date:  .................................
Signature: ................................

14. Date:  ..................................
Signature: .................................

15. Date:  ..................................
Signature: .................................

16. Date:  ..................................
Signature: .................................

Summary of Contents for TTK 33 E

Page 1: ...TRT BA TTK33E TC2021 17 001 EN TTK 33 E EN OPERATING MANUAL DEHUMIDIFIER ...

Page 2: ...r using the device Always store the manual in the immediate vicinity of the device or its site of use Warning Read all safety warnings and all instructions Failure to follow the warnings and instructions may result in electric shock fire and or serious injury Save all warnings and instructions for future reference This appliance can be used by children aged from 8 years and above and persons with ...

Page 3: ...refrigerant is odourless Only install the device in compliance with the national installation regulations Observe the national gas regulations Only install operate and store the device TTK 33 E in a room measuring more than 4 m2 Store the device in a way that no mechanical damage can occur Please note that the connected pipelines must not contain any sources of ignition R290 is a refrigerant that ...

Page 4: ...fety signs and labels are attached to the device TTK 33 E Follow the manual This symbol indicates that the operating manual must be observed Follow the repair manual Disposal maintenance and repair work of the refrigerant circuit may only be carried out in accordance with the manufacturer s specifications and by persons having a certificate of qualification A corresponding repair manual is availab...

Page 5: ...me The dehumidified cooled air is slightly warmed at the condenser and blown out again The drier air thus conditioned mixes with the air in the room The humidity in the room where the device is positioned is reduced as air constantly circulates through the device Depending on the air temperature and the relative humidity the condensed water either drops continuously or only during the defrost phas...

Page 6: ...f components to be transported together can be gathered from the applicable transport regulations To make the device easier to transport it is fitted with a carry handle Before transporting the device observe the following Switch off the device Hold onto the mains plug while pulling the power cable out of the mains socket Drain the remaining condensate from the device and the condensation drain ho...

Page 7: ...e power cable is not damaged and that you do not damage it during unwinding Start up When positioning the device observe the minimum distance from walls or other objects as described in the chapter Technical annex A B C C D Before restarting the device check the condition of the power cable If there are doubts as to the sound condition contact the customer service Only position the device in rooms...

Page 8: ...ng switched on the device operates fully automatically The fan continues to run in dehumidification mode even after the selected setpoint has been reached 11 1213 15 16 18 19 20 21 22 23 24 25 14 17 Operating elements No Designation Meaning 11 Timer LED Illuminated when the timer is activated 12 Drying LED Illuminated when the self cleaning function is activated 13 Low LED Is illuminated at low fa...

Page 9: ...press the Mode button 20 to change the operating mode ð In continuous operation mode the Continuous LED 16 is illuminated ð In automatic operation mode the Auto LED 17 is illuminated Automatic operation The device dehumidifies the air continuously until the set relative humidity level is reached Please proceed as follows to adjust the desired humidity value 1 Repeatedly press the Humidity button 2...

Page 10: ...on again ð The device will switch to standby mode Setting the timer Note The device must not be left unattended in a freely accessible room with an activated timer The timer has two modes of operation Automatic switch on upon expiry of a preset number of hours Automatic switch off upon expiry of a preset number of hours The function can be set in addition in all operating modes The number of hours...

Page 11: ...he mains socket Drying laundry In addition the device may also be used as a kind of clothes dryer to dry wet laundry in living or working spaces When positioning the device or a clothes horse please observe the minimum distances specified in the technical data The following humidity values are suitable for drying laundry cupboard dry 46 relative humidity iron dry 58 relative humidity slightly drie...

Page 12: ... specialist company or by Trotec The device might carry out an automatic defrost During automatic defrost the device does not dehumidify The device is loud or vibrates Check whether the device is set up in a stable and upright position Condensate is leaking Check the device for leaks The compressor does not start Check the room temperature Observe the device s permissible operating range according...

Page 13: ... or drain hose X Maintenance and care log Device type Device number Maintenance and care interval 1 2 3 4 5 6 7 8 9 10 11 12 13 14 15 16 Check air inlets and outlets for dirt and foreign objects and clean if necessary Clean the exterior Visually check the inside of the device for dirt Check the air filter for dirt and foreign objects and clean or replace if necessary Replace the air filter Check f...

Page 14: ...s on the device Check the safety signs and labels attached to the device at regular intervals Replace illegible safety signs Cleaning the housing Clean the housing with a soft damp and lint free cloth Ensure that no moisture enters the housing Protect electrical components from moisture Do not use any aggressive cleaning agents such as cleaning sprays solvents alcohol based or abrasive cleaners to...

Page 15: ... insert a wet filter into the device 4 Reinsert the air filter into the device Emptying the condensation tank If the condensation tank is full the Condensation tank full LED 15 will be illuminated The compressor and fan will switch off 1 Take the condensation tank out of the device 2 Empty the condensation tank over a drain or sink 3 Rinse the tank with clear water Clean the tank regularly using a...

Page 16: ... voided Reconnect the device to the mains If you do not intend to use the device for a considerable time Store the device according to the Transport and storage chapter Technical annex Technical data Parameter Value Model TTK 33 E Dehumidifying capacity max 14 l 24 h Dehumidification performance 30 C and 80 RH 12 l 24 h Air volume 80 m3 h Operating range temperature 5 C to 32 C Operating range rel...

Page 17: ...EN 17 dehumidifier TTK 33 E Circuit diagram ...

Page 18: ...18 EN dehumidifier TTK 33 E Overview of spare parts Info The position numbers of the spare parts differ from those describing the positions of the components mentioned in these instructions ...

Page 19: ...e at the end of its life You will find collection points for free return of waste electrical and electronic equipment in your vicinity The addresses can be obtained from your municipality or local administration You can also find out about other return options that apply for many EU countries on the website https hub trotec com id 45090 Otherwise please contact an official recycling centre for ele...

Page 20: ...Trotec GmbH Grebbener Str 7 D 52525 Heinsberg 49 2452 962 400 49 2452 962 200 info trotec com www trotec com ...

Reviews: