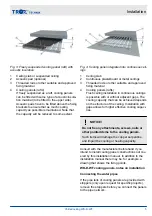
Fig. 3: Freely suspended cooling panel (raft) with
acoustic insulation
1
Ceiling slab or suspended ceiling
2
Acoustic pad (optional)
3
Threaded rods or other suitable and approved
fixing material
4
Cooling panels (rafts)
If freely suspended as a raft, cooling panels
can be fitted with some type of acoustic insula-
tion material (to be fitted to the upper side).
Acoustic pads have to be fitted above the fixing
brackets to ensure that as much cooling
capacity as possible is maintained. Note that
the capacity will be reduced to some extent.
Fig. 4: Cooling panel integrated into continuous ceil-
ings
1
Ceiling slab
2
Continuous plasterboard or metal ceilings
3
Threaded rods or other suitable and approved
fixing material
4
Cooling panels (rafts)
Flush ceiling installation in continuous ceilings
is possible with or without adjacent gaps. The
cooling capacity that can be achieved depends
on the structure of the ceiling. Installation with
gaps allows for higher effective cooling capaci-
ties.
NOTICE!
Do not fix any attachments, screws, nails or
other pointed items to the cooling panels.
Such items will damage the copper serpentine
and impair the cooling or heating capacity.
Consult with the manufacturer beforehand if you
intend to install cooling panel constructions not cov-
ered by this installation manual. In addition to the
installation manual there may be, for example, a
drawing that shows the fixing points.
WK-D-WF cooling panels, notes on installation
Connecting the water pipes
If the pipe tails of cooling panels are provided with
stoppers (only upon request for specific projects),
remove the stoppers before you connect the panels
to the pipe network.
Installation
Chilled ceiling WK-D-WF
5


