Appendix A–12
✓
With the source rod in the
SAFE
(shielded) position, place the
gauge on its side.
✓
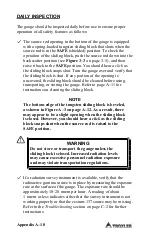
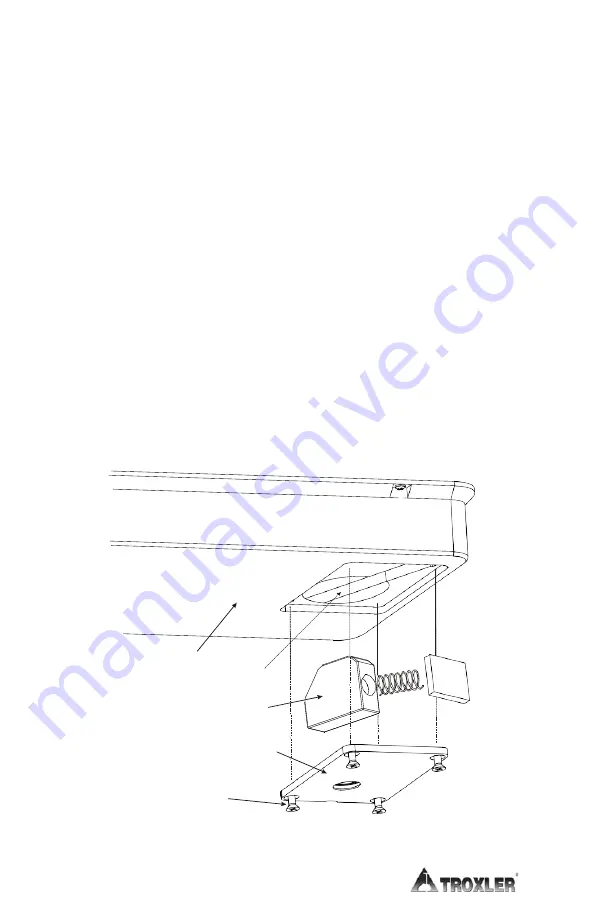
Clean the heads of the four corner screws that hold the bottom
plate to the gauge base (Figure A–3). Using a Phillips
screwdriver, remove the four screws in the corner of the plate
and remove the plate.
✓
To reduce radiological exposure, stand to one side of the gauge.
Paying close attention to the position of the sliding block,
remove the block.
✓
Using a stiff brush or rag soaked in alcohol, clean the sliding
block and the cavity.
✓
Re-install the sliding block with the angled side up. Apply a
light coating of Magnalube-G paste to the
top angled
surface of
the sliding block.
✓
Re-install the bottom plate.
Do not over-tighten screws!
Ensure that the source rod moves up and down freely.
Figure A–3. Cleaning the Tungsten Sliding Block
GAUGE BASE
CAVITY
SLIDING BLOCK
BOTTOM PLATE
FLAT HD
SCREWS (4)
Summary of Contents for 3430 Plus
Page 3: ...Model 3430 Plus 3440 Plus iii ...
Page 7: ...Model 3430 Plus 3440 Plus vii NOTES ...
Page 10: ......
Page 14: ...Model 3430 Plus 3440 Plus xii NOTES ...
Page 16: ...xiv NOTES ...
Page 30: ...2 6 NOTES ...
Page 64: ...4 NOTES ...
Page 98: ...7 NOTES ...
Page 122: ...9 NOTES ...
Page 142: ...Appendix A 20 NOTES ...
Page 178: ...Appendix D 2 STANDARD COUNT LOG Gauge Serial Number Date MS DS Date MS DS ...
Page 180: ...Appendix D 4 STANDARD COUNT LOG Gauge Serial Number Date MS DS Date MS DS ...
Page 190: ...Appendix F 8 NOTES ...
Page 194: ...Appendix G 4 NOTES ...
Page 200: ...Appendix H 6 NOTES ...
Page 215: ...Model 3430 Plus 3440 Plus Index 11 W Wide Area Augmentation System WAAS 2 Y YES key 3 4 INDEX ...
Page 216: ...Index 12 NOTES ...
Page 217: ...Model 3430 Plus 3440 Plus Warranty 1 NOTES WARRANTY ...


