Model 3430 Plus & 3440 Plus
Appendix A–9
SOURCE ROD INSPECTION
To ensure the integrity of the source rod, Troxler recommends
that a qualified Troxler service person inspect the gauge and the
source rod at least once every five years.
This inspection includes
checking for excessive wear, corrosion, or damage that could affect
the safety of gauge operation.
However, as a precaution, ensure that the tip of the source rod is
intact and undamaged (that is, ensure that the source is not missing).
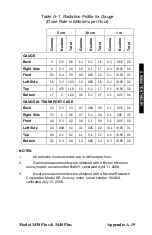
Use a radiation survey meter to check the radiation levels at the
gauge base surface (without extending the source rod). A maximum
reading of 10-20 mrem/hr is normal, and indicates the source is
present. However, if the maximum reading is less than 1 mrem/hr or
if a survey meter is not available, perform a visual inspection of the
source rod tip as follows to confirm its integrity:
1.
Extend the source rod just far enough to see the source rod tip.
The tip should appear flat to slightly rounded and smooth.
2.
Stay at least three feet away from the tip of the unshielded
source rod and complete the inspection as quickly as possible to
minimize exposure (the dose rate at three feet from the
unshielded source is about 2.7 mrem/hr).
If the visual inspection indicates that the source rod tip is broken off
(source is missing):
1.
Immediately contact your Radiation Safety Officer (RSO).
2.
Initiate a search for the source starting at the location where the
gauge was last used.
3.
Report lost or missing radioactive sources to the state or federal
radiation control agency in accordance with applicable
regulatory requirements.
Contact the Troxler Radiation Safety Department for further advice.
A. R
AD
IA
TIO
N T
HE
OR
Y
Summary of Contents for 3430 Plus
Page 3: ...Model 3430 Plus 3440 Plus iii ...
Page 7: ...Model 3430 Plus 3440 Plus vii NOTES ...
Page 10: ......
Page 14: ...Model 3430 Plus 3440 Plus xii NOTES ...
Page 16: ...xiv NOTES ...
Page 30: ...2 6 NOTES ...
Page 64: ...4 NOTES ...
Page 98: ...7 NOTES ...
Page 122: ...9 NOTES ...
Page 142: ...Appendix A 20 NOTES ...
Page 178: ...Appendix D 2 STANDARD COUNT LOG Gauge Serial Number Date MS DS Date MS DS ...
Page 180: ...Appendix D 4 STANDARD COUNT LOG Gauge Serial Number Date MS DS Date MS DS ...
Page 190: ...Appendix F 8 NOTES ...
Page 194: ...Appendix G 4 NOTES ...
Page 200: ...Appendix H 6 NOTES ...
Page 215: ...Model 3430 Plus 3440 Plus Index 11 W Wide Area Augmentation System WAAS 2 Y YES key 3 4 INDEX ...
Page 216: ...Index 12 NOTES ...
Page 217: ...Model 3430 Plus 3440 Plus Warranty 1 NOTES WARRANTY ...


