background image

Chipper / Shredder Servicing

6

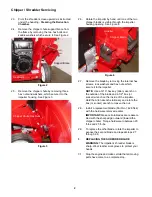
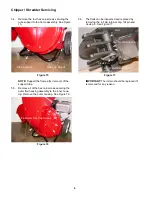
5.4.

Remove the four hex cap screws securing the 
tube support to the frame assembly. See Figure 
15.

NOTE: 

Support the frame after removal of the 

support tube.

5.5.

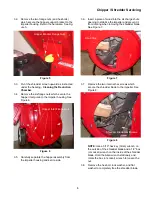
Remove all of the hex cap screws securing the 
outer flail housing assembly to the inner hous-
ing. Remove the outer housing. See Figure 16.

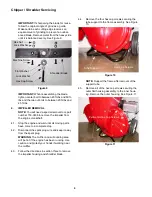
5.6.

The flails can be inspected and replaced by 
removing the roll pin retainer clip, roll pin and 
clevis pin. See Figure 17.

IMPORTANT: 

The roll pin should be replaced if it 

is removed for any reason.

Figure 15

Hex Cap Screws

Tube Support

Figure 16

Perimeter Hex Cap Screws

Figure 17

Flail

Roll Pin Retainer Clip

Roll Pin (Under Retainer)

Clevis Pin

Summary of Contents for Chipper/Shredder -CS4210

Page 1: ...is Service Manual is not a substitute for the Operator s Manual You must read understand and follow all of the directions in this manual as well as the Operator s Manual before working on this power e...

Page 2: ......

Page 3: ...Remove the hairpin clip from the clevis pin which extends through the housing and shred der screen Retain the clevis pin and hairpin clip See Figure 1 1 5 Pivot the shredder screen upward and clean t...

Page 4: ...key Allen wrench on the outside of the blade and a 1 2 box or socket wrench on the inside of the impeller Hold the Allen wrench stationary and rotate the box or socket wrench to loosen the nut 2 8 In...

Page 5: ...ket Flange Nuts Figure 6 Hopper Inlet Flange Nuts 3 6 Insert a piece of wood into the discharge chute opening to stabilize the impeller and prevent it from rotating when removing the shredder blade Se...

Page 6: ...oving parts have come to a complete stop 4 2 Disconnect the spark plug wire and keep it away from the spark plug WARNING The muffler and surrounding area will be hot if the engine has been running Use...

Page 7: ...serrated housing exten sions can be seen These help shear debris that gets behind the impeller See Figure 14 5 FLAIL REMOVAL AND REPLACEMENT 5 1 Stop the engine and wait until all moving parts have c...

Page 8: ...outer flail housing assembly to the inner hous ing Remove the outer housing See Figure 16 5 6 The flails can be inspected and replaced by removing the roll pin retainer clip roll pin and clevis pin Se...

Reviews: