2
ENGLISH
Congratulations on your purchase of a Tru-Test electric fence
energizer. This product uses the latest technology to give
superior performance and many years of service.
Please read the instructions carefully to ensure maximum
safety, performance and reliability of the Tru-Test electric
fence energizer.
Models covered by this manual
This manual covers various energizer models:
0.15 J model SG1/901B
0.3 J model
SG3/903B
Warning!
- Do not connect to mains-operated (line-operated)
equipment.
- Switch the energizer off before installation or
performing any work on the fence.
- Read all the safety considerations carefully.
- Check your installation to ensure that it complies with all
local safety regulations.
- Do not connect simultaneously to a fence and to any
other device such as a cattle trainer or a poultry trainer.
Otherwise, lightning striking your fence will be
conducted to all other devices.
Note:
- This product has been designed for use with electric
animal fences.
- Keep this manual in a handy location.
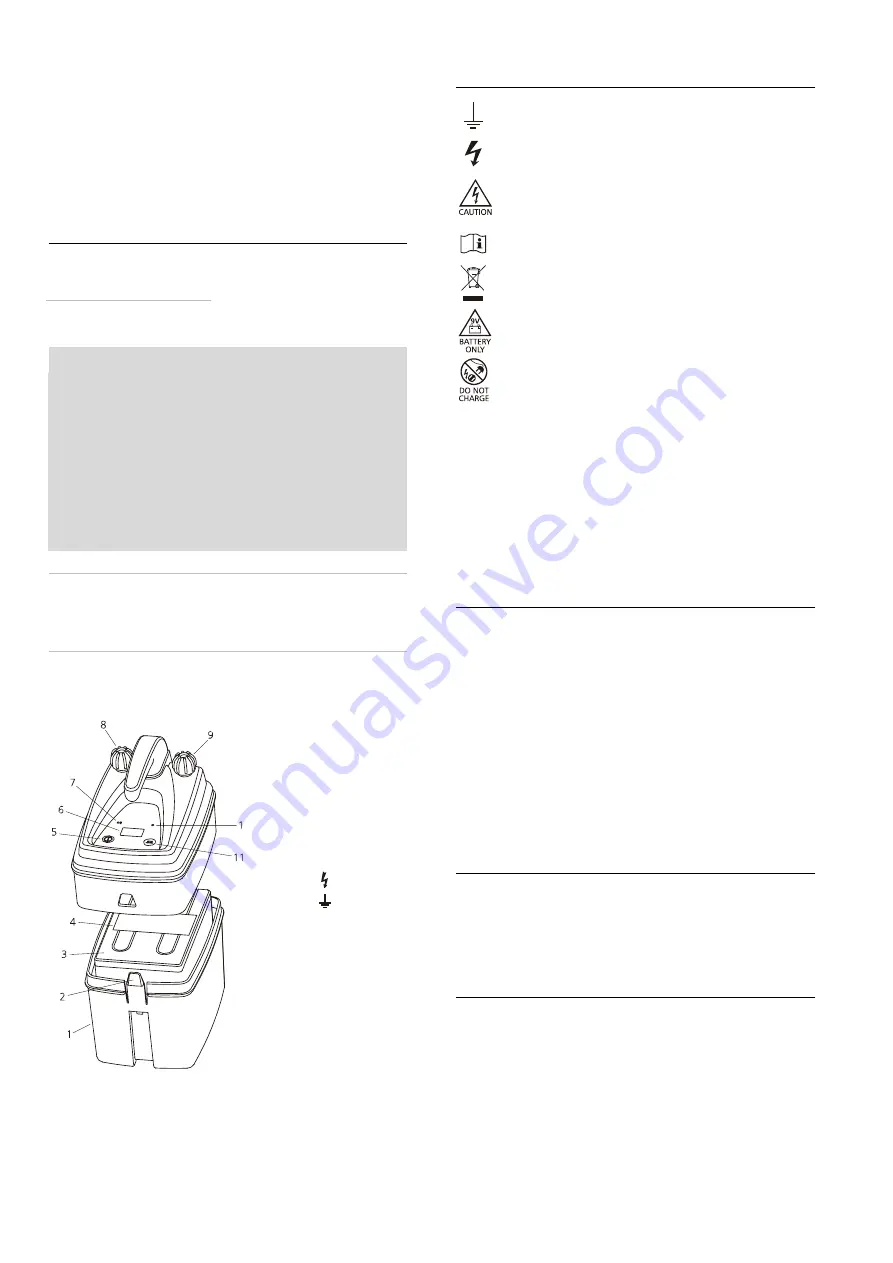
Parts of the energizer
1 Battery
compartment
2 Side
latch
3 Battery
4 Battery
label
5 On/Off
button
6 Display (0.3 J model
only)
7 Pulse indicator light
8 Fence
( ) terminal
9 Earth
( ) terminal
10 Battery
indicator
light
(0.15 J model only)
Light sensor
(0.3 J model only)
11 Pulse Speed button
Key to symbols on the energizer
Fence earth terminal. Connect the fence earth
terminal to the earth system.
Fence output terminal. Connect the fence output
terminal to the fence.
The energizer should be opened or repaired only by
qualified personnel in order to reduce the risk of
electric shock.
Read full instructions before use.
Product Information: Please recycle this product in
accordance with the regulations for your country.
This battery energizer is intended for connection to a
9 V battery.
This battery energizer must not be connected to a
battery while the battery is being charged by a
mains/line operated charger. Do not connect the
energizer or the battery wiring to any other mains
/line operated equipment.
Installation
To set up the energizer for use, install the battery and
connect the energizer to an electric fence and an earthing
system.
Installing the battery
1 Place the energizer on a flat surface. Open the lid of the
energizer by releasing the side latch. Remove any loose
accessories from the battery compartment.
2 Select a 55 Ah to 150 Ah, 9 V battery to use with your
energizer. Remove the battery label to activate the
battery (failure to do this will reduce the battery life).
3 Place the battery in the battery compartment.
4 Connect the positive (red) lead from the battery to the
positive (+) terminal inside the lid of theenergizer.
5 Connect the negative (black) lead from the battery to
the negative (–) terminal inside the lid of the energizer.
6 Close the lid of the energizer.
Connecting a 12 volt battery (optional)
A 12 volt battery connection cable can be purchased from
your local Tru-Test stockist. Instructions for connecting a 12
volt battery to an energizer are supplied with the connecting
cable.
Positioning
Position the energizer on firm ground away from flooding
and out of reach of animals and children. If possible, position
the energizer in a sheltered area to protect it from the
weather and improve visibility of the indicators.


