background image

13

TRUE

gdim

www

.

truemfg

.

com

MAINTENANCE, CARE, CLEANING

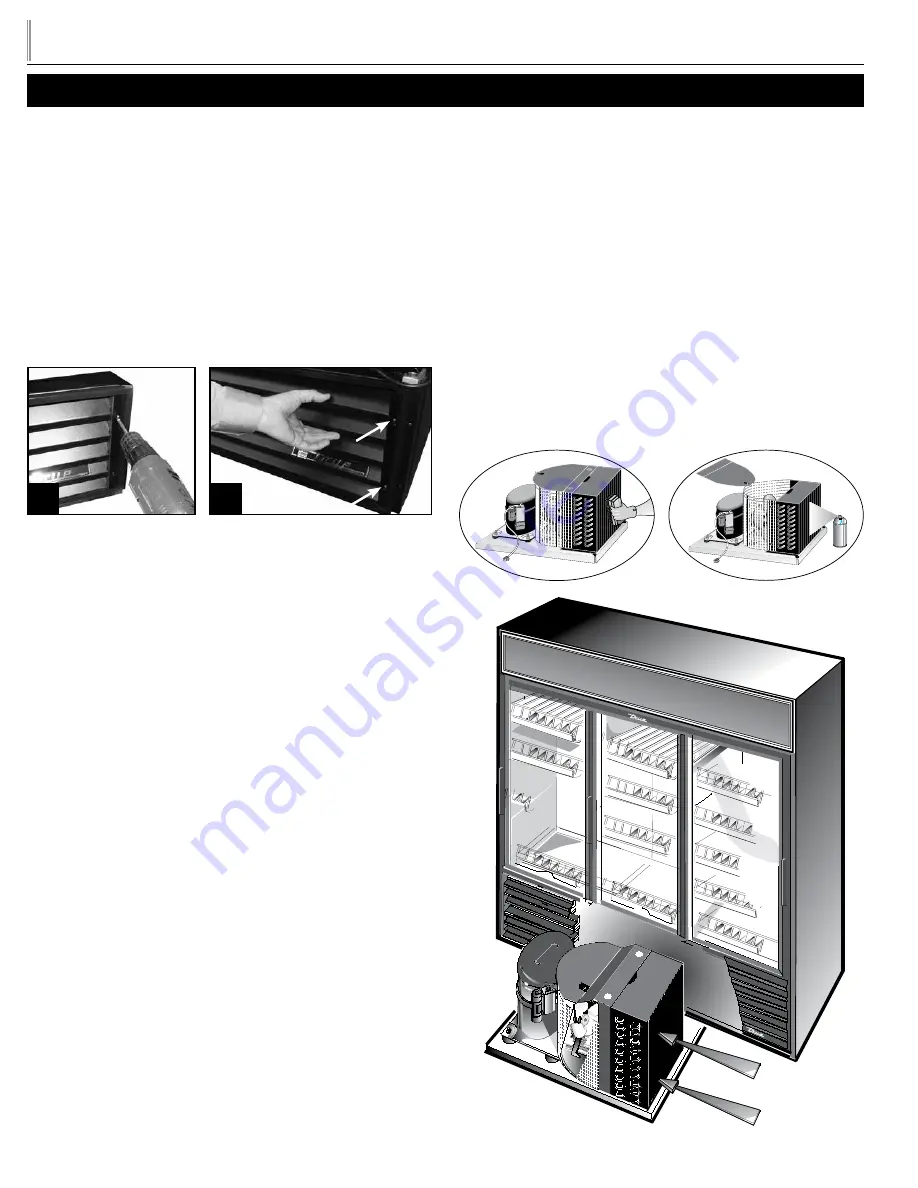
CLEANING THE CONDENSER COIL

When using electrical appliances, basic safety precautions should be 
followed, including the following:

TOOLS REQUIRED

STEP 1

 - Disconnect power to unit.

STEP 2

 - Take off lower grill assembly by removing four (4) screws. 

•  Phillips Screwdriver
•  Stiff Bristle Brush
•  Adjustable Wrench

•  Air Tank or CO2 Tank 
•  Vacuum Cleaner

STEP 3

 - Remove bolts anchoring compressor assembly to frame 

rails and carefully slide out. (tube connections are flexible)

STEP 4 

- Clean off accumulated dirt from condensing coil with a 

stiff bristle brush.

STEP 5

 - Lift cardboard cover above fan at plastic plugs and carefully 

clean condenser coil and fan blades.

STEP 6

 - After brushing condenser coil vacuum dirt from coil, and 

interior floor.

STEP 7

 - Replace cardboard cover. Carefully slide compressor 

assembly back into position and replace bolts.

STEP 8

 - Reinstall louver assembly onto unit with appropriate 

fasteners and clips. Tighten all screws.

STEP 9

 - Connect unit to power and check to see if condenser is 

running.

NEPCO/CENTRALAB

1227-5

REMOVE COVER MAKE PO

WE

CONNECT

IO

N

E. McCabe

1

2

Summary of Contents for GDIM

Page 1: ...ALLATION MANUAL INSTALLATION MANUAL gdim glass door ice merchandisers TABLE OF CONTENTS 975541 LM 6 15 SAFETY INFORMATION Safety Precautions 1 Proper Disposal Connecting Electricity Adapter Plugs 2 IN...

Page 2: ...tions must be followed CAUTION Risk of fire or explosion Dispose of properly in accordance with federal or local regulations Flammable refrigerant used CAUTION Risk of fire or explosion due to punctur...

Page 3: ...OUNDED The power cord from this appliance is equipped with a grounding plug which minimizes the possibility of electric shock hazard Have the wall outlet and circuit checked by a qualified electrician...

Page 4: ...ges 4 6 Do not throw the bracket or blocks away For future cabinet movement the bracket and blocks will need to be installed so the glass door does not receive any damage See image for bracket and shi...

Page 5: ...8 8 8 5 20 14 12 10 10 8 8 8 6 6 6 5 5 25 12 10 10 8 8 6 6 6 6 5 4 4 30 12 10 8 8 6 6 6 6 5 4 4 3 35 10 10 8 6 6 6 5 5 4 4 3 2 40 10 8 8 6 6 5 5 4 4 3 2 2 45 10 8 6 6 6 5 4 4 3 3 2 1 50 10 8 6 6 5 4...

Page 6: ...stall the desired number of shims making sure the slot of the shim is in contact with the threaded stem of the castor See image 2 C If more than one shim is used turn the slot at a 90 angle so they ar...

Page 7: ...f the cooler Level cabinet STEP 3 Draw an outline on the base on the floor STEP 4 Raise and block the front side of the cabinet STEP 5 Apply a bead of NSF Approved Sealant see list below to floor on h...

Page 8: ...Should it ever become necessary to replace temperature control be sure it is ordered from your TRUE dealer or recommended service agent D Good air flow in your TRUE unit is critical Be careful to loa...

Page 9: ...e evaporator coil is reached 3 The temperature control may cycle the compressor and evaporator fan s on and off together a The temperature control is sensing the air temperature b The temperature cont...

Page 10: ...making adjustment measure temperature during three cycles before adjusting again NOTE Only adjust the screw small flathead on the face of the control next to the cam See Figure 3 Follow the Altitude...

Page 11: ...which wire is on which spade terminal STEP 4 Pull out gently from cabinet NOTE Mechanical temperature controllers are affected when functioning at high altitude The cut in and cut out temperatures wil...

Page 12: ...truemfg com O 9 8 7 6 5 4 3 2 1 2 O 9 8 7 5 4 3 2 1 CUT OUT CUT IN COLDER BUL NO CHART CCW Adjustment based on 360 complete turn Height 2000 42 3000 78 4000 114 5000 150 6000 186 7000 222 8000 258 900...

Page 13: ...RATION FOR UNITS WITH MECHANICAL CONTROL RECOMMENDED DEFROST SETTINGS TRUE Manufacturing has factory set your defrost time clock to a recommended time and duration defrost scenario All refrigeration e...

Page 14: ...carefully slide out tube connections are flexible STEP 4 Clean off accumulated dirt from condensing coil with a stiff bristle brush STEP 5 Lift cardboard cover above fan at plastic plugs and carefully...

Page 15: ...pose the Condenser The Condenser looks like a group of vertical fins You need to be able to see through the condenser for the unit to function at maximum capacity Do not place filter material in front...

Page 16: ...STAINLESS STEEL 1 USING THE CORRECT CLEANING TOOLS Use non abrasive tools when cleaning your stainless steel products The stainless steel s passive layer will not be harmed by soft cloths and plastic...

Page 17: ...ulb 2 GENERAL MAINTENANCE LIGHT BULB REPLACEMENT IDL INTEGRATED DOOR LIGHTING WARNING When replacing a light bulb make sure power to the unit is either turned off or unplugged IDL INTEGRATED DOOR LIGH...

Page 18: ...vacuums must be achieved to insure low moisture levels in the system 500 microns or lower must be obtained All claims for labor or parts must be made directly throughTRUE All claims should include mo...

Reviews: