background image

Truefitness.com / 800.426.6570 / 636.272.7100

33 of 34

CHAPTER 7: ADDITIONAL INFORMATION

Save Time and Register Online!

Activate Multiple Warranties at truefitness.com

1.  

THIS LIMITED WARRANTY GIVES YOU SPECIFIC 

LEGAL RIGHTS AND YOU MANY ALSO HAVE OTHER RIGHTS, 

WHICH VARY FROM STATE TO STATE.

2.  

This Limited Warranty can be processed only if the 

Warranty Registration Form is completed on-line; or if the 

attached form is filled in, signed by the original purchaser and 

mailed to TRUE within 30 days of purchaser’s receipt of this 

Product. The serial number must be intact on the Product for 

this Limited Warranty to be valid.

3.  

This Limited Warranty applies to the product only 

while the Product remains in the possession of the original 

purchaser and is not transferable.

4.  

This Limited Warranty becomes VALID ONLY if the 

Product is initially assembled/installed by a TRUE authorized 

dealer/ technician (if anyone other than a TRUE authorized 

dealer/ technician initially assembles and installs the 

Product, this Limited Warranty will be void unless the written 

authorization of TRUE is first obtained).

5.  

This Limited Warranty does not cover damage or 

equipment failure resulting from or caused by improper 

assembly/ installation, failure to follow instructions and 

warnings in owner’s manual, accident, misuse, abuse, 

unauthorized modification, or failure to provide reasonable and 

necessary maintenance (as referenced in the owner’s manual.)

6.  

This Limited Warranty applies only to the cost of repair 

or replacement of parts and does not include labor (beyond  

the above warranty period), transportation, service, return 

and freight charges associated therewith except as expressly 

specified herein.

7.  

This Limited Warranty shall not apply to: Service 

calls to correct installation of the equipment or instruction 

to owners on how to use the equipment; or any labor costs 

incurred beyond the applicable labor warranty period.

8.  

This Limited Warranty, which is given expressly and 

in lieu of all other express warranties, constitutes the only 

warranty made by TRUE.

9.  

ANY IMPLIED WARRANTY, INCLUDING WITHOUT 

LIMITATION THE WARRANTIES OF MERCHANTABILITY 

AND FITNESS FOR A PARTICULAR PURPOSE, IS LIMITED IN 

DURATION AND REMEDY TO THE TIME PERIOD COVERED BY 

THE LIMITED WARRANTY.  SOME STATES DO NOT ALLOW 

LIMITATIONS ON HOW LONG AN IMPLIED WARRANTY 

LASTS, SO THE ABOVE LIMITATION MAY NOT APPLY TO YOU.

10.  

THE REMEDIES DESCRIBED ABOVE ARE YOUR SOLE 

AND EXCLUSIVE REMEDIES AND TRUE’S ENTIRE LIABILITY 

FOR ANY BREACH OF THIS LIMITED WARRANTY.  TRUE’S 

LIABILITY SHALL UNDER NO CIRCUMSTANCES EXCEED 

THE ACTUAL AMOUNT PAID BY YOU FOR THE PRODUCT, 

NOR SHALL TRUE UNDER ANY CIRCUMSTANCES BE LIABLE 

FOR ANY CONSEQUENTIAL, INCIDENTAL, SPECIAL OR 

PUNITIVE DAMAGES OR LOSSES, WHETHER DIRECT OR 

INDIRECT.  SOME STATES DO NOT ALLOW THE EXCLUSION 

OR LIMITATION OF INCIDENTAL OR CONSEQUENTIAL 

DAMAGES, SO THE ABOVE LIMITATION OR EXCLUSION MAY 

NOT APPLY TO YOU.

NOTE TO AUTHORIZED WARRANTY LABOR PROVIDERS: 

Warranty labor reimbursement or warranty parts rights may not 

be transferred to, reassigned to, a third party without the express 

written consent of TRUE.  Even jobbing out warranty labor 

requires TRUE’s written approval.

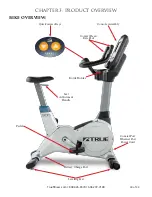
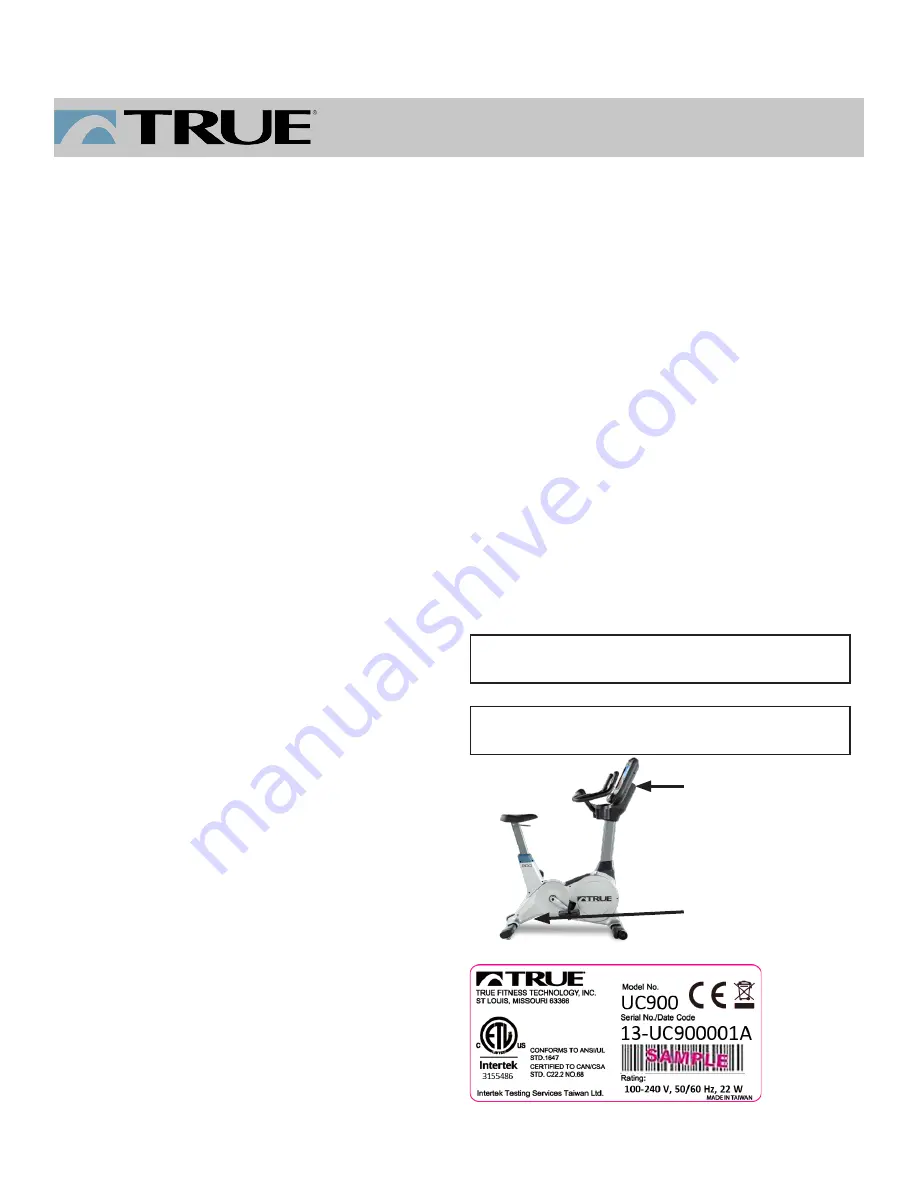
UC900 UPRIGHT BIKE SERIAL NUMBERS: 

The UC900 upright bike comes with two serial numbers; one on 

the base and one on the display console (see diagram below). 

The serial number on the base is on the crossbar under the 

running surface. The console serial number is located on the 

bottom right side of each console. Please write down your serial 

numbers below and keep for your records.

CONSOLE SERIAL NUMBER:

BASE SERIAL NUMBER:

    CONSOLE 

SERIAL 

NUMBER:

    BASE 

SERIAL 

NUMBER:

SAMPLE SERIAL NUMBER STICKER:

Keep this page for your records

COMMERCIAL LIMITED WARRANTY

UC900 UPRIGHT BIKE

Summary of Contents for UC900

Page 1: ...Assembly Guide Warranty Card Included UC900 UPRIGHT BIKE OWNER S MANUAL Transcend Console Model UC900 Revision 020917 Escalate15 Console Escalate9 Console Emerge Console...

Page 2: ...Pour la plus jour le manuel du propri taire s il vous pla t visitez www truefitness com Pour documents dans des langues suppl mentaires veuillez www truefitness com resources document library de visi...

Page 3: ...l alike The proud manufacturing tradition of quality and the culture of innovation at TRUE have given rise to a full line of extraordinary cardio and strength equipment As a result people all over the...

Page 4: ...54 Advanced Console Functions 55 Chapter 4B Escalate15 Operation Escalate15 Overview 73 Console Navigation 75 TV Controls 79 Bluetooth Audio 80 Advanced Console Functions 82 Chapter 4C Escalate9 Oper...

Page 5: ...ck always unplug this TRUE product before cleaning or attempting any maintenance activity Do not handle the plug with wet hands WARNING To reduce the risk of burns fire electric shock or injury it is...

Page 6: ...self generated equipment contain materials that are considered hazardous to the environment Federal law requires proper disposal of these batteries Position this product so the power cord plug is acce...

Page 7: ...een moving parts by making sure that they are out of reach of the bike while it is in motion Allow only one person at a time on the bike while it s operating It is the sole responsibility of the owner...

Page 8: ...vided with the product If it will not fit the outlet have a proper outlet installed by a qualified electrician Do not remove the motor cover or you may risk injury due to electric shock 120 Volt This...

Page 9: ...Truefitness com 800 426 6570 636 272 7100 9 of 34 CHAPTER 1 SAFETY INSTRUCTIONS...

Page 10: ...www truefitness com The Transcend Touchscreen and Escalate9 console have passed ITS testing and are EN957 compliant PROPER TRAINING POSITION Once seated users should place their feet on the pedals A W...

Page 11: ...t use until corrected replaced or tightened prior to use Do not wear loose or dangling clothing while using the unit Care should be used when mounting or dismounting the unit Read understand and test...

Page 12: ...Truefitness com 800 426 6570 636 272 7100 12 of 34 PRE ASSEMBLY CHECKLIST Provided Hardware STEP 1 2 FRONT REAR STABILIZER BARS STEP 5 FRONT MAST STEP 6 MAST BOOT STEP 11 STORAGE TRAY STEP 8 HANDLEBA...

Page 13: ...mbling bike It is recommended that at least two people unpack and assemble bike Remove all bike components from packaging For each step use hardware in the corresponding bag Sub Assembly Identificatio...

Page 14: ...Front Stabilizer Bar a Rotate the frame backwards on the Rear Stabilizer At least one person should hold the frame while another person completes the remaining Front Stabilizer installation steps b F...

Page 15: ...t washers and nuts from the 3 threaded rods on the bottom of the Seat Saddle b Insert Seat Saddle onto the Seat Post Mounting Plate Note The threaded rods on the bottom of the Seat Saddle will align w...

Page 16: ...570 636 272 7100 16 of 34 ASSEMBLY STEPS Step 4 Preparation IMPORTANT Prior to routing the front mast cables it is very important that the following cable connection is confirmed If this connection is...

Page 17: ...tion d Secure the Front Mast to the bike frame by tightening all 6 screws with the provided hex wrench e Verify that the Front Mast is secured tightly to the bike frame tighten screws if necessary Har...

Page 18: ...Handlebar Cable Routing a While at least one person holds the handlebar another person should direct the handlebar cables through the front mast Step 8 Handlebar a Insert the handlebar u bracket onto...

Page 19: ...p 10 Cable Connections a Locate the Ground Screw pre installed into the Front Mast Mounting Plate b Remove the Ground Screw with a Phillips head screwdriver not provided c Insert the shaft of the Grou...

Page 20: ...n using a phillips head screwdriver not provided a Attach the front cover P13 to the front mast tube using a single X06 screw make sure the front cover P13 aligns with the storage tray plastic around...

Page 21: ...s should be clearly labeled on the Pedal Strap b Secure each pedal to the appropriate crank using the provided wrench NOTE The left pedal is reverse threaded turn counter clockwise to tighten Step 14...

Page 22: ...CHAPTER 2 ASSEMBLY GUIDE Truefitness com 800 426 6570 636 272 7100 22 of 34 ASSEMBLY STEPS Step 16 Final Unit Connections...

Page 23: ...Power Supply Installation Step A cable routing Auxiliary Power Supply Installation Step B remove access plastic IMPORTANT Prior to routing the front mast cables it is very important that the following...

Page 24: ...nstallation Step D ouput plug connection a Remove the wire tie shown in the provided This will release the Power Supply Input Plug Use caution not to drop the loose wire tie into the machine after it...

Page 25: ...F secure access plastic a Secure the power supply to the square frame tube using 2 wire ties positions shown Wire ties should also secure the extra power supply cables b Verify that there is no inter...

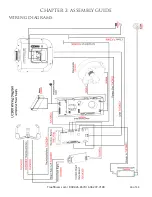
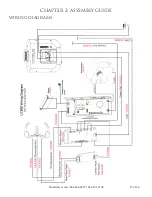
Page 26: ...CHAPTER 2 ASSEMBLY GUIDE Truefitness com 800 426 6570 636 272 7100 26 of 34 WIRING DIAGRAMS...

Page 27: ...CHAPTER 2 ASSEMBLY GUIDE Truefitness com 800 426 6570 636 272 7100 27 of 34 WIRING DIAGRAMS...

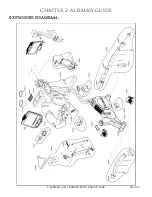
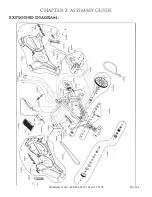
Page 28: ...CHAPTER 2 ASSEMBLY GUIDE Truefitness com 800 426 6570 636 272 7100 28 of 34 EXPLODED DIAGRAM...

Page 29: ...CHAPTER 2 ASSEMBLY GUIDE Truefitness com 800 426 6570 636 272 7100 29 of 34 EXPLODED DIAGRAM...

Page 30: ...272 7100 30 of 34 CHAPTER 3 PRODUCT OVERVIEW BIKE OVERVIEW Console Assembly Quick Access Keys Contact Heart Rate Pads Bottle Holder Seat Adjustment Handle Coaxial Port Ethernet Port Power Cord Pedals...

Page 31: ...ithout wearing a wireless chest strap Seat Adjustment Handle Used to adjust the vertical position of the seat to a comfortable position for the user Bottle Holder Holds an average size drink bottle fo...

Page 32: ...aused by improper assembly installation failure to follow instructions and warnings in owner s manual accident misuse abuse unauthorized modification or failure to provide reasonable and necessary mai...

Page 33: ...equipment or instruction to owners on how to use the equipment or any labor costs incurred beyond the applicable labor warranty period 8 This Limited Warranty which is given expressly and in lieu of...

Page 34: ...___ b Website ____ c Advertisement ____ d Referral ____ e Current Customer ____ f Other_______________ 2 Why did you purchase a TRUE product ___ a Design Appearance ___ b Dealer Suggestion ___ c Price...

Reviews: