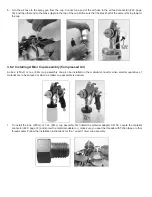
background image


7.


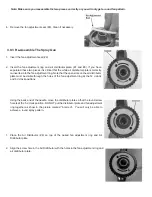
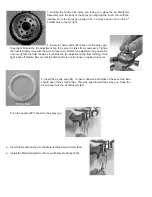
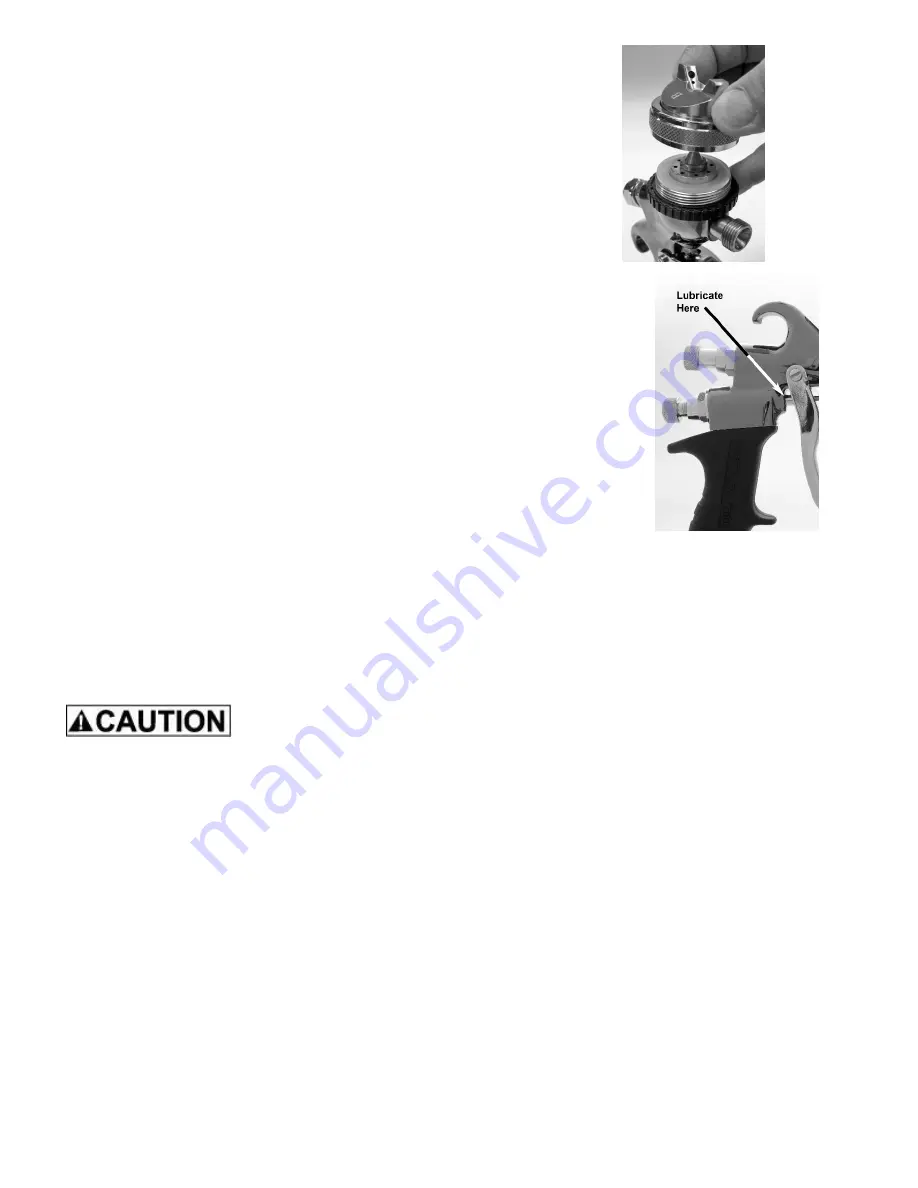
Install air cap and air cap ring. Spray gun is now re-assembled and ready to use.


                 Periodically, use Apollo lubricant to lubricate the air valve bushing as shown.
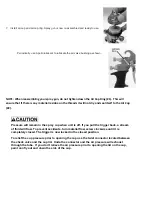


NOTE:


When


reassembling


your


spray


gun,


do


not


tighten


down


the


Air


Cap


Ring


(#1).


This


will


ensure


that


if


there


is


any


material


residue


on


the


threads


it


will


not


dry


and


seal


itself


to


the


Air


Cap


(#2).


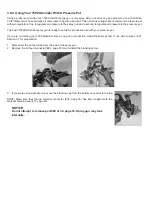
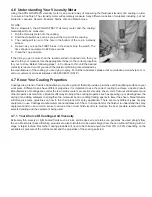
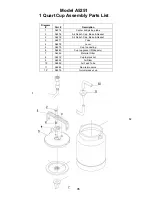
Pressure will remain in the spray cup when unit is off. If you pull the trigger back, a stream 

of fluid will flow. To prevent accidents, turn material flow screw clockwise until it is 
completely closed. The trigger is now locked in the closed position.  

 
To relief the cup pressure prior to opening the cup use the twist connector located between 

the check valve and the cup lid.  Undo the connector and the air pressure will exhaust 
through the tube.  If you don’t relieve the air pressure prior to opening the lid on the cup, 
paint can fly out and down the side of the cup.


Summary of Contents for Apollo 7500 AtomiZer

Page 1: ...A Apollo Sprayers HVLP Instruction Manual 7500 Series tom Apollo Sprayers lnt l Inc 1040 Joshua Way Vista CA 92081 760 727 8300 www hvlp com...

Page 2: ...ir 13 3 7 Preparation Of 7500 AtomiZer For Production Spraying 19 3 8 Installing Cup Air Regulator And Gauge Compressor Only 20 3 9 Using Your 7500 AtomiZer With An Optional Handle Air Regulator 20 4...

Page 3: ...causing severe nausea fainting or poisoning Make sure the room is well ventilated Avoid all ignition sources such as static electricity sparks open flames hot objects sparks from connecting and discon...

Page 4: ...Systems The 7500 AtomiZer is a standard turbine spray gun non bleed type When the turbine is turned on NO air will flow through the spray gun When the trigger is partially pulled air will flow through...

Page 5: ...Zer As A Bleeder Type Spray Gun With the appropriate optional adapter the 7500 AtomiZer can be operated as a bleeder type spray gun Note there is a blanking cap 12B page 33 above the material adjustin...

Page 6: ...E turbine system that does not have an air relief mechanism installed If using with a system other than Apollo please check with the manufacturer to determine if a non bleed spray gun can be safely op...

Page 7: ...erclockwise until you feel you have the most efficient results To create a textured or splattered paint effect turn the air control screw all the way closed clockwise Do not thin your paint or if you...

Page 8: ...ations A top mounted gravity cup can also be used Apollo offers a 250cc 600cc and 1000cc top mounted cup 250cc Cup 600cc Cup 1000cc Cup The 7500 AtomiZer can also be used as a production spray gun in...

Page 9: ...or not being used and make sure that it is installed on the top material connection 30 page 33 2 Screw the cups center bolt to the material connector 29 page 33 finger tight 3 Locate the brass air fee...

Page 10: ...e cup Connect one end of the air hose to the air feed connector 22 page 33 and the other end to the brass nipple in the top of the cup lid Be sure that the black half of the valve is facing toward the...

Page 11: ...lanks the unused material connection and make sure that it is installed onto the bottom material connection 29 page 33 2 Screw the top feed cup to the top material connection 30 page 33 and tighten wi...

Page 12: ...compressed air in order to pressurize the remote pot and move the fluid from the pot to the spray gun tip nozzle In general 5PSI 0 345 Bar of air pressure is adequate to push most average viscosity fl...

Page 13: ...acing it with the compressed air handle coupler 37 page 33 or screwing a standard male compressed air fitting directly into the turbine handle coupler 3 6 1 Installing A Cup Assembly Compressed Air To...

Page 14: ...the brass nipple is in the 7 o clock position 4 While holding the cup assembly firmly tighten the cups center bolt with the wrench spanner supplied 5 Remove the stainless steel screw located in the s...

Page 15: ...ir An 8oz 250cc or 3oz 88cc cup assembly can also be installed on the material connector when smaller quantities of material are to be sprayed or when a smaller cup assembly is desired 1 To install th...

Page 16: ...cup to the top material connection 30 page 33 You are now ready to spray 3 Sometimes when spraying heavy materials cup pressure is required Attach the cup air pressure regulator to the bottom of the...

Page 17: ...gun is ready to set up for production use with your pressure pot If you are converting your 7500 AtomiZer from a cup gun to production follow these steps first If not skip to step one of Section 3 7 f...

Page 18: ...u get runs and sags but you also don t want it to come out too slowly so that you are spraying very slowly To test the air pressure in the pressure pot follow these simple instructions 1 DO NOT turn o...

Page 19: ...Thread the regulator onto the handle coupler so that the gauge is located to the right of the spray gun 3 Once your gravity cup of choice is installed connect the air feed tube from the brass nipple o...

Page 20: ...oss from side to side Fig 2 Use this position when spraying from top to bottom Fig 3 Use this position for spotting small objects corners and sharp angles Install the appropriate fluid nozzle needle a...

Page 21: ...acteristics of the coating you will be spraying Build up layers of material 3 4 applications or more if necessary Sand between coats and allow proper drying time between applications It is important t...

Page 22: ...414 Bar 0 83 Bar for thin low viscosity fluids 13PSI 23PSI 0 9 Bar 1 59 Bar for medium to high viscosity fluids Without Air Regulator Without Air Regulator With Air Regulator With Air Regulator 7500C...

Page 23: ...Varnish Primers Automotive Marine Airplane finishes Varnish High Viscosity Industrial Coatings Urethanes Enamels 18 24 seconds B 1 8MM 0 07 Same as 1 5mm above except slightly higher viscosity 20 22 s...

Page 24: ...re a blend of resins and additives to create a product that will provide a protective and beautifying surface to your work piece Different resins have different properties It is important to use the c...

Page 25: ...pollo 7500 AtomiZer spray gun 1 Empty any unused material paint from the cup and wash out any residue with an appropriate cleaner compatible with the coating or water if using water based material Par...

Page 26: ...the small groove on the air cap seal You can rotate the groove to a comfortable position for removal 3 o clock or 9 o clock 2 Place the flat tip of the wrench spanner in the air cap seal groove Push i...

Page 27: ...the open slots on the air distributor plate must be visible through the holes of the fan adjustment ring at the 12 o clock and 6 o clock positions Using the back end of the needle move the distributo...

Page 28: ...ore with the wrench spanner Rotate fan adjustment ring again Do not over tighten the fluid nozzle as it will stop the fan adjustment ring from rotating If too tight back off slightly Be sure that the...

Page 29: ...ssure will remain in the spray cup when unit is off If you pull the trigger back a stream of fluid will flow To prevent accidents turn material flow screw clockwise until it is completely closed The t...

Page 30: ...otal Hours Turbine Recommended Maintenance Clean and or change pre filters and or cartridge filters every 50 hours or when necessary See Accessories Page for appropriate filter replacement for your mo...

Page 31: ...el after drying orange peel effect Try A Increasing air pressure Compressor or Turbine Models 835VR 1050VR 1100 1200 B Thin the coating more Turbine or compressor 4 If the finish looks like dry mist o...

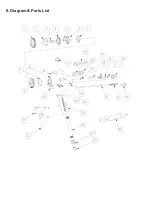
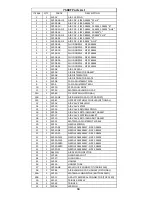
Page 32: ...8 Diagram Parts List...

Page 33: ...AP 12A 1 A7546 OS CONTROL OPTIONAL 12B 1 A7513 HX AIR BLANKING CAP UPPER PORT 12C 1 A7543 UPPER PORT HOSE COUPLER OPTIONAL 13 1 A7514 AIR VALVE BUSHING 14 1 A7515 AIR VALVE STEM 15 1 A7516 AIR VALVE R...

Page 34: ...e 2 A5276 Air Relief Cap Base Gasket 2 A5276 Air Relief Cap Base Gasket 3 A5271 Yoke 4 A5278 Lever 5 A5270 Cup top casting 6 A5280 Cup top gasket White poly 7 A4254 Material Filter 8 A5272 Cup top loc...

Page 35: ...limited to the duration of the express Warranty No representative or person is authorized to extend this Warranty or to create for APOLLO SPRAYERS INTERNATIONAL INC any other liability in connection...

Reviews: