background image

4

INSTRUCTIONS FOR USE

1. Place the brush head on the handle. 

2. Moisten the head and apply toothpaste.

3. Place the head with the bristles on the teeth towards the gums.

4. Switch the toothbrush on with the power button.

5.  To select a mode, press the mode change button within 5 seconds of switching 

on the toothbrush, otherwise the toothbrush will switch off. Choose one of the 

three modes:


CLEAN

 – Basic mode for perfectly clean teeth


WHITEN

 – Cleaning and polishing to whiten your teeth


MASSAGE

 – Vibrations for gentle stimulation of the gums

6.  You can choose between 5 intensity levels for each mode. Switch between them 

using the intensity button.

7.  Move the bristles back and forth across the teeth, moving slowly between each 

tooth. At the same time, gently push the brush towards the teeth.

8.  For maximum efficiency, divide brushing into 4 sections. Spend 30 seconds on 

each section. After each 30-second cycle, the brush will pause and alert you to 

move on to the next section. After 2 minutes, the brush will turn itself off.

9.  Rinse the brush head and handle under running water and then wipe them with 

a cloth or towel. 

10.  Put the handle back in the base or in the travel case. Place the head in the UV 

sterilizer.

UV Sterilizer

1. Use the button to open the UV sterilizer lid.

2.  Place the toothbrush head in the UV sterilizer. The bristles should point towards 

the UV lamp.

3.  Close the lid. Sterilization will start automatically. Do not open the lid during ste-

rilization.

4.  Once the UV light goes out, open the lid and remove the head.

Please note: 

The bristles of the toothbrush head can be slightly damp when inserted. 

However, water must not be dripping from the toothbrush at any time.

CHARGING 

The sonic toothbrush is equipped with a contactless charging system. Therefore, no 

direct connection to the power cord is required. This makes charging more conve-

nient and safer. For a full charge, the toothbrush must be left to charge for appro-

ximately 24 hours.
1. When the charging indicator turns red, the toothbrush needs to be charged.

2. Connect the charging base to the adapter and then to a power source.

3.  Insert the switched-off toothbrush into the charging base. The charging indicator 

lights red throughout the charging process. Once the toothbrush is charged, the 

charging indicator lights green. 

Summary of Contents for SonicBrush K150 UV

Page 1: ...SonicBrush K150 UV EN USER MANUAL DE BENUTZERHANDBUCH CZ UŽIVATELSKÝ MANUÁL SK POUŽÍVATEĽSKÝ MANUÁL PL INSTRUKCJA UŻYTKOWNIKA HU HASZNÁLATI ÚTMUTATÓ SLO UPORABNIŠKI PRIROČNIK HR UPUTE ZA UPOTREBU ...

Page 2: ......

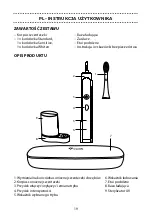
Page 3: ...ging base Adapter Travel case Manual and safety instructions PRODUCT DESCRIPTION 7 1 2 9 8 6 5 3 4 1 Replaceable sonic toothbrush head 2 Sonic toothbrush handle 3 Power and mode select button 4 Intensity button 5 Mode indicator 6 Charging indicator 7 Travel case 8 Charging base 9 UV sterilizer ...

Page 4: ... handle under running water and then wipe them with a cloth or towel 10 Put the handle back in the base or in the travel case Place the head in the UV sterilizer UV Sterilizer 1 Use the button to open the UV sterilizer lid 2 Place the toothbrush head in the UV sterilizer The bristles should point towards the UV lamp 3 Close the lid Sterilization will start automatically Do not open the lid during ...

Page 5: ...all surfaces with a soft cloth and return the brush Do not immerse the handle of the brush in water 3 Rinse the head and its bristles after each use 4 Do not wash the brush or its parts in the dishwasher Travel case Wipe the surface and interior of the travel case with a damp cloth Recommendation For reasons of hygiene we recommend changing the brush heads regularly after 3 4 months SPECIFICATIONS...

Page 6: ...ing from the use of this product elem6 s r o shall in no event be liable for inci dental or consequential damages in connection with or arising from the use of this product or any of its components Return or exchange of spare parts and or produ cts may be subject to shipping handling and replacement or replenishment fees Printing errors and changes of information reserved SAFETY GUIDELINES WHEN OP...

Page 7: ...ation Netzteil Reiseetui Handbuch und Sicherheitshinweise PRODUKTBESCHREIBUNG 7 1 2 9 8 6 5 3 4 1 Austauschbarer Kopf der Schallzahnbürste 2 Körper der Schallzahnbürste 3 Ein Aus und Moduswechsel Taste 4 Intensitätstaste 5 Anzeige des gewählten Programms 6 Ladeanzeige 7 Reiseetui 8 Ladestation 9 UV Sterilisator ...

Page 8: ...n mit dem nächsten Abschnitt fortzufa hren Nach 2 Minuten schaltet sich die Zahnbürste aus 9 Spülen Sie den Kopf und den Körper der Zahnbürste unter fließendem Wasser ab und wischen Sie sie dann mit einem Wischtuch oder Handtuch ab 10 Legen Sie den Zahnbürstenkörper wieder in die Gerätebasis oder bewahren Sie ihn im Reiseetui auf Der Kopf kann in den UV Sterilisator gelegt werden UV Sterilisator 1...

Page 9: ...on nicht in Wasser Zahnbürste 1 Entfernen Sie den Borstenkopf 2 Wischen Sie Schmutz mit einem weichen Tuch von allen Oberflächen ab und le gen Sie die Zahnbürste wieder ins Glas Tauchen Sie nicht den ganzen Körper der Zahnbürste in Wasser 3 Spülen Sie den Borstenkopf und seine Borsten nach jedem Gebrauch ab 4 Reinigen Sie die Zahnbürste oder ihre Bestandteile nicht in der Spülmaschine Reiseetui Wi...

Page 10: ...hren sind Firma elem6 s r o übernimmt keine Haftung für Unfälle Verletzungen Tod Verlust oder andere Ansprüche im Zusammenhang mit diesem Produkt oder aufgrund der Verwendung dieses Produkts Firma elem6 s r o haftet in keinem Fall für Zufalls oder Folgeschäden im Zusammenhang mit oder aus der Verwendung dieses Produkts oder einer seiner Komponenten Für die Rückgabe oder den Austausch von Ersatztei...

Page 11: ...aptér Cestovní pouzdro Manuál a bezpečnostní instrukce POPIS PRODUKTU 7 1 2 9 8 6 5 3 4 1 Vyměnitelná hlavice sonického zubního kartáčku 2 Tělo sonického kartáčku 3 Tlačítko zapnout vypnout a změna režimu 4 Tlačítko intenzity 5 Indikátor zvoleného módu 6 Indikátor nabíjení 7 Cestovní pouzdro 8 Nabíjecí základna 9 UV sterilizátor ...

Page 12: ...jej uložte do cestovního pouzdra Hlavici můžete umístit do UV sterilizátoru UV Sterilizátor 1 Otevřete pomocí tlačítka víko UV sterilizátoru 2 Umístěte hlavici zubního kartáčku do UV sterilizátoru Štětiny by měly mířit smě rem k UV lampě 3 Zavřete víko Sterilizace se automaticky spustí Během sterilizace neotvírejte víko 4 Jakmile zhasne UV světlo můžete víko otevřít a hlavici vyndat Upozornění Ště...

Page 13: ... a její štětinky oplachujte po každém použití 4 Neumývejte kartáček ani jeho součásti v myčce na nádobí Cestovní pouzdro Povrch a vnitřek cestovního pouzdra otřete vlhkým hadříkem Doporučení Z hygienických důvodů doporučujeme zubní hlavice pravidelně měnit po 3 4 měsících SPECIFIKACE Materiál ABS TPE Napětí vstup kartáček 3 7 V Spotřeba energie kartáček 1 7 W Napětí vstup základna 12 V Spotřeba en...

Page 14: ...nou odpovědnost za jakékoliv nehody zranění smrt ztrá tu nebo jiné požadavky související s výrobkem nebo vyplývající z používání tohoto výrobku Společnost elem6 s r o v žádném případě nenese odpovědnost za náhod né nebo následné škody související s nebo vyplývající z používání tohoto výrobku nebo některé z jeho součástí Vrácení nebo výměna náhradních dílů a nebo výrobků může podléhat poplatkům za ...

Page 15: ...ňa Adaptér Cestovné puzdro Manuál a bezpečnostné inštrukcie POPIS PRODUKTU 7 1 2 9 8 6 5 3 4 1 Vymeniteľná hlavica sonickej zubnej kefky 2 Telo sonickej kefky 3 Tlačidlo zapnúť vypnúť a zmena režimu 4 Tlačidlo intenzity 5 Indikátor zvoleného módu 6 Indikátor nabíjania 7 Cestovné puzdro 8 Nabíjacia základňa 9 UV sterilizátor ...

Page 16: ...u vodou a následne ju otrite utierkou alebo uterákom 10 Postavte telo naspäť do základne alebo ho uložte do cestovného puzdra Hlavicu môžete umiestniť do UV sterilizátora UV Sterilizátor 1 Otvorte pomocou tlačidla veko UV sterilizátora 2 Umiestnite hlavicu zubnej kefky do UV sterilizátora Štetiny by mali smerovať sme rom k UV lampe 3 Zavrite veko Sterilizácia sa automaticky spustí Behom sterilizác...

Page 17: ...otrite nečistoty zo všetkých plôch a vráťte kefku naspäť do pohárika Neponárajte celé telo kefky do vody 3 Čistiacu hlavicu a jej štetinky oplachujte po každom použití 4 Neumývajte kefku ani jej súčasti v umývačke riadu Cestovné puzdro Povrch a vnútro cestovného puzdra otrite vlhkou handričkou Odporučenie Z hygienických dôvodov odporúčame zubné hlavice pravidelne meniť po 3 4 mesiacoch ŠPECIFIKÁCI...

Page 18: ...dnosť za akékoľvek nehody zranenia smrť stratu alebo inej požiadavky súvisiace s výrobkom alebo vy plývajúce z používania tohoto výrobku Spoločnosť elem6 s r o v žiadnom prípade nenesie zodpovednosť za náhodné alebo následné škody súvisiace s alebo vyplýva júce z používania tohoto výrobku alebo niektoré z jeho súčastí Vrátenie alebo vý mena náhradných dielov a alebo výrobkov môže podliehať poplatk...

Page 19: ...asilacz Etui podróżne Instrukcja i wskazówki bezpieczeństwa OPIS PRODUKTU 7 1 2 9 8 6 5 3 4 1 Wymienialna końcówka sonicznej szczoteczki do zębów 2 Korpus sonicznej szczoteczki 3 Przycisk włączyć wyłączyć i zmiana trybu 4 Przycisk intensywności 5 Wskaźnik wybranego trybu 6 Wskaźnik ładowania 7 Etui podróżne 8 Baza ładująca 9 Sterylizator UV ...

Page 20: ...zka wyłączy się sama 9 Opłucz końcówkę i korpus szczoteczki pod bieżącą wodą a następnie wytrzyj je szmatką lub ręcznikiem 10 Włóż korpus z powrotem do podstawy lub schowaj w etui podróżnym Końcówkę można włożyć do sterylizatora UV Sterylizator UV 1 Za pomocą przycisku otwórz pokrywę sterylizatora UV 2 Włóż końcówkę szczoteczki do sterylizatora UV Włosie powinno być skierowane w stronę lampy UV 3 ...

Page 21: ...Miękką szmatką zetrzyj brud ze wszystkich powierzchni i włóż ponownie szczo teczkę do szklanki Nie zanurzaj całego korpusu szczoteczki w wodzie 3 Po każdym użyciu opłucz końcówkę czyszczącą i jej włosie 4 Nie myj szczoteczki ani jej elementów w zmywarce do naczyń Etui podróżne Etui podróżne wytrzyj wilgotną szmatką z zewnątrz i wewnątrz Zalecenie Ze względów higienicznych zalecamy regularną wymian...

Page 22: ...i obrażenia śmierć utratę lub inne roszczenia związane lub wynikające z używania tego produktu Firma elem6 s r o w żadnym wypadku nie ponosi odpowiedzialności za przypadkowe lub wtórne szkody w związku lub wynikające z użytkowania tego produktu lub którego kolwiek z jego elementów Zwrot lub wymiana części zamiennych i lub produktów może podlegać opłatom za wysyłkę obsługę wymianę i lub uzupełnieni...

Page 23: ... fej Dokkoló állomás Adapter Utazótok Használati és biztonsági útmutató TERMÉKLEÍRÁS 7 1 2 9 8 6 5 3 4 1 Szónikus fogkefe készüléktest 2 Szónikus fogkefe test 3 Be kikapcsoló és üzemmódváltó gomb 4 Intenzitás gomb 5 Kiválasztott mód kijelző 6 Töltésjelző 7 Utazótok 8 Dokkoló állomás 9 UV sterilizáló ...

Page 24: ...blítse le a fogkefe testét folyóvízzel majd törölje szárazra törlőruhával vagy törülközővel 10 Helyezze vissza a készüléktestet a talprészre vagy tegye az utazótokba A fej UV sterilizátorba helyezhető UV sterilizáló készülék 1 Nyissa fel a gomb segítségével az UV sterilizátor fedelét 2 Helyezze a fogkefefejet az UV sterilizálóba A sörtéknek az UV lámpa felé kell nézniük 3 Zárja le a fedelet A ster...

Page 25: ... összes felületről majd helyezze vissza a kefét a pohárba Ne merítse az egész fogkefetestet vízbe 3 Minden használat után öblítse le a fogmosó fejet és annak sörtéit 4 Ne mosogassa el se az ecsetet se annak alkatrészeit mosogatógépben Hordozótok Nedves törlőruhával törölje át az utazótáska felületét és belsejét Ajánlások Higiéniai okokból kifolyólag javasolt a fogfejeket rendszeres 3 4 havonta cse...

Page 26: ...vetkező vagy azzal összefüggésben lévő balesetekért sérülésekért halálesetekért elvesz tésekért vagy azokkal kapcsolatos más egyéb követelményekért A elem6 s r o cég semmi esetre sem felel a jelen termék vagy annak bizonyos részeinek használatával kapcsolatos vagy abból következő véletlenszerű vagy utólagos károkért A pótal katrészek és vagy termékek visszaadására vagy cseréjére szállítási vagy ke...

Page 27: ...vek Adapter Potovalna torbica Navodila in varnostni napotki OPIS IZDELKA 7 1 2 9 8 6 5 3 4 1 Zamenljiva glava sonične zobne ščetke 2 Ogrodje sonične ščetke 3 Gumb za vklop izklop in spremembo načina 4 Gumb za intenzivnost 5 Kazalec izbranega načina 6 Kazalec polnjenja 7 Potovalna torbica 8 Polnilni podstavek 9 UV sterilizator ...

Page 28: ...podstavek ali ga shranite v potovalno torbico Glavo lahko postavite v UV sterilizator UV sterilizator 1 Odprite ga s pomočjo gumba na pokrovu UV sterilizatorja 2 Postavite glavo zobne ščetke v UV sterilizator Ščetine naj bodo usmerjene proti UV lučki 3 Zaprite pokrov Sterilizacija se začne samodejno Med sterilizacijo ne odpirajte pokrova 4 Ko UV lučka ugasne lahko pokrov odprete in vzamete glavo O...

Page 29: ...ene ščetine spirajte po vsaki uporabi 4 Ne pomivajte ščetke ali njenih delov v pomivalnem stroju Potovalna torbica Površino in notranjost potovalne torbice obrišite z vlažno krpo Priporočilo Iz higienskih razlogov priporočamo da glave zobne ščetke redno menjate po 3 4 mesecih SPECIFIKACIJA Material ABS TPE Vhodna napetost ščetka 3 7 V Poraba energije ščetka 1 7 W Vhodna napetost podstavek 12 V Por...

Page 30: ... odgovornosti za kakršnekoli nesreče poškodbe smrt izgubo ali druge zahtevke ki so povezani ali izhajajo iz uporabe tega izdelka Družba elem6 s r o v nobenem primeru ni odgovorna za naključne ali posledične škode ki so povezane ali izhajajo iz uporabe tega izdelka ali njegovega dela Vračilo ali menjava nadomestnih delov in ali izdelkov je lahko predmet doplačila za prevoz rokovanje menjavo in ali ...

Page 31: ...er Putna futrola Upute za upotrebu i sigurnosne upute OPIS PROIZVODA 7 1 2 9 8 6 5 3 4 1 Zamjenjiva glava sonične četkice za zube 2 Tijelo sonične četkice za zube 3 Tipka uključi isključi i promjena modusa 4 Tipka intenziteta 5 Pokazatelj odabranog modusa 6 Pokazatelj punjenja 7 Putna futrola 8 Baza za punjenje 9 UV sterilizator ...

Page 32: ...jelo četkice pod mlazom vode i obrišite ih krpom ili ručnikom 10 Vratite tijelo četkice u bazu ili ga pohranite u futrolu Glavu možete staviti u UV sterilizator UV sterilizator 1 Pomoću tipke otvorite poklopac UV sterilizatora 2 Postavite glavu za čišćenje u UV sterilizator Dlake treba okrenuti u smjeru UV lampe 3 Zatvorite poklopac Sterilizacija će se automatski pokrenuti Tijekom sterilizacije ne...

Page 33: ...brišite nečistoće sa svih površina i vratite četkicu u čašu Ne uran jajte cijelo tijelo četkice u vodu 3 Lavu za čišćenje i njene dlake operite nakon svake upotrebe 4 Ne perite četkicu niti njene dijelove u perilici za suđe Putna futrola Vanjsku i unutarnju površinu futrole obrišite vlažnom krpom Preporuka Iz higijenskih razloga preporučujemo zamijeniti glavu za čišćenje svaka 3 4 mjeseca SPECIFIK...

Page 34: ...de ozljede smrt gu bitak ili druge zahtjeve koji su u svezi ili koji proizlaze iz upotrebe ovog proizvoda Društvo elem6 s r o ni u kojem slučaju ne snosi odgovornost za slučajne ili poslje dične štete koje su u svezi ili koje proizlaze iz upotrebe ovog proizvoda ili nekog od njegovih dijelova Za povrat ili zamjenu rezervnih dijelova i ili proizvoda može biti naplaćen prijevoz manipulacija zamjena ...

Page 35: ......

Page 36: ......

Reviews: