AEV350, MEV350
TWO PART VALVE HOUSING,
AUTO AND MANUAL EXPULSION
Installation and User Guide
32210-001 REV A
Trulife
www.trulife.com
Page 2 of 4
6.
After the socket has cooled, sand off excess plastic directly above the forming tool until the top surface of the forming tool
is exposed.
7.
Remove the socket from model. Use a sanding cone to carefully open up the hole if necessary so that the inner housing fits
snug through the hole.
8.
Clean the inside and outside of the formed pocket of anything that could prevent a good seal.
Final Assembly:
9.
Make sure the large o-ring is seated in the groove of the flange of the inner housing and place components into the recess
formed inside the socket.
10.
On the outside of the socket, screw on the aluminum outer housing, and firmly hand tighten.
Tip: To facilitate a tight fit and a good seal, wet the o-ring and the threads of the housing components with water or
isopropyl alcohol just prior to tightening.
11.
Assemble the valve insert (auto expulsion or manual expulsion) by gently hand tightening clockwise until the o-ring on the
outside of the valve insert makes contact with the sealing surface inside the valve housing.
Note: To prevent cross-threading, it is sometimes necessary to initially turn the insert counter-clockwise until the
threads are aligned properly, and then tighten clockwise.
12.
A valve key is provided to assist removal of the valve insertfor individuals with limited hand strength or dexterity.
Disassembly and cleaning valve inserts:
Foreign debris such as dust, baby powder, and residue from lotions used for donning the
socket can become lodged in the sealing surfaces of the valve overtime and may cause a
decrease in vacuum performance.
Instruct patients to periodically wipe clean the outer o-ring and threads of the valve insert
and the inner threads and sealing surface of the valve housing. Use water or isopropyl
alcohol.
To disassemble the valve insert for more thorough cleaning, steps 1-4 pertain to both the
auto expulsion and the manual expulsion valve inserts:
1.
Remove the valve insert from the housing.
2.
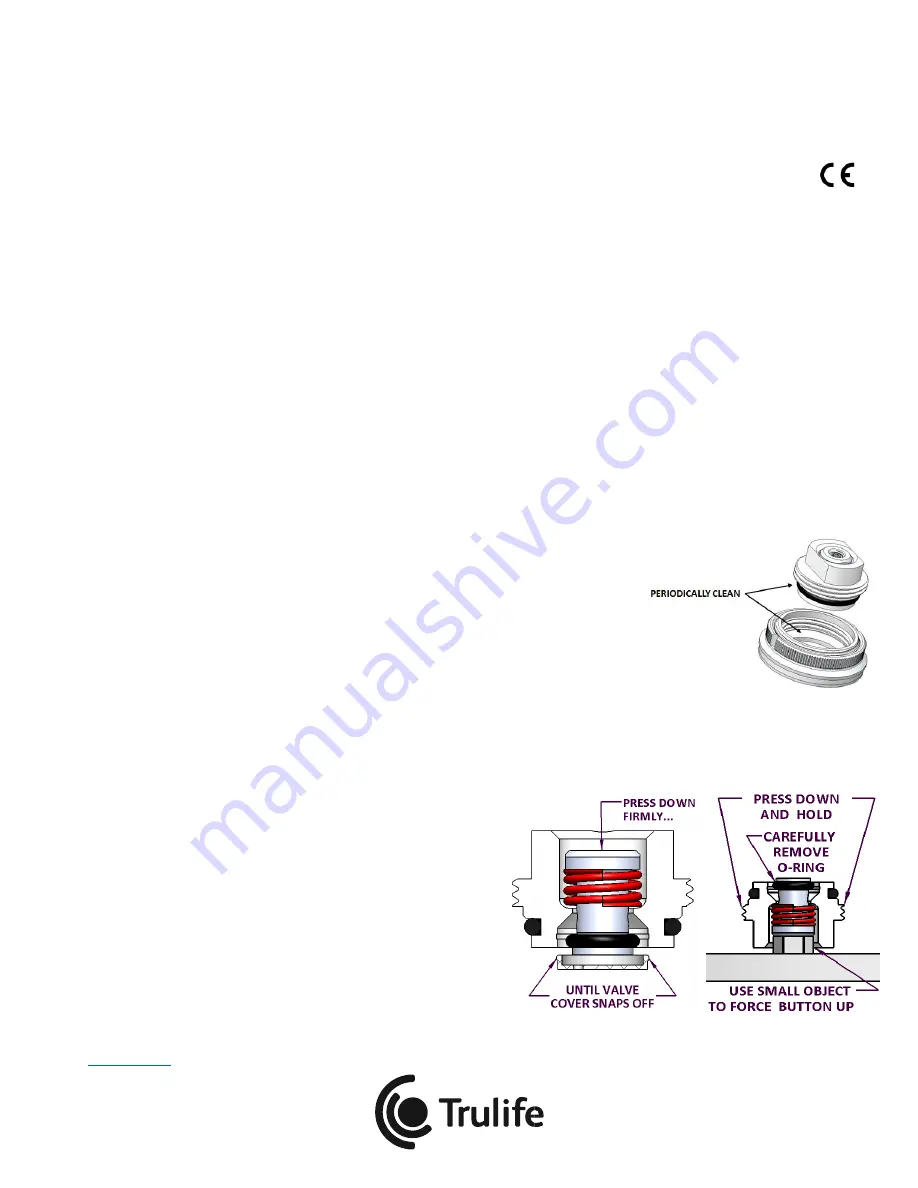
Firmly press down on the valve button until the valve cover
snaps off.
3.
Maintain downward force of the button, while carefully
removing the inner o-ring.
This is made easier by using a small nut or other object on a
flat, sturdy work surface.
Press the assembly down onto the small object so that the
valve button lifts up from the inner seal surface.
While the valve button is lifted, use a pick to
CAREFULLY
remove the o-ring from the button.
DO NOT CUT OR
DAMAGE THE O-RING!
4.
Remove the button and spring from the valve body. Clean
components with water and mild detergent, or isopropyl
alcohol. Ensure all sealing surfaces are free of debris or
residue.


