background image

2

Table of Contents

Trademark information

  ........................................................   2

Intended use

  ..........................................................................   2

Prohibited use

  ........................................................................   2

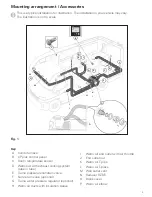
Mounting arrangement / Accessories

  ................................   3

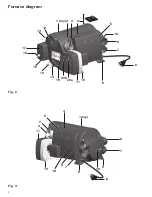
Furnace diagram

  ....................................................................   4

Installer Safety Information

Safety symbols and signal words

  ......................................   6

Safety behavior and practices

  .............................................   6

Installation Instructions

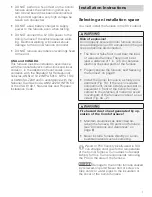
Selecting an installation space

  ...........................................   7

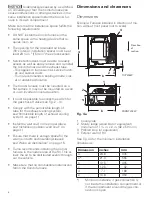
Dimensions and clearances

  .................................................   8

Dimensions  ...............................................................................   8

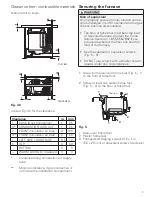
Clearance from combustible materials  ....................................   9

Securing the furnace

  ............................................................   9

Exhaust venting system

  .....................................................   10

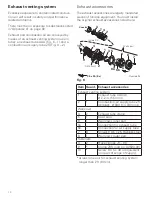
Exhaust accessories  ...............................................................   10

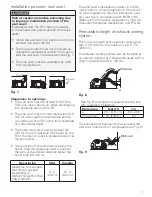
Installation position: wall cowl  ...............................................   11

Permissible length of exhaust venting system  .......................   11

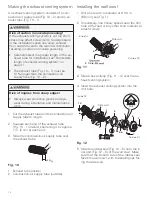
Making the exhaust venting system  ......................................   12

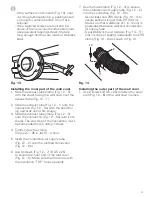
Installing the wall cowl  ...........................................................   12

Connecting the exhaust venting system 

to the Combi furnace  ..............................................................   14

Circulated air intake

  ............................................................   14

Warm air distribution

  .........................................................   15

Parts for warm air distribution  ................................................   15

Warm air outlets  .....................................................................   15

Permissible warm air ducts  ....................................................   15

Installing warm air ducts  ........................................................   16

Installing end outlets  ..............................................................   17

Gas connection

  ....................................................................   17

Connecting the gas line  ..........................................................   17

Checking for gas leaks  ...........................................................   18

Water installation

  ................................................................   19

Advice on water installation  ...................................................   20

Installing a 12 mm / 1/2 in. CTS adaptor  ................................   20

Installing a water pressure regulator  ......................................   21

Installing a non-return valve  ...................................................   21

Installing a pressure relief/drain valve  ....................................   22

Laying water lines  ..................................................................   22

Connecting the water container  .............................................   22

Final tasks  ...............................................................................   23

Installing the CP plus control panel

  .................................   23

Installing the room temperature sensor

  ..........................   23

Electrical connections 

  .......................................................   24

Setting up a 12-volt connection  .............................................   25

Connecting the room temperature sensor  .............................   25

Connecting the CP plus control panel  ....................................   25

Setting up a 120 V connection  ...............................................   25

Final tasks

  ............................................................................   26

Warning labels

  .....................................................................   26

System checks

  .....................................................................   26

Functional test

  .....................................................................   26

Ignition control test  ................................................................   26

Static pressure test  .................................................................   27

Final check of installation

  ..................................................   27

Connection diagram 12 volt (Control_PCB)

  ....................   28

Connection diagram 120 volt AC (120 VAC_E_PCB)

  .....   29

Appendix A

  ...........................................................................   30

Appendix B

  ...........................................................................   31

Appendix C

  ...........................................................................   34

Trademark information

Truma Combi® referred to as Combi below.

Intended use

The Combi LP gas furnace* with supplemen-
tary indirect water heating may be used only in 
recreational vehicles (RVs) for heating the room 
and the faucet water.

Recreational vehicles (RVs) are designed as 
temporary living quarters for recreation, travel 
and/or camping. RVs have their own power or 
are towed by another vehicle.

*Models


• Combi 

eco 

•  Combi eco plus
• Combi 

comfort 

•  Combi comfort plus

The Combi eco plus and Combi comfort plus 
furnaces also feature electrical heating elements 
for a supply voltage of 120 V.

Prohibited use

Any use other than the intended use (see above) 
is prohibited.

Examples of prohibited use:
•  Use in a marine environment.
•  Use as part of a space heating system.
•  Use in mobile homes.
•  Use in food trucks or roadside food vending 

vehicles.

•  Use in construction trailers. 

Summary of Contents for Combi comfort

Page 1: ...nly for use by trained and qualified technicians To the installer The operating instructions for this Truma furnace are part of these installation instructions The operating instructions are included...

Page 2: ...3 Installing the CP plus control panel 23 Installing the room temperature sensor 23 Electrical connections 24 Setting up a 12 volt connection 25 Connecting the room temperature sensor 25 Connecting th...

Page 3: ...r optional H Warm air ducts with insulation sleeve Mounting arrangement Accessories This is a typical installation for illustration The installation in your vehicle may vary The illustration is not to...

Page 4: ...4 1 top 7 6 9 9 10 19 7 6 4 11 3 2 5 18 8 Furnace diagram Fig 3 Fig 2 13 11 17 16 14 15 12 3 2 5 6 7 4 1 top 9 18 10 10 19 20b 20a 8...

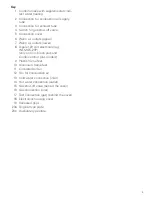
Page 5: ...ole 120 volt electrical plug NEMA 5 20P only on Combi eco plus and Combi comfort plus models 9 Plastic frame feet 10 Aluminum frame feet 11 Circulated air fan 12 Fan for combustion air 13 Cold water c...

Page 6: ...when connecting the Combi furnace Close the vehicle s gas supply during in stallation and when connecting the Combi furnace Always wear protective gloves to avoid inju ries from sharp edges during in...

Page 7: ...loors typically used in RVs can change color due to the temperature of the Combi furnace Truma does not accept liability for this Truma recommends removing the PVC in the area of the furnace Damage to...

Page 8: ...e quires room air The opening for the circulated air intake RV s interior installation space must be at least 23 in 150 cm free cross section Service technicians must be able to readily access as well...

Page 9: ...An improperly secured Combi furnace can be come dislodged in an RV accident and the gas line can become disconnected The floor or false floor must bear the load of a secured furnace Contact the Truma...

Page 10: ...riginal exhaust accessories listed here 4 1 2 6a 6b 6 8 7 5 7 Side wall Outside RV Inside RV 3 5 x 25 8x 3 1 2 4 Combi Wall cowl 3 9 10 Fig 6 Item Quant Exhaust accessories Exhaust venting system 1 1...

Page 11: ...ated above or at the same level If any portion of the wall cowl is below the spout then the clearance must amount to the sum of the vertical distance below the spout plus 3 ft 0 9 m Description USA Ca...

Page 12: ...tube and the combustion air supply tube to length 2 Squeeze each end of the exhaust tube Fig 10 1 inward shortening it by approx 1 in 2 cm at each end 3 Slide the combustion air supply tube over the...

Page 13: ...supplied screws are too short be cause of the non smooth surface structure use equivalent tapping screws that are long enough and that are made of stainless steel HOT Fig 13 Installing the inner part...

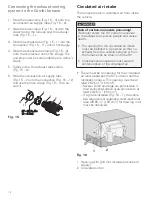
Page 14: ...The furnace draws in circulated air from inside the vehicle Risk of carbon monoxide poisoning If exhaust enters the RV carbon monoxide in the exhaust can poison people and cause death The opening for...

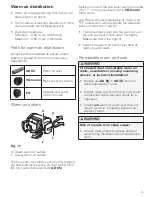
Page 15: ...m one of the two lower warm air outlets Fig 17 L may be closed with a VD Combi blank cover We recommend equipping all 4 warm air outlets with warm air ducts for ideal distri bution of warm air in the...

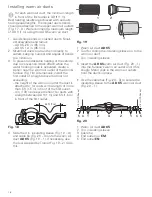
Page 16: ...above the floor not exceeding the height of the warm air outlet the duct is attached to for ducts with a length of more than 5 ft 1 5 m in front of the first outlet 4 in 100 mm above the floor for duc...

Page 17: ...tlet to tighten the LT T pipe Segmented threads allow you to push the end outlet against the wall before tighten ing it by turning The insertion position is marked by notches on both parts 3 Insert th...

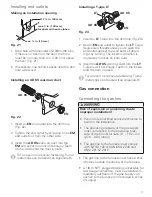
Page 18: ...g 24 Damage to the flare fitting The flare fitting is a dry seal Never use pipe dope on the flare fitting 2 Screw the gas line s union nut wrench size 3 4 in 19 mm onto the Combi furnace s gas connect...

Page 19: ...1 14 9 4 2 Fig 26 1 Adaptor 12 mm to 1 2 in CTS tube 2 1 2 in PEX x 1 2 in NPT female threaded adapter 3 1 2 in CTS PEX tube 4 T piece 1 2 in CTS PEX tube not included 5 Truma water pressure regulator...

Page 20: ...siderable switching hysteresis hot water can flow back via the cold water faucet You must install a non return valve Fig 26 6 between the outlet to the cold water faucet and the pressure relief drain...

Page 21: ...ter line Insert the water pressure regulator in the proper direction Direction of flow is indi cated by arrow Screw the connecting parts not in scope of delivery with a nominal torque of 2 2 lb ft 3 N...

Page 22: ...readed adapter 7 1 2 in CTS PEX tube 8 Cold water line inlet 1 2 in CTS PEX tube 9 1 2 in x 1 2 in x 1 2 in PEX tee 10 Cold water line outlet 1 2 in CTS PEX tube 11 Crimp ring or clamp 1 Drill a hole...

Page 23: ...tasks Pull on all the water connections to ensure that they are securely connected Check all water connections for leaks Repair leaks as needed Repeat check for leaks and take any neces sary steps to...

Page 24: ...electrical compo nents to the connector cables Connector cables and lines must be se curely fastened they must not become loose or be disconnected due to vibration Electric lines switching equipment...

Page 25: ...onnectors 0 25 in x 0 032 in 6 3 x 0 8 mm TE PIDG FASTON 250 series DO NOT connect any other load to the 12 V connection Connecting the room temperature sensor Insert the connector cable into the conn...

Page 26: ...ons Test water connections water lines and joints for leakage Be absolutely certain that all water drains properly No warranty claims will be ac cepted for frost damage 2 Hand over the operating instr...

Page 27: ...ssure test The Combi furnace has an automatic fan speed control Truma recommends that all 4 warm air outlets should be fitted with warm air ducts 1 For testing close all warm air outlets but one The s...

Page 28: ...Control Heating Unit Option Control_PCB Flame detection Igniter CATS Circulation Air FAN WTSS WTS ATSS ATS Combustion Air FAN Blue Blue Blue Blue _ _ Blue Gray Gray Gray White White Black Red Red Red...

Page 29: ...E_PCB AECO E Manual Reset Electric Heating Rod 120V AC Plug Control_PCB GND GND N VCC K 3 K 2 K 1 GND 120 ON L R1_N R2_N R1_L R2_L Green White Black NEMA 5 20P If any of the original wire as supplied...

Page 30: ...ers Chlorine based swimming pool chemicals Water softening chemicals De icing salts or chemicals Carbon tetrachloride Halogen type refrigerants Cleaning solvents such as perchloroethylene Printing ink...

Page 31: ...3 15 in 80 mm Clamp for holding the warm air duct AD 65 with insula tion sleeve 40171 11 40171 61 bulk 200 pieces End outlet EN brown Closable warm air outlet Air throttle can be rotated 360 to direct...

Page 32: ...40701 52 bulk 100 pieces Wall outlet vent WL To release a small flow of warm air along the wall 40191 02 40191 52 bulk 55 pieces Y piece To branch off another warm air duct AD 65 40161 02 40161 52 bu...

Page 33: ...r end outlet nut EM T piece TS T pipe LT and Combi for secure fastening of air duct AD 65 34310 02 34310 52 bulk 200 pieces Blank cover VD Combi To close one of the lower warm air outlets of the Combi...

Page 34: ...34 17 18 22 19 15 16 10 11 1 12 5 6 7 13 14 x 20 x x 22 2 3 4 23 24 12 V 21 25 26 x Appendix C Exploded view of spare parts and accessories...

Page 35: ...emperature sensor 16 34000 71900 Cable for room sensor 13 1 ft 4 m 17 34020 00178 Elbow tting with aeration valve for rigid piping 12 mm 18 34000 17700 Condensation tube 3 ft 0 9 m long 19 34020 00177...

Page 36: ...Please have the model number and serial number on furnace s type plate handy when you call Manufacturing Truma Ger tetechnik GmbH Co KG Wernher von Braun Stra e 12 85640 Putzbrunn Germany www truma co...

Reviews: