17
7200790 Service Manual for the HELION
®
XENION
®
Surgical Lighting System GB
Figure 01
Figure 02
5 Changing the Lamp
5.1
5.1
5.1
5.1
5.1
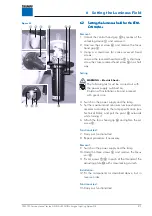
Changing the lamp of the HELION S
Changing the lamp of the HELION S
Changing the lamp of the HELION S
Changing the lamp of the HELION S
Changing the lamp of the HELION S
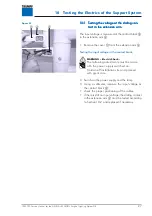
The lamp does not light up.
Removal:
1. Carefully turn the lamp holder
2
and remove it
from the HELION S lamp
3
.
2. Carefully remove the old lamp
1
from the lamp
holder
2
and dispose of it in the appropriate
manner.
Installation:
3. Fit the new lamp
1
holding it by the packaging
film/using a soft cloth and fit the components as
described above, but in the reverse order.
5.2
5.2
5.2
5.2
5.2
Changing the lamp of the HELION M/
Changing the lamp of the HELION M/
Changing the lamp of the HELION M/
Changing the lamp of the HELION M/
Changing the lamp of the HELION M/
M+ / L/L+
M+ / L/L+
M+ / L/L+
M+ / L/L+
M+ / L/L+
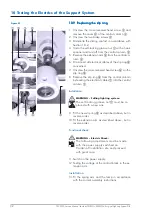
The display
8
is lit up. The lamp is defective.
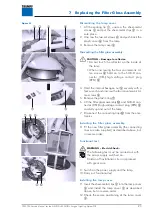
Removal:
1. Unlock the central hand grip
2
by means of the
unlocking device
1
and remove it.
WARNING – Failure of the spare lamp:
• Always change both lamps.
• When replacing the lamp always replace the
lamp base too.
2. Undo the three screws
3
and remove the focus
unit
4
.
3. Unscrew the two cross-recessed head screws
5
and remove the old lamp
6
together with the
base
7
by pulling it upwards and dispose of it in
an appropriate manner.
Installation:
4. Fit the new lamp
6
together with the base
7
holding it by the packaging film/using a soft cloth
and fit the components as described above, but
in the reverse order.
5. Insert the focus unit
4
into the lamp so that both
the plug connectors
9
are aligned.
6. Tighten the three screws
3
by hand.
7. Attach the central hand grip
2
.


