background image

00:20

6

ENGLISH

Preparation

J

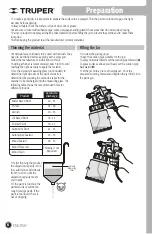
• Most paints are sold ready to be used with a brush. They 

need to be thinned before applying with a spray gun. 

Follow the manufacturer’s instructions to thin it.

• Adding a thinner is recommended. Add 5 to 10% until 

reaching the right viscosity to apply the material.

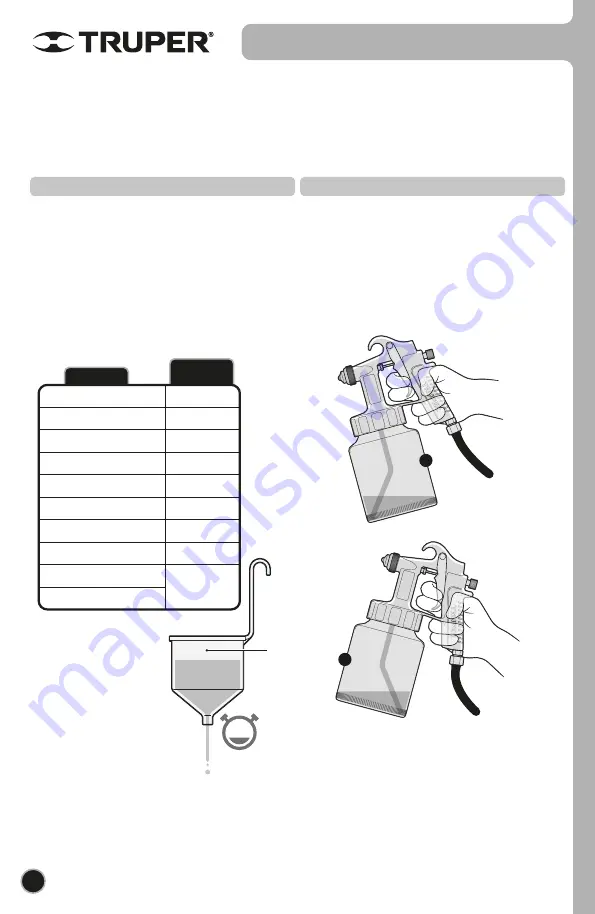
• Use the viscosity measuring glass (not included) to 

determine right viscosity of the paint. Viscosity is 

determined by counting the seconds it takes for the 

material to be discharged into the measuring glass. The 

following table shows the recommended times for 

different products.

• If after thinning the product 

the dispersion capacity is too 

low, add thinner. Add slowly 

from 5 to 10 % until the 

dispersion capacity meets 

your needs.

• If the paint is too thick, the 

painted surface will be too 

rough (orange peel). If the 

paint is too liquid, there is 

risk of dripping.

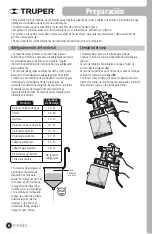
Thinning the material

• Unscrew the paint gun jar.

• Align the suction pipe suitable for the job:

To spray horizontal objects set the suction pipe forward (

A

).

To spray surfaces above your head, set the suction pipe 

backwards (

B

).

• Set the jar onto a piece of newspaper.  Pour the 

prepared covering material and tighten the jar firmly into 

the paint gun.

Filling the Jar

• To make a good job, it is important to prepare the surface to be sprayed. Thin the paint or product to gain the right 

viscosity before applying.

• Always double check the surface is free of dust, dirt or grease.

• Make sure to cover with adhesive tape, some newspaper and/or plastic those areas that do not require spraying.

• Paint or product to be sprayed shall be mixed perfectly before filling the jar to prevent they settle and to make them 

lump-free.

• Before buying the product read the manufacturer recommendations.

Product

Second to

discharge

Water based Paint

Primer

Varnish

Oil Based Paint

Enamel Paint

Aluminum Paint

Automotive Sealant

Wood Sealant

Wood Preserver

Wood Stain

20 - 25

24 - 28

20 - 25

18 - 22

18 - 22

22 - 25

25 - 35

28 - 35

A

B

Viscosity

Measuring

Glass

Thinning is not 

Required

Summary of Contents for 14037

Page 1: ...o por completo antes de usar la herramienta ATENCI N Instructivo de Pistola para pintar 20 PSI 50 PSI Presi n de trabajo 137 8 kPa 344 7 kPa Modelo C digo PIPI 200 Este Instructivo es para 14037 PIPI...

Page 2: ...6 7 8 9 Para poder sacar el m ximo provecho de la herramienta alargar su vida til hacer v lida la garant a en caso de ser necesario y evitar riesgos o lesiones graves es fundamental leer este Instruc...

Page 3: ...as o aplastamiento Utilice equipo adecuado de protecci n personal Utilice protecci n para los ojos Mascarilla antipolvo zapatos de seguridad antideslizantes casco y protecci n para los o dos en condic...

Page 4: ...abajo Si va a trabajar en interiores verifique que haya ventilaci n adecuada El rea de trabajo debe de estar libre de cualquier fuente de ignici n No fume durante el trabajo de rociado ni cerca del re...

Page 5: ...rca tipo anillo Vaso Tapa del vaso Mango Entrada de aire Tubo de succi n Gancho Boquilla Aguja Resorte Tornillo de ajuste Tobera Gatillo Tuerca Espiga Boquilla de punto Boquilla de abanico Boquilla an...

Page 6: ...ubo de succi n dependiendo del trabajo a realizar Para rociar objetos horizontales coloque el tubo de succi n hacia adelante A Para rociar superficies por encima de la cabeza coloque el tubo de succi...

Page 7: ...No roc e en ngulo de lo contrario la pintura podr a correrse por la superficie D pasadas suaves y uniformes Cuando roc e reas grandes utilice un patr n cruzado D Desplace la pistola a una velocidad co...

Page 8: ...pleto presione el gatillo para que retirar todo el producto del interior del sistema A Vac e el material sobrante del vaso en un contenedor adecuado Desconecte la manguera de la pistola Limpie el vaso...

Page 9: ...pretado o empaque del vaso da ado Limpie las boquillas Reemplace las boquillas Apriete o reemplace el sello de la aguja consulte la p gina 8 Coloque un sello para la aguja consulte la p gina 8 Limpie...

Page 10: ...Notas 10 ESPA OL...

Page 11: ...Manual Spray Gun Model Code PIPI 200 Applies for 14037 PIPI 200 ENGLISH ESPA OL CAUTION Read this manual thoroughly before using the tool 20 PSI 50 PSI Air Pressure...

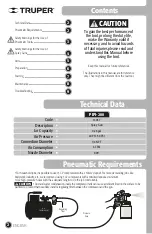
Page 12: ...4 5 6 7 8 9 Technical Data Pneumatic Requirements PIPI 200 14037 0 26 gal 20 PSI 50 PSI 1 4 NPT Spray Gun Code Description Jar Capacity Air Pressure Connection Diameter 6 CFM Air Consumption 0 05 Nozz...

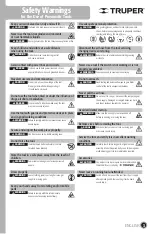
Page 13: ...ply with this safety measure exposes you to severe personal injury Use adequate personal protection Using safety glasses anti dust mask safety non skid shoes helmet and earplugs used in adequate condi...

Page 14: ...job difficult If working indoors verify there is adequate ventilation The work area shall be free of any ignition source Do not smoke while spraying or near the work area Wear a face mask and safety g...

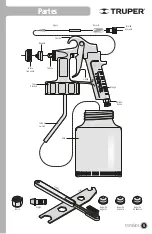
Page 15: ...5 ENGLISH Parts Regulator Jar Jar Cover Grip Air Inlet Suction Pipe Hook Nozzle Needle Spring Adjusting Nut Liquid Nozzle Trigger Nut Spike Round nozzle Fan nozzle Angular nozzle Wrench Brush...

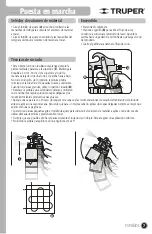
Page 16: ...n jar Align the suction pipe suitable for the job To spray horizontal objects set the suction pipe forward A To spray surfaces above your head set the suction pipe backwards B Set the jar onto a piece...

Page 17: ...Do not spray in an angle otherwise the paint may run through the surface Do soft and uniform passes When spraying large surfaces use a crossed pattern D Move the gun with a steady and uniform speed Fa...

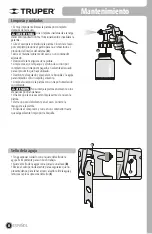
Page 18: ...ger to remove remaining product from inside the spray gun system A Pour the remaining material into an adequate container Disconnect the paint gun hose Clean the jar the gasket seal and the suction pi...

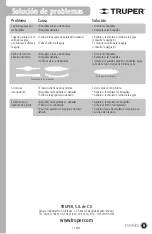
Page 19: ...lter is dirty or obstructed The jar is not tightened correctly or the jar washer is damaged Clean the nozzles Replace the nozzles Tighten or replace the needle seal see page 8 Set a new seal fro the n...

Page 20: ...Notes 10 ENGLISH PIPI 200...

Reviews: