background image

6

TROUBLESHOOTING

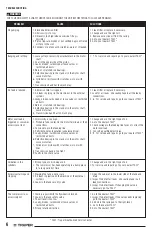
 FOR YOUR OWN SAFETY ALWAYS TURN OFF AND DISCONNECT THE UNIT BEFORE TRYING TO SOLVE ANY PROBLEM.

CAUSE

1.  Blocked admission filter

2. Oil viscosity is to low.

3. Oil level is too high (when excessive fill-up is 

possible).

4. Piston rings are broken or not settled. Gaps not tiered 

or stuck in the slot.

5. Cylinders or pistons with scratches, worn or streaked.

1. Loose pulley or excessive axial backlash in the motor 

shaft.

2. Coal in the upper side of the piston.

3. Leaky, broken, carbonized or loose valves or 

restricted air ducts.

4.Worn or scratched rod bearings

5. Defective bearing in the crank or in the motor shaft. 

Loose motor fan.

6.  Cylinders or pistons with scratches, worn or with 

lines.

7. Transmission band has too much play.

1.  Admission filter is clogged.

2. Air leaks in piping (in the machine or in the external 

system).

3.Leaky, broken, carbonized or loose valves or restricted 

air ducts.

4.Worn or scratched rod bearings

5. Defective bearing in the crank or in the motor shaft. 

Loose motor fan.

6.  Transmission band has too much play.

1. Oil viscosity is too high.

2.  Probable false contact in the motor terminals or their 

connections.

3. Tension drop in the feeding line.

4. Deficient energy regulation (unbalanced line).

5. Leaky, broken, carbonized or loose valves or 

restricted air ducts.

6. Defective bearing in the crank or in the motor shaft. 

Loose motor fan.

7.  Cylinders or pistons with scratches, worn or with 

lines.

8. Transmission band is too tight

9. Faults in the check valve.

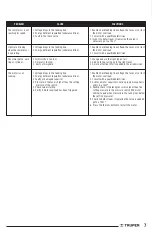
1.  Wrong type of oil is being used.

2.  The compressor has been operating in a damp place 

for a long period of time.

1. Draining the tank is necessary.

2. Air leaks in pipeline (in the machine or the external 

system).

3. Leaks in the tank security valve

1. There is a possibility the flywheel is blocked.

2. Leaks in the tank safety valve.

3. The oil level is too low.

4. Leaky, broken, carbonized or loose valves or 

restricted air ducts.

5. Wrong rotation direction.

SOLUTIONS

1.  Clean filter or replace if necessary.

2. Change and use the right oil.

3.  Remove excessive oil from the casing.

4. Go to your nearest TASC*

5. Go to your nearest TASC*

1 - 7.  For service and repairs go to your nearest TASC* 

1.  Clean filter or replace if necessary.

2. Look for air leaks.  Use sealing tape in all the leaky 

connections.

3 - 6.  For service and repairs go to your nearest TASC*

1.  Change and use the right type of oil.

2. Go to the nearest TASC*

3. Check voltage in the feeding line fuses or correct the 

motor overload.

4.  Consult a qualified electrician.

5 - 9.  For service and repairs go to your nearest TASC*

1.  Change and use the right type of oil

2. For service and repairs go to your nearest TASC*

1.  Open the valve set in the lower side of the tank and 

drain.

2. Inspect to detect air leaks.  Use sealing tape in all 

leaky connections.

3. Inspect to detect leaks. If changing the valve is 

necessary go to a TASC*

1.  Go to the nearest TASC*

2. Inspect to detect leaks. If the valve needs replacing 

go to the nearest TASC*

3. Add oil in the casing up to the right level.

4.  Go to the nearest TASC*

5. Go to the nearest TASC*

PROBLEM

Oil pumping

Banging and rattling.

Air feed is reduced.

Motor overload is 

triggered or consumes 

excessive current

Oxidation in the 

cylinders

Excessive starting and 

stopping

The compressor runs 

excessively hot

* TASC:  Truper® Authorized Service Center.

EVERY  FOUR  MONTHS  OR 
AFTER 500 HOURS USE

OIL: 

Drain oil and refill up to 

the right level using SAE-30 
motor oil. (See figure H)

GENERAL MAINTENANCE

CLEANSING: 

Keep the 

inside and outside of the 
compressor clean.  Replace 
oil regularly and keep all 
the external surfaces clean. 
A clean inner side 
guarantees good 
mechanical efficiency and a 
clean exterior allows 
circulating air heat to 
dissipate efficiently. 
(See figure I). 

SUCTION  ACTION: 

Put your hand lightly onto the filter admission 

orifices.  You will clearly hear the air suction. A deficient suction 
suggests the air filter is blocked or the admission valves are damaged. 
(See figure J).

PISTON RINGS: 

The sealing 

rings and the oil-scraper 
ring shall be inspected 
when the motor is using oil 
in excess.  It indicates the 
rings are worn and need to 
be replaced.  When 
replacing rings or other 
major components always 
change oil.


          These types of adjustments must be carried out 

in a Truper Authorized Service center.

BEARINGS:

 When reviewing or changing the piston rings, the crankshaft 

bearings must also be checked to determine if they are worn, and 
replace them if necessary.

OVERLOAD PROTECTION:

The compressor has a thermal switch (P) 

that prevents the motor from heating up excessive. The motor shuts 
off when the switch is activated. To re-establish the motor, follow 
the following steps:
1.- Press the switch to ensure that the compressor is off.
2.- Let the compressor cool down for at least 5 minutes
3.- Press the thermal switch located on the top cover of the engine.
4.- Lift the switch to start the compressor.

Note: 

If the unit shuts down again, please go to a Truper Authorized 

Service Center

MOTOR TRANSMISSION PULLEY

Isolate power and remove the guard and belt. The pulley can be removed 
using an extractor known as “Ouller”.  Do not use a hammer to hit the 
pulley and remove from the shaft. It could damage the motor bearings.

MOTOR:  If the motor does not start or stops during operation not 
necessarily means there is something wrong with the motor.  
A “buzzing” motor may indicate:

a) Voltage drops in the feeding line or loose connections.
b) Leaks in the check valves causing counter-pressure from the receptor.
c) Wrong starting procedure is being used (See Start up and Automatic 
Operation).
d) Compressor pump is “stiff” due to lack of oil.

An apparently “dead” motor may indicate:

a) The thermal overload protection device was activated.
b) Power supply fuses blew.
c) Loose connection.

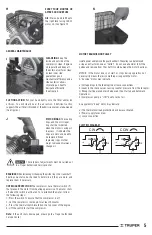
ELECTRIC DIAGRAM

WARNING

Summary of Contents for 15657

Page 1: ...o 15657 NOTA IMPORTANTE Este producto no debe quedar expuesto a goteo o salpicaduras por líquidos Compresor vertical de banda Instructivo Lea este Instructivo por completo antes de usar la herramienta ATENCIÓN ESPAÑOL ENGLISH ...

Page 2: ...a o se cruce cuando esté en funcionamiento 12 No extienda su radio de acción Evite toda postura que cause cansancio Cuide de que su posición sea segura y de que conserve el equilibrio 13 Mantenga las herramientas en las mejores condiciones Mantenga las herramientas limpias para tener la mejor ejecución y seguridad Siga las instrucciones para la lubricación y cambio de accesorios Verifique los cabl...

Page 3: ...a para esta aplicación Revise regularmente que todas las cubiertas estén fijas y firmemente colocadas Reemplace todas las partes herramientas y accesorios si son inadecuados para una operación segura Instale una válvula sin retorno o de corte en la tubería de entrega si el compresor se acoplará en paralelo con otro compresor o si se conectará a un sistema de suministro de aire Asegure que toda la ...

Page 4: ...E L MANÓMETRO DE TANQUE M VÁLVULA DE PURGA N VÁLVULA DE SALIDA DE 19 mm O BOTÓN DE INTERRUPTOR P PROTECTOR DE SOBRECARGA ACCESORIOS 1 Botella de aceite 2 Filtros de aire 1 Tapón del depósito de aceite ANTES DE CONECTAR EL COMPRESOR REVISE LO SIGUIENTE Que la tensión de alimentación sea igual a la indicada en la placa de especificaciones del compresor Que la lectura del manómetro de aire sea de cer...

Page 5: ...preventivo diario ACEITE Revise el nivel del aceite del cárter y rellene de ser necesario Si su compresor no se usa diariamente revise el nivel de aceite del cárter antes de arrancarlo Cambie el aceite después de 500 horas Fig C AGUA El agua que se almacena en el fondo del tanque al condensarse el aire debe drenarse usando la válvula de purga que se localiza en la parte inferior del tanque del com...

Page 6: ...a con un interruptor térmico P que evita que el motor tenga un calentamiento excesivo El motor se apaga cuando se activa el interruptor Para restablecer el motor siga los siguientes pasos 1 Presione el interruptor para asegurar que el compresor esta apagado 2 Deje enfriar el compresor al menos 5 minutos 3 Oprima el interruptor térmico ubicado en la tapa superior del motor 4 Levante el interruptor ...

Page 7: ...operado durante un periodo considerable en un lugar húmedo 1 Es necesario drenar el tanque 2 Fugas de aire en la tubería en la máquina o en el sistema externo 3 Fugas en la válvula de seguridad del tanque 1 Es posible que el volante se encuentre bloqueado 2 Fugas en la válvula de seguridad del tanque 3 Nivel de aceite demasiado bajo 4 Válvulas con fugas rotas carbonizadas o sueltas o conductos de ...

Page 8: ...o reemplazar la válvula acuda a un CSAT 1 Revise la tensión de la línea de alimentación los fusibles o corrija la sobrecarga del motor 2 Consulte a un electricista calificado 1 Cambie y use el aceite correcto 2 Agregue aceite al cárter hasta el nivel correcto 3 Se necesita dar mantenimiento con mayor frecuencia al filtro de aire 1 Revise la tensión de la línea de alimentación los fusibles o corrij...

Page 9: ... SUCURSAL GUADALAJARA AV ADOLFO B HORN 6800 COL SANTA CRUZ DEL VALLE C P 45655 TLAJOMULCO DE ZUÑIGA JAL TEL 01 33 3606 5285 AL 90 MICHOACÁN FIX FERRETERÍAS AV PASEO DE LA REPÚBLICA 3140 A COL EX HACIENDA DE LA HUERTA C P 58050 MORELIA MICH TEL 01 443 334 6858 MORELOS FIX FERRETERÍAS CAPITÁN ANZURES 95 ESQ JOSÉ PERDIZ COL CENTRO C P 62740 CUAUTLA MOR TEL 01 735 352 8931 NAYARIT HERRAMIENTAS DE TEPI...

Page 10: ...as recomendadas o no se haya operado de acuerdo al instructivo o haya sido alterado o reparado por personal no autorizado por Para hacer válida la garantía o adquirir piezas y componentes deberá presentar el producto y su comprobante de compra en Av San Isidro 110 Col Industrial San Antonio Alc Azcapotzalco C P 02760 CDMX Méx o en el establecimiento donde lo compró o en algún Centro de Servicio de...

Page 11: ... Code 15657 Vertical belt air compressor Manual IMPORTANT NOTICE This product should not be exposed to liquids dripping or splashing Read the user s manual thoroughly before operating this tool CAUTION ENGLISH ESPAÑOL ...

Page 12: ...g one hand and enables to use both hands Keep proper footing and balance at all times Do not overreach over or walk across the tool when is running 12 Do not extend your range of action Avoid a standing position that makes you get tired Keep a safe position and stable balance 13 Keep tools in the best conditions Keep tools clean to get better performance Follow lubrication and appliance replacemen...

Page 13: ...ace all parts tools and accessories when unfit for a safe operation Install a check valve or a cut valve in the inlet piping in case compressor shall be parallel coupled with a second compressor or if it will be connected to an air supply system Double check all piping and hoses connected to the compressor have the right diameter and adequate resistance for the maximum pressure delivered by the co...

Page 14: ...ETER M PURGE VALVE N 3 4 OUTLET VALVE O SWITCH BUTTON P THERMAL OVERLOAD PROTECTOR ACCESSORIES 1 Oil Bottle 2 Air Filters 1 Oil Deposit Cap BEFORE CONNECTING THE COMPRESSOR VERIFY THE FOLLOWING Feeding voltage shall match voltage indicated in the compressor nameplate Air gauge readings shall be zero Oil level in the compressor pump casing shall reach the mark in the level indicator N A O P B C L D...

Page 15: ...um efficiency for a long period of time PREVENTIVE DAILY MAINTENANCE OIL Check oil level in the casing and refill if necessary If the compressor is not used every day check the oil level in the casing before starting Replace oil after 500 hours See figure C WATER Due to air condensation water gets stored in the tank bottom Drain using the purge valve found in the lower side of the compressor tank ...

Page 16: ...sor has a thermal switch P that prevents the motor from heating up excessive The motor shuts off when the switch is activated To re establish the motor follow the following steps 1 Press the switch to ensure that the compressor is off 2 Let the compressor cool down for at least 5 minutes 3 Press the thermal switch located on the top cover of the engine 4 Lift the switch to start the compressor Not...

Page 17: ...g in a damp place for a long period of time 1 Draining the tank is necessary 2 Air leaks in pipeline in the machine or the external system 3 Leaks in the tank security valve 1 There is a possibility the flywheel is blocked 2 Leaks in the tank safety valve 3 The oil level is too low 4 Leaky broken carbonized or loose valves or restricted air ducts 5 Wrong rotation direction SOLUTIONS 1 Clean filter...

Page 18: ... to a TASC 1 Double check feeding line voltage the fuses or correct the motor overload 2 Consult with a qualified electrician 1 Change and use the right type of oil 2 Add oil to the casing up to the right level 3 A more effective filter is needed in the air admission 1 Double check feeding line voltage the fuses or correct the motor overload 2 Consult with a qualified electrician 3 Ask for a motor...

Page 19: ... GUADALAJARA AV ADOLFO B HORN 6800 COL SANTA CRUZ DEL VALLE C P 45655 TLAJOMULCO DE ZUÑIGA JAL TEL 01 33 3606 5285 AL 90 MICHOACÁN FIX FERRETERÍAS AV PASEO DE LA REPÚBLICA 3140 A COL EX HACIENDA DE LA HUERTA C P 58050 MORELIA MICH TEL 01 443 334 6858 MORELOS FIX FERRETERÍAS CAPITÁN ANZURES 95 ESQ JOSÉ PERDIZ COL CENTRO C P 62740 CUAUTLA MOR TEL 01 735 352 8931 NAYARIT HERRAMIENTAS DE TEPIC MAZATLA...

Page 20: ...60 CDMX Mex or at the store where you bought it or at a service center listed in the attached warranty policy and or at www truper com Transportation costs resulting from compliance of this warranty will be covered by For questions or comments call 01 800 690 6990 Imported by Truper S A de C V Made in China Parque Industrial 1 Jilotepec Edo de Méx Méx C P 54240 Warranty policy In the event of any ...

Reviews: