background image

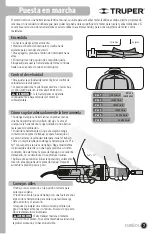
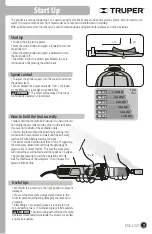
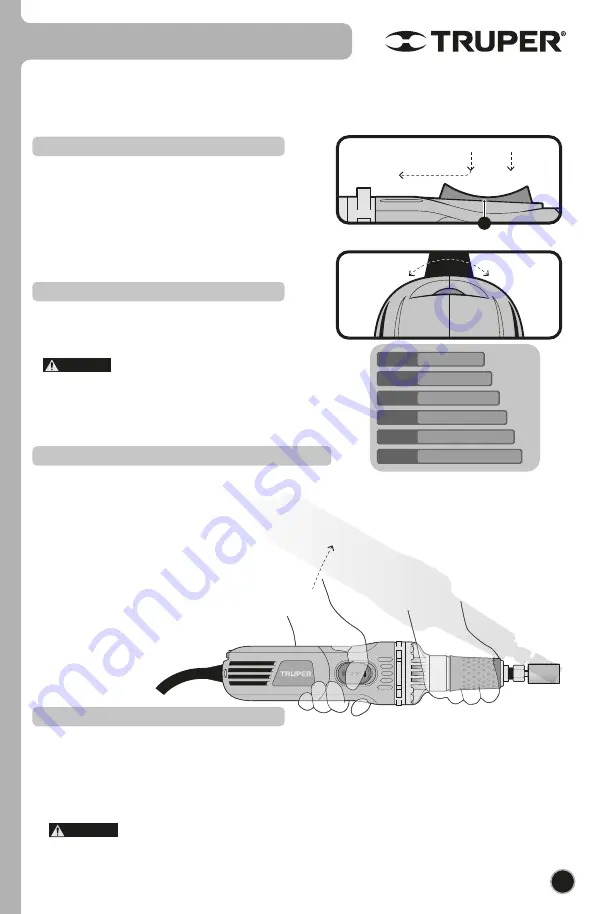
0° to 30°

Speed 1

11 300 RPM

Speed 2

13 300 RPM

Speed 3

16 200 RPM

Speed 4

19 400 RPM

Speed 5

23 000 RPM

Speed 6

30 000 RPM

Speed

chart

7

ENGLISH

Start Up

ON

OFF

How to hold the tool correctly

• Always hold the tool with both hands. One hand should 

be holding the axis collar and the other on the tool body.  

Use care not to obstruct the ventilation slots.

• Turn on the tool without the attachment coming into 

contact with the workpiece and wait until the accessory 

reaches full speed before starting the work.

• For better results hold the tool from 0° to 30° regarding 

the work piece. Move from left to right applying light 

pressure at a constant rhythm. This way the work piece 

will not overheat, will not fade and there will be no edges.

• Apply light pressure to start the operation and only 

touch a small area of the workpiece. Then increase the 

pressure little by little.

Start Up

• Connect the plug to the power.

• Press the switch button and push it forward to turn the 

die grinder on.

• Press the switch button and push it backward to turn 

the die grinder off.

• The switch in the On position gets blocked to use it 

continuously until pressing the switch back.

Speed control 

• To adjust the grinder speed, turn the speed control into 

the desired level.

• Choose between the 6 speeds available:  From 1, the lowest 

(11 300 RPM) up to 6, the highest (30 000 RPM).

                          • The motor will overheat if the tool is 

continuously operated  at low speed.

The grinder is a manual power tool.  It is used to grind metal, bricks, tiles, stone and/or ceramic pieces, with no need to use 

water. It is used to remove burr from metal surfaces. To level and smooth down in welding.

With a different accessory the tool can be used to remove oxide and polish metal surfaces and other materials.

• Work with the accessory in the right position to prevent 

damages.

• Press on the work piece using a weight lower to the 

tool’s to prevent overheating damaging the motor and 

accessory.

• After fitting a new accessory leave it running for one 

minute with no load.  If it vibrates, replace it immediately.


       • Avoid working with soft wood or metal 

like lead.  These materials saturate the accessory very fast 

and make it useless.

Useful tips

CAUTION

A

CAUTION

Summary of Contents for 16871

Page 1: ...uctivo de Lea este instructivo por completo antes de usar la herramienta Esmeril recto Rectificador ESRE 1 4N Modelo C digo ESRE 1 4N Este instructivo es para 16871 Potencia 600 W ATENCI N ESPA OL ENG...

Page 2: ...s Sucursales P liza de Garant a Guarde este instructivo para futuras referencias Los gr ficos de este Instructivo son para referencia pueden variar del aspecto real de la herramienta 3 3 4 5 6 6 7 8 9...

Page 3: ...ientas de doble aislamiento y aislamiento reforzado est n equipadas con una clavija polarizada una pata es m s ancha que la otra Esta clavija cabe en cualquier enchufe polarizado y s lo puede conectar...

Page 4: ...tes de arrancar la herramienta el ctrica Las llaves o herramientas que quedan en las partes rotativas de la herramienta pueden causar un da o personal No sobrepase su campo de acci n Mantenga ambos pi...

Page 5: ...rio ni la pieza de trabajo inmediatamente despu s de esmerilar Espere a que se enfr en para manipularlas No intente enfriarlas con agua o aceite Verifique que la herramienta est desconectada antes de...

Page 6: ...llave gire la boquilla en sentido de las manecillas del reloj D para apretar el accesorio Para aflojar y desmontar el accesorio gire la boquilla en sentido contrario Una vez que el accesorio est inst...

Page 7: ...rruptor Control de velocidad Para ajustar la velocidad del esmeril gire el control de velocidad al nivel deseado Se pueden seleccionar 6 velocidades desde la 1 la m s baja 11 300 r min hasta la 6 la m...

Page 8: ...carcasa no debe estar cuarteada o da ada Siempre revise que el cable no est cortado o pelado Cambio de carbones ESPA OL Los carbones deben revisarse peri dicamente y ser reemplazados siempre por un C...

Page 9: ...9 Notas ESPA OL...

Page 10: ...C V CORREGIDORA No 76 A COL CENTRO C P 06060 CIUDAD DE M XICO TEL 01 55 5522 9976 FAX 01 55 5522 9966 671131 CERRADA PINO SUAREZ No 24 COL ZONA ESCOLAR C P 07230 GUSTAVO A MADERO CIUDAD DE M XICO TEL...

Page 11: ...ACAN AV SEGUNDA DE MORELOS No 303 COL CENTRO TEHUAC N TEL 01 238 384 8640 670402 MOTORES Y HERRAMIENTAS EL CTRICAS AV 6 No 1004 B ESQ CALLE 19 COL LOMAS DE CASA BLANCA C P 76080 QUERETARO QRO TEL Y FA...

Page 12: ...tablecimiento donde adquiri el producto bien en las sucursales TRUPER enlistadas en este instructivo y o manual en su caso SUCURSAL CENTRO FOR NEO AV PARQUE INDUSTRIAL No 1 A JILOTEPEC ESTADO DE M XIC...

Page 13: ...Model Code ESRE 1 4N Applies for 16871 Power 0 8 HP ESRE 1 4N CAUTION ENGLISH ESPA OL Read this manual thoroughly before using the tool Manual Die grinder...

Page 14: ...l To gain the best performance of the tool prolong the duty life make the Warranty valid if necessary and to avoid hazards of fatal injuries please read and understand this Manual before using the too...

Page 15: ...plug cannot be introduced into the outlet reverse the plug If it still doesn t fit call a qualified electrician to install for you a polarized outlet Do not alter the plug in any way Both insulation...

Page 16: ...the ON position may cause accidents Remove any wrench or vice before turning the power tool on Wrenches or vices left attached to rotating parts of the tool may result in personal injury Do not overr...

Page 17: ...tween the accessory and the work surface should have a 0 to 30 angle Do not touch both the accessory and the work piece immediately after grinding Wait for them to cool down to handle Do nit try to co...

Page 18: ...the other wrench turn the nozzle in a clockwise direction D to tighten the accessory To loosen and remove the accessory turn the nozzle counterclockwise Once the accessory is set run the grinder with...

Page 19: ...witch button and push it backward to turn the die grinder off The switch in the On position gets blocked to use it continuously until pressing the switch back Speed control To adjust the grinder speed...

Page 20: ...damage the motor When changing carbons always change both pieces Carbon brush replacement ENGLISH Maintenance Always disconnect the tool before cleaning Never use water or other liquids Use only a bru...

Page 21: ...9 ENGLISH Notes...
Page 22: ...76 A COL CENTRO C P 06060 CIUDAD DE M XICO TEL 01 55 5522 9976 FAX 01 55 5522 9966 671131 CERRADA PINO SUAREZ No 24 COL ZONA ESCOLAR C P 07230 GUSTAVO A MADERO CIUDAD DE M XICO TEL 01 55 2207 0882 67...

Page 23: ...AN AV SEGUNDA DE MORELOS No 303 COL CENTRO TEHUAC N TEL 01 238 384 8640 670402 MOTORES Y HERRAMIENTAS EL CTRICAS AV 6 No 1004 B ESQ CALLE 19 COL LOMAS DE CASA BLANCA C P 76080 QUERETARO QRO TEL Y FAX...

Page 24: ...JA CALIFORNIA C P 22244 CONMUTADOR 01 664 969 5100 SUCURSAL VILLAHERMOSA CALLE HELIO LOTES 1 2 Y 3 MZNA No 1 COL INDUSTRIAL 2A ETAPA VILLAHERMOSA TAB C P 86010 CONMUTADOR 01 993 353 7244 3 YEARS Stamp...

Reviews: