background image

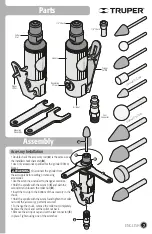
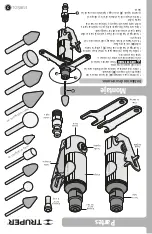
Mounting

Wrenches

Stones with 1

/8” Rod

Stones with 1

/4” Rod

7

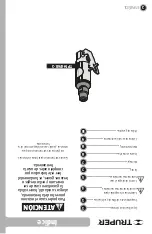
Assembly

Fast

Connector

1/8” Chuck

Trigger

Lever

Regulating

Screw

Air Input

Handle

1/4” Chuck

Collet

Nut

Trigger

Switch

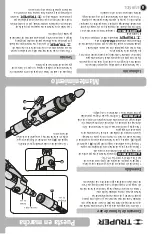
Accesory Installation

• Double check the accessory rod (

A

) is the same size as 

the installed chuck diameter (

B

).

• Use only accessories specified for the grinder RPM or 

bigger.

                            • Disconnect the grinder from 

the air supply before setting or removing 

accessories.

• Use the wrenches included to change accessories.

• Hold the spindle with the wrench (

C

) and with the 

second wrench loosen the collet nut (

D

).

• Insert the rod up to the bottom of the accessory in the 

chuck.

• Hold the spindle with the wrench and tighten the collet 

nut until the accessory y perfectly secured.

• To change the chuck, remove the collet nut completely.  

Replace the chuck and set the collet nut back. 

• Remove the air input cap and set the fast connector (

E

in place. Tighten using one of the wrenches.

WARNING

A

B

E

C

D

Parts

ENGLISH

Summary of Contents for 16887

Page 1: ...nder Kit TPN 876K 2 Code Applies for 16887 Chuck 1 4 Manual Use oil continuously and dosed to lubricate the tool WARNING CAUTION Read this manual thoroughly before using the tool ENGLISH ESPA OL Model...

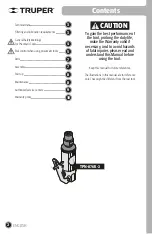
Page 2: ...l prolong the duty life make the Warranty valid if necessary and to avoid hazards of fatal injuries please read and understand this Manual before using the tool ENGLISH Technical data Filtering and lu...

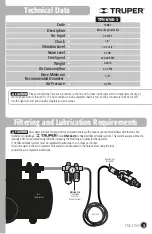
Page 3: ...er minute Drain the water in the air compressor tank and also condensation in the hoses before using the tool Consult the air compressor instructions Filtering and Lubrication Requirements CAUTION Ple...

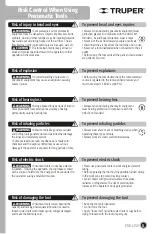
Page 4: ...severe personal injuries or crushing Wear adequate protective safety accessories Wear eye protection dust mask non skid safety shoes helmet and ear plugs In normal conditions the risk of injury is red...

Page 5: ...Pneumatic tools do not have electric insulation If during the operation the tool makes contact with a source of electricity the energy will be conducted to the operator causing a fatal electrocution...

Page 6: ...rp or abrasive edges Unplug the hose when setting up accessories like grinding discs or bits Never use the hose to carry the tool Never pull the hose to unplug it Do not expose the hose to heat oil or...

Page 7: ...e air supply before setting or removing accessories Use the wrenches included to change accessories Hold the spindle with the wrench C and with the second wrench loosen the collet nut D Insert the rod...

Page 8: ...all be carried out every 3 months only in a Authorized Service Center Service and maintenance carried out by not certified people mat y be dangerous and can cause severe personal injuries as well as m...

Page 9: ...O ECLIPSE CALLE PRINCIPAL MZ 1 LT 1 COL SANTA FE C P 39010 CHILPANCINGO GRO TEL 747 478 5793 FERREPRECIOS S A DE C V LIBERTAD ORIENTE 304 LOCAL 30 INTERIOR DE PASAJE ROBLEDO COL CENTRO C P 43600 TULAN...

Page 10: ...in Corregidora 22 Col Centro Alc Cuauht moc CDMX C P 06060 or at the establishment where you purchased it or at any Truper Service Center listed in the annex to the warranty policy and or in www trupe...

Page 11: ...esentar el producto en Corregidora 22 Col Centro Alc Cuauht moc CDMX C P 06060 o en el establecimiento donde lo compr o en alg n Centro de Servicio Truper de los enlistados en el anexo de la p liza de...

Page 12: ...RO DE SERVICIO ECLIPSE CALLE PRINCIPAL MZ 1 LT 1 COL SANTA FE C P 39010 CHILPANCINGO GRO TEL 747 478 5793 FERREPRECIOS S A DE C V LIBERTAD ORIENTE 304 LOCAL 30 INTERIOR DE PASAJE ROBLEDO COL CENTRO C...

Page 13: ...deber engrasar un poco El exceso de grasa puede disminuir la potencia Puesta en marcha Mantenimiento Lubricaci n Servicio Encendido Encienda el compresor de aire y permita que se llene Regule la pres...

Page 14: ...il o mayores Desconecte el esmeril del suministro de aire antes de colocar o retirar los accesorios Utilice las llaves incluidas para cambiar los accesorios Sostenga el husillo con la llave C y afloje...

Page 15: ...ejada se superficies afiladas o abrasivas Desconecte la manguera cuando instale accesorios como discos de esmeril o brocas Nunca use la manguera para cargar la herramienta Nunca jale de la manguera pa...

Page 16: ...eraci n llegan a hacer contacto con alguna fuente de electricidad conducir la energ a al operador provocando electrocuci n incluso fatal Riesgo de choque el ctrico Jam s utilice herramientas neum tica...

Page 17: ...lla antipolvo zapatos de seguridad antideslizantes casco y protecci n para los o dos en condiciones adecuadas reducen considerablemente el riesgo de lesiones Desconecte la manguera de aire de la herra...

Page 18: ...nsiderar el aumento en la presi n de l nea o el di metro interior de la manguera para compensar el uso de mangueras muy largas m s de 8 metros El di metro interior m nimo de la manguera debe ser de 9...

Page 19: ...ados P liza de garant a Guarde este Instructivo para futuras referencias Los gr ficos de este Instructivo son para referencia pueden variar del aspecto real de la herramienta 3 3 4 5 7 7 8 8 9 10 TPN...

Page 20: ...cada para lubricar la herramienta Kit de mini esmeriladora neum tica TPN 876K 2 Modelo TPN 876K 2 C digo 16887 Este Instructivo es para 6 5 mm Broquero 1 4 ADVERTENCIA ATENCI N Lea este Instructivo po...

Reviews: