6
ENGLISH
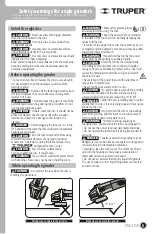
Safety warnings for
angle grinders
KICKBACK (Sharp Recoil)
Kickback (sharp recoil) is a sudden reaction when a
rotating wheel, backrest, brush, or other accessory gets
stuck or snagged. Stalling or snagging causes rapid stalling
of the rotary attachment which in turn causes the power
tool to be forced uncontrollably in the direction opposite
to the rotation of the attachment at the working point.
An abrasive disc jams into the workpiece, the edge of the
contacting disc can be pinched into the surface of the
material causing the disc to stop, creating a kickback
(sudden recoil). The disc may break and the fragments
may jump in the direction of or away from the operator,
depending on the direction of disc movement at the point
of jamming.
Kickback can occur as a result of misuse of power tools
and/or improper operating procedures or conditions and
can be avoided by taking the precautions listed below:
a) Keep a firm grip on the power tool. Maintain your
body and arm so that they can resist the forces of
kickback. Always use the auxiliary handle, if provided,
for maximum control over kickback or the reaction of
the torsional movement of the engine during starting.
The operator can control the torsional movement and the
kickback forces if the appropriate precautions are taken;
b) Never place your hand near the rotating
attachment.
The accessories may kick back in your hand;
c) Do not place your body in the area where the power
tool can move if kickback (sudden recoil) occurs.
This will propel the power tool in the opposite direction of
disc movement at the point of engagement or binding;
d) Take special care when working on corners, sharp
edges, among others. Avoid bouncing and jamming of
the attachment.
When working corners, sharp edges, or bouncing, can
cause the attachment to jam and result in loss of control
of the power tool or kickback (sudden recoil) of the
power tool.
Specific safety for grinding and
cutting operations with abrasives
a) Use only disc types that are recommended for the
specific power tool and the specific tool holder that is
designed for the selected disc.
Discs that are not designed for the power tool cannot be
properly protected and are unsafe;
b) The grinding surface of discs with a sunken center
must be installed below the plane of the guard.
An improperly installed disc may project burrs outside the
plane of the guard and cannot be properly protected;
c) The guard must be securely fastened to the power
tool and positioned to provide maximum safety, so
that the least amount of the blade is exposed to the
operator.
d) Discs should be used only for their recommended
applications. For example: do not grind with the side of
a cut-off wheel.
Abrasive discs are used for perfect grinding. If lateral forces
are applied, they can break;
e) Always use flanges in perfect condition, of the correct
size according to the shape of the selected disk.
A flange with the correct characteristics supports the disc,
which reduces the possibility of disc rupture. The flanges
for cut-off wheels can be different from the flanges for
grinding wheels;
f) Do not use worn out disks from larger or higher
capacity tools
Disks that are designed for larger or higher capacity tools
are not suitable for the increased speed that occurs in the
operation of a smaller size or capacity tool and may
defragment.
Additional safety warnings for
abrasive cutting operations
a) Avoid locking or applying excessive pressure to the
abrasive cut-off wheel. Do not attempt to make an
excessively deep cut.
Applying excessive force to the disc increases the load on
the power tool and the susceptibility to deformation in the
cutting area and increases the possibility of kickback
(sudden recoil) or blade breakage;
b) Do not place your body in line and behind the
rotating disc.
When the disc, at the point of operation, is aligned with
your body, the possibility of a kickback (sudden recoil) can
propel the spinning disc and the power tool directly against
you;
c) When disc operation is interrupted or cutting stops
for any reason, turn off the power tool and keep it
stationary until the disc comes to a complete stop. Do
not attempt to remove the blade while it is in motion, as
this may cause kickback (sudden recoil ) or similar
effect.
Investigate and complete corrective actions to eliminate the
cause of the spin interruption;
d) Do not restart the cutting operation on the
workpiece. Allow the blade to reach maximum speed
off the workpiece and carefully restart cutting.
The abrasive cut-off disc can jam, move upwards or
produce a kickback if cutting is restarted on the workpiece;
e) Support large workpieces on presses or clamping
brackets to reduce the risk of the abrasive cut-off disc
becoming trapped or of kickback (sudden recoil).
Large pieces tend to sink under their own weight. Brackets
should be placed under the workpiece near the cutting line
and near the edge of the workpiece on both sides of the
abrasive cut-off wheel;
f) Be careful when making a "very small cut" in walls or
other blind areas or where there is no visibility of
internal components.
The protruding abrasive cutting disc can cut through gas or
water pipes, electrical wiring, or objects that may cause
kickback (sudden recoil).
WARNING
WARNING
DANGER
Summary of Contents for ESMA-4-1/2A9
Page 10: ...10 ENGLISH Notes...
Page 15: ...10 Notas ESPA OL...

