TRUST 240H EASY WEBSCAN GOLD
7
U K
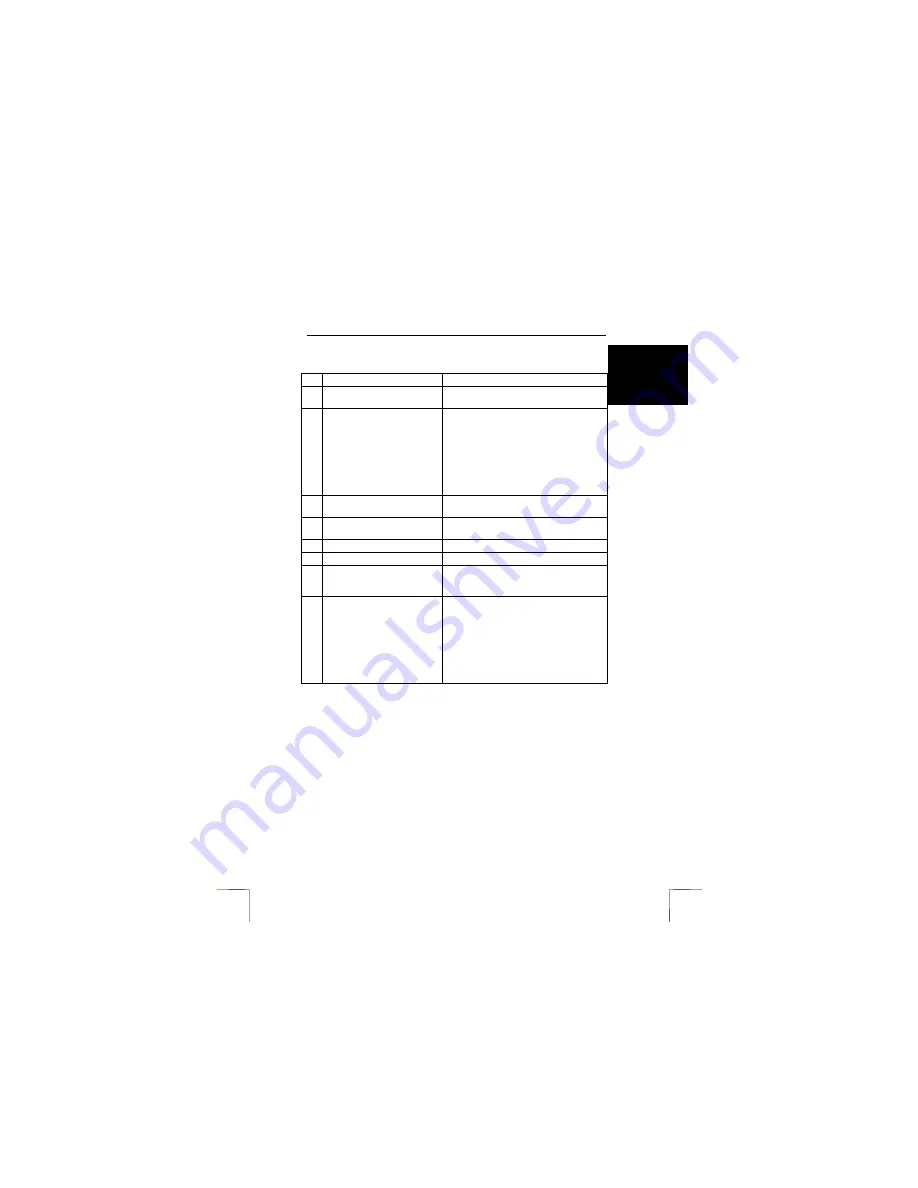
See the table below for a description of the various functions available in the main
TWAIN window:
Function
Description
A
Preview button
(Make a preview of the image)
Makes a preview of the image. This is
displayed in the ‘Preview’ window (F).
B
TWAIN settings
(Adjust the setting if needed)
The TWAIN settings window contains 3
folders. The folders can be selected by
clicking on the tabs using the mouse.
- Easy:
Easy user settings (see chapter
5.2.1.1).
- Advanced:
Advanced user settings (see
chapter 5.2.1.2).
- Monitor:
Calibration of the monitor (see
chapter 5.2.1.3).
C
Scan button
(Scan the image)
Scans the selected area. The settings for
the selected tab (B) are used.
D
Zoom in/out button (Zoom
in/out)
Increases or decreases the size of the
image in the preview window.
E
Exit
Closes the main TWAIN window.
F
Preview window
Shows a preview scan of the image.
G
‘Pixels, Inch, cm’ selection
button
Displays the width and height of the
selected area in pixels, inches or cm in the
information window (H).
H
Information window
Gives information about the selected area.
- Width:
width of the area.
- Height:
height of the area.
- Image size:
file size of the image to be
scanned.
- Disk space needed:
the minimum free
hard disk space necessary to scan the
image. This is approximately three times
the file size of the image to be scanned.
5.2.1.1
Easy user settings
The ‘Easy’ tab is the easiest way to scan a standard image. This tab contains a
number fixed settings. You only have to select what type of image you wish to scan.
All the advanced settings are default settings.
You can also specify where the scanned image must be sent. See the table below
for the possible settings.
Note:
The ‘Easy’ tab and the ‘Advanced’ tab work independently from
each other. When you press the Scan button (C), only the
settings for the selected tab are used.


