background image

TRUST 350FT POWERC@M FLASH

19

UK

F

Mirrors the inserted photograph.

G

Moves the photograph (left, right, up, down).

H

Increases or reduces the size of the photograph.

I

Rotates the photograph clockwise or anticlockwise.

J

Adds text.

K

Zooms in or out.

L

Colour settings (only works for coloured subjects).

Table 5: Photo Fantasy 2000 functions

Note:


The photograph in this example is black-and-white. Depending on the chosen subject, it is also
possible to insert colour photographs.

11.  The subject with the inserted photograph can be saved by clicking on ‘Save As’.

This was a short description of Photo Fantasy. For more information about this program, click on the question
mark in the top-right hand corner of the program’s window.

9.2 

Photo Impression 2000

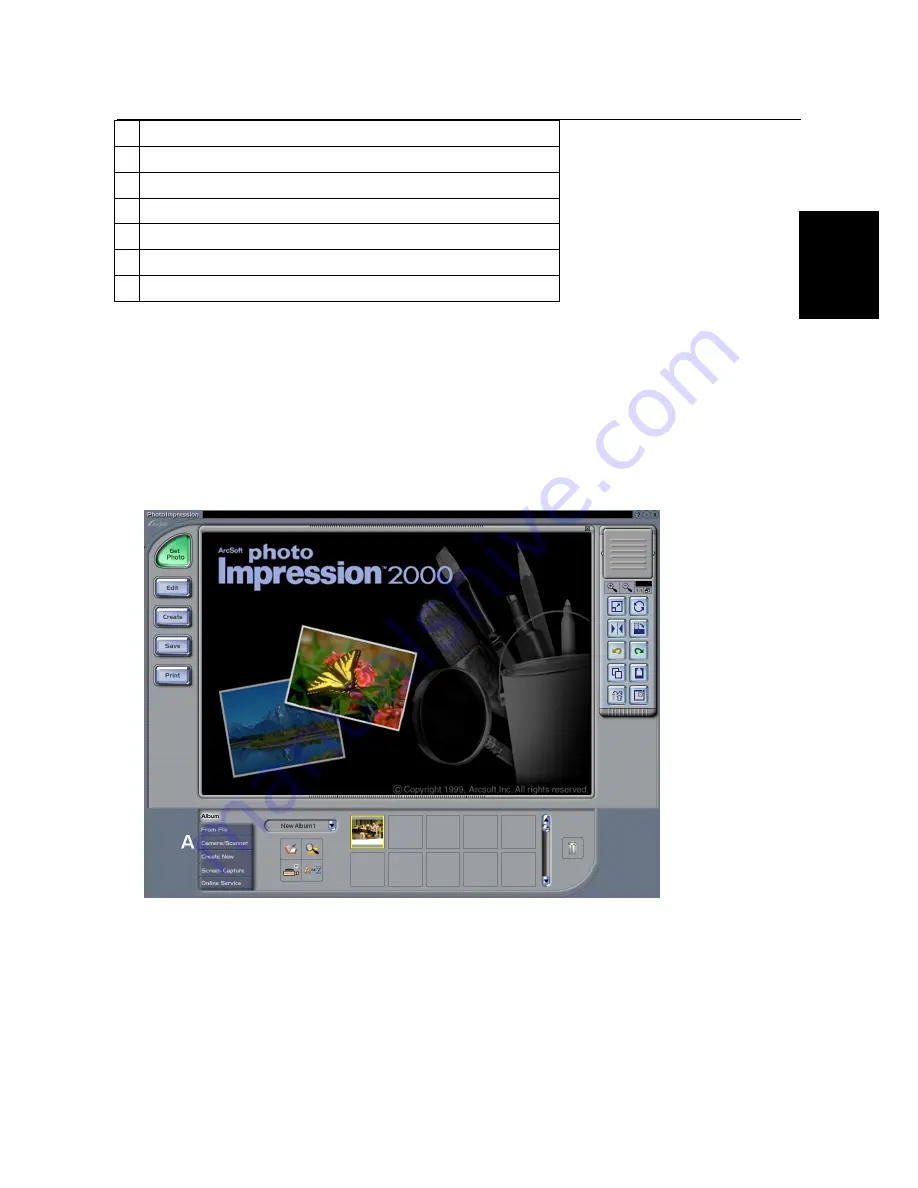
1.  Click on the Photo Impression icon on your Windows desktop. Figure 21 will appear.

Figure 21: Photo Impression 2000

2.  Click on ‘Camera/Scanner’ (

A

). Figure 22 will appear.

Summary of Contents for 350FT

Page 1: ...TRUST 350FT POWERC M FLASH UK UK TRUST 350FT POWERC M FLASH Instruction manual Version 1 0 ...
Page 2: ...ystems for any purpose other than the purchaser s own personal use without prior written permission from the manufacturer Disclaimer statement The manufacturer specifically disclaims all warranties either explicit or implied including but not limited to implied warranties for the marketability and suitability for a particular purpose with respect to the software the accompanying product manual s a...

Page 3: ...us mode 10 5 7 Deleting recordings 10 5 7 1 Deleting the last recording 11 5 7 2 Deleting all the recordings 11 6 Installing the driver 11 6 1 Uninstalling old drivers and devices 11 6 2 Trust Software Installer 12 6 3 Installing the driver in Windows 98 Windows ME Windows 2000 Windows XP 12 7 Installing the software 13 7 1 Photo Fantasy 2000 13 8 Connecting and checking 15 8 1 Connecting 15 8 2 C...

Page 4: ...TRUST 350FT POWERC M FLASH 2 11 Troubleshooting 26 12 Specifications 28 13 Trust Customer Care Centers 29 ...

Page 5: ...ollows Note If you connect the Trust 350FT PowerC m Flash to a USB HUB then this USB HUB should have its own power supply The examples assume that the letter D has been assigned to your CD ROM drive If your system uses a different letter for your CD ROM drive for example E you should replace D by E 1 2 Contents of the box Check the contents of the box before reading the instruction manual It shoul...

Page 6: ...ration with regard to the life span of the batteries The flash shortens the life span of the batteries Better quality batteries such as Duracell Ultra are often more effective in the long run and work for a much longer period of time Rechargeable batteries are also useful if the camera is used a lot Only use NiMH batteries preferably at least 1 800 mA the maximum power can vary per battery type an...

Page 7: ...ert the two AA batteries as shown in figure 1 The position is also shown on the inside of the battery flap Note Inserting the batteries incorrectly may cause damage to the camera The warranty will then no longer be valid Note The camera will make a noise when the battery voltage becomes too low 3 Close the battery flap again by gently pushing it and sliding it upwards 4 The Trust 350FT PowerC m Fl...

Page 8: ...age to be taken 7 ON OFF button Turns the camera on and off 8 Select button Sets the new settings resolution flash automatic exposure etc 9 LCD screen Displays the life span of the battery the number of photographs the photograph number and the photograph quality 10 MACRO button For setting the distance to the object to be photographed 90 cm infinity 25 cm 30 cm 11 USB connection Connection for th...

Page 9: ...side default setting Outside sunny Inside clear 17 Setting for making recordings in certain surroundings Inside dark 18 Memory Appears when the camera s memory is full 19 Flash mode Automatic If this is not shown on the LCD screen then the flash is turned off 20 Delete recordings ALL Deletes all the recordings from the camera s memory LST Deletes the last recording from the camera s memory 21 Auto...

Page 10: ...hen have to select the low resolution as described in chapter 5 1 5 2 Setting the recording surroundings The Trust 350FT PowerC m Flash can be adjusted to suit the conditions of the surroundings The table below gives the four different possibilities which can be selected The default setting when the camera is turned on is the first resolution Outside default setting Outside sunny Inside clear Insi...

Page 11: ...tarts to flash on the LCD screen 9 A beep will be heard each time the MODE button is pressed 3 Once the desired setting has been found press the SELECT button 8 until two beeps are heard The camera has now been set to the desired flash setting Note When the camera is turned off either by using the ON OFF button or when it turns off automatically the flash will return to the OFF position when the c...

Page 12: ...n off again Press the MODE button 2 a number of times until starts to flash on the LCD screen 9 Once the desired setting has been found press the SELECT button 8 until two beeps are heard The automatic exposure function has now been turned off 5 6 Continuous mode Note The video function only works in the low CIF resolution The TRUST 350FT POWERC M can be used to take a number of photographs one af...

Page 13: ...nly works with this driver on a system using Windows 98 or later versions This camera does not work on an Apple Mac with OS 8 9 and Mac OSX Note The latest driver can be downloaded from www trust com 11336 Check whether a new driver is available and use this for the installation Note Make sure all other programs are closed during the installation Note During installation in Windows XP you may rece...

Page 14: ...ROM Figure 4 will appear The Trust Software Installer will appear in Windows 98 Windows ME Windows 2000 and Windows XP Figure 4 Trust Software Installer 6 3 Installing the driver in Windows 98 Windows ME Windows 2000 Windows XP 1 Click on 350FT POWERC M FLASH to start the installation Figure 5 will appear Figure 5 Installation in Windows 98 Windows ME Windows 2000 Windows XP 2 Click on Next to sta...

Page 15: ...all the other software See chapter 7 for instructions on how to install the other software 7 Installing the software The software programs provided with the camera Photo Fantasy 2000 Photo Impression 2000 Photo Montage 2000 and Video Impression 1 6 are all installed in exactly the same way We have used the installation of Photo Fantasy as an example 7 1 Photo Fantasy 2000 1 Click on Photo Fantasy ...

Page 16: ...agreement and continue with the installation Figure 10 will appear Figure 10 Installing Photo Fantasy 2000 4 Click on Next to continue Figure 11 will appear Figure 11 Installing Photo Fantasy 2000 5 Click on Next to continue with the installation Figure 12 will appear at the end of the installation process ...

Page 17: ...t your system may display a message saying that the driver has not been signed You can ignore this message because it does not affect the functionality of the driver It only means that the driver had not yet been fully certified by Microsoft at the time this instruction manual was written Click on Yes to continue with the installation Note When the camera is connected to the USB port in Windows XP...

Page 18: ...ations have been selected Note Deviations may also occur as a result of using new drivers available on the Internet Note The location or name may vary in the Control Panel for different operating systems 9 Using the software and downloading recordings 9 1 Photo Fantasy 2000 Photo Fantasy 1 Click on the Photo Fantasy icon on your Windows desktop Figure 13 will appear Figure 13 Photo Fantasy 2000 2 ...

Page 19: ...ill appear Figure 15 Photo Fantasy 2000 4 Click on Get Photo D to add a photograph Figure 16 will appear Figure 16 Photo Fantasy 2000 5 Here you will see a number of example photographs which you can insert To insert photographs from the camera s memory click on Acquire E Figure 17 will appear Figure 17 Selecting a camera 6 Select 350FT PowerC m Flash and click on Select Figure 18 will appear ...

Page 20: ...ear Figure 19 Loading photographs 8 The selected photograph will now be visible in the row of Sample Photos see figure 16 9 Click on OK Figure 20 will appear Figure 20 Photo Fantasy 2000 10 The photograph has now been inserted in the selected subject in point 3 If desired this photograph can be reduced in size mirrored or moved see the table below ...

Page 21: ...n this example is black and white Depending on the chosen subject it is also possible to insert colour photographs 11 The subject with the inserted photograph can be saved by clicking on Save As This was a short description of Photo Fantasy For more information about this program click on the question mark in the top right hand corner of the program s window 9 2 Photo Impression 2000 1 Click on th...

Page 22: ...se C TWAIN settings Settings for saving recordings D TWAIN window Displays the camera s memory E Video function For recording live video images Table 6 Photo Impression 2000 functions 3 Select 350FT PowerC m Flash for B see figure 22 4 Click on the Camera Scanner icon D The TWAIN window will now be opened see figure 23 ...

Page 23: ...click on the diskette icon in the bottom left hand corner of the TWAIN window You can now save the photograph in the desired format JPG or BMP in a location of your choice 6 If you wish to transfer a recording to Photo Impression 2000 double click on the desired recording Figure 24 Loading a recording 7 Click on Standard The photograph will now appear in one of the photograph boxes see figure 22 8...

Page 24: ... resolution than the available image sensor resolution This higher resolution is called picture resolution The photograph is made sharper as a result of a complex graphic calculation The highest attainable resolution is therefore always higher than the sensor resolution To load photographs in the picture resolution click on Large instead of Standard in figure 24 The photographs will now be loaded ...

Page 25: ...TRUST 350FT POWERC M FLASH 23 UK Figure 26 Video Impression 1 6 2 Click on the New icon A Figure 27 will appear Figure 27 Video Impression 1 6 3 Click on the acquire icon B Figure 28 will appear ...

Page 26: ...lor Space Compression select the RGB 24 format 7 If desired select the image format for Output Size 8 Click on Apply and then on OK to save the new settings Figure 28 will appear again 9 Click on button E to view a live video image The live video image will be visible in window I 10 Click on button F to start recording a video 11 To stop recording a video click on button H or the Esc button on you...

Page 27: ...ge allows you to make masterpieces from your digital photographs by using digital technology Start by selecting a photograph for example a portrait photograph See this program s detailed Help function for instructions on how to use this program This can be viewed after starting the program by clicking on the question mark in the top right hand corner of the program s window see HELP in figure 30 F...

Page 28: ...ll Ultra batteries are recommended The camera does not react although the batteries are full There is a fault with the camera Remove the batteries from the camera for at least 1 minute to reset the camera Reinsert the batteries into the camera The camera should now work The power in the batteries is low Replace the batteries see chapter 3 Duracell Ultra batteries are recommended NiCd or NiMH batte...

Page 29: ... product information Table 7 Troubleshooting Check the FAQ s on the Internet www trust com You can also register your product at www trust com so that you can receive optimal guarantee and service support You will be automatically informed of developments to your product and other Trust products You will also have the chance of winning some spectacular prizes If you still have problems after tryin...

Page 30: ...ts High resolution 60 Max number of photos Low resolution 190 Memory 8 MB Memory type Flash memory Extendable memory No Webcam speed 7 fps VGA 15 fps CIF Connection USB port Flash Yes TWAIN interface Yes Windows support Windows 98 Windows ME Windows 2000 Windows XP MacIntosh support No Power Two AA alkaline batteries Max number of photos 900 with flash 1 200 without flash Acoustic signal when the ...

Page 31: ...tschlands Mo Fr 9 00 17 00 Deutsche Geschäftsstelle Telefon 0800 00TRUST 0800 0087878 Fax 31 0 78 6543299 Los habitantes de España pueden ponerse en contacto con lun viernes De las 9 00 a las 17 00 horas Oficina española Teléfono 34 0 902 160937 Fax 31 0 78 6543299 Siedziebę w Polsce powinno skąntaktować się Od pon do pią w godz 09 00 17 00 biuro Polsce Tel 48 0 22 8739812 Fax 31 0 78 6543299 Inwo...

Reviews: