742AV USB2.0 LCD POWER VIDEO
5
U K
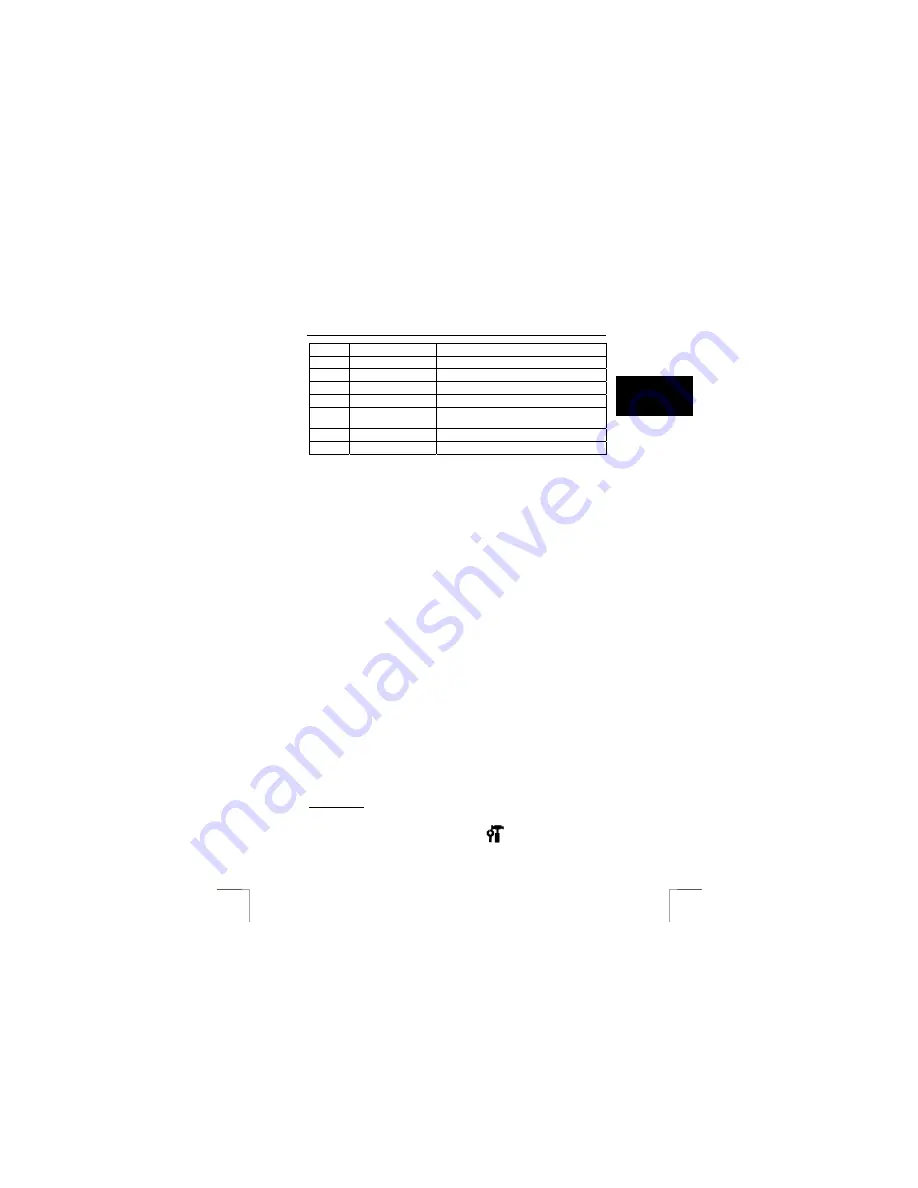
Item
Description Function
20
A/V out connector
Connector for A/V cable (see chapter 10.5)
21
Earphone connector
Connector for earphone
22
USB connector
Connector for USB cable
23
Strap hook (2)
Attach wrist strap here (see chapter 5.1)
24
Speaker
When playing a video clip or audio file the
sound can be heard from this part.
25
Mode dial pointer
Indicator for mode dial
26
Tripod socket
Socket for tripod stand
Table 1: Description of the camera
5
Setting the camera for the first time
5.1
Attach the wrist strap
A wrist strap is supplied with the camera. Carry out the following to attach it to the
camera.
1.
Unfasten and separate the strap into two parts (fig. 2).
2.
Thread one part of the strap into the hook at the backside of the camera (10,
fig. 1).
3.
Thread the other part of the strap into the hook at the front of the camera (23,
fig. 1)
4.
Fasten the wrist strap as indicated in fig. 3. Moving the ring on the strap to the
right will tighten the strap and vice versa. Use the leather wrap to hold the strap.
5.
Hold the camera as shown in fig. 4
5.2 Insert
batteries
To install the batteries see step 1 of the Quick Installation Guide.
5.3 Turning
the camera on
See step 2 of the Quick Installation Guide.
Note:
The LCD screen will turn to black after 1 - 5 minutes of inactivity
depending on the auto-off setting (see chapter 10.2).
5.4
Setting the date and time
When you transfer a photo or video clip to a computer, the date and time will be show
when it was taken. When using the camera for the first time the date and time has to
be set.
To set the date:
1.
Turn on the camera (see step 2 of the quick installation guide)
2.
Set the Mode dial (2, fig. 1) to settings mode.
Settings menu will appear
(fig. 5).


