background image


5.  When you are changing the track allow some overlap 

with the cleaned area. In case of large halls take a U-
turn and move forward. If quick drying is required, 
move on the same track, without discharging the liquid 
(Fig-v) 

6.  Clean the blades and push the tank into its place. 
 

WARNING-

 Pre-sweep the floor to remove debris before 

using the Multiwash. 

WARNING-

 Avoid touching the sharp 

edge of dirty water tank, it may cause injury to hands. 


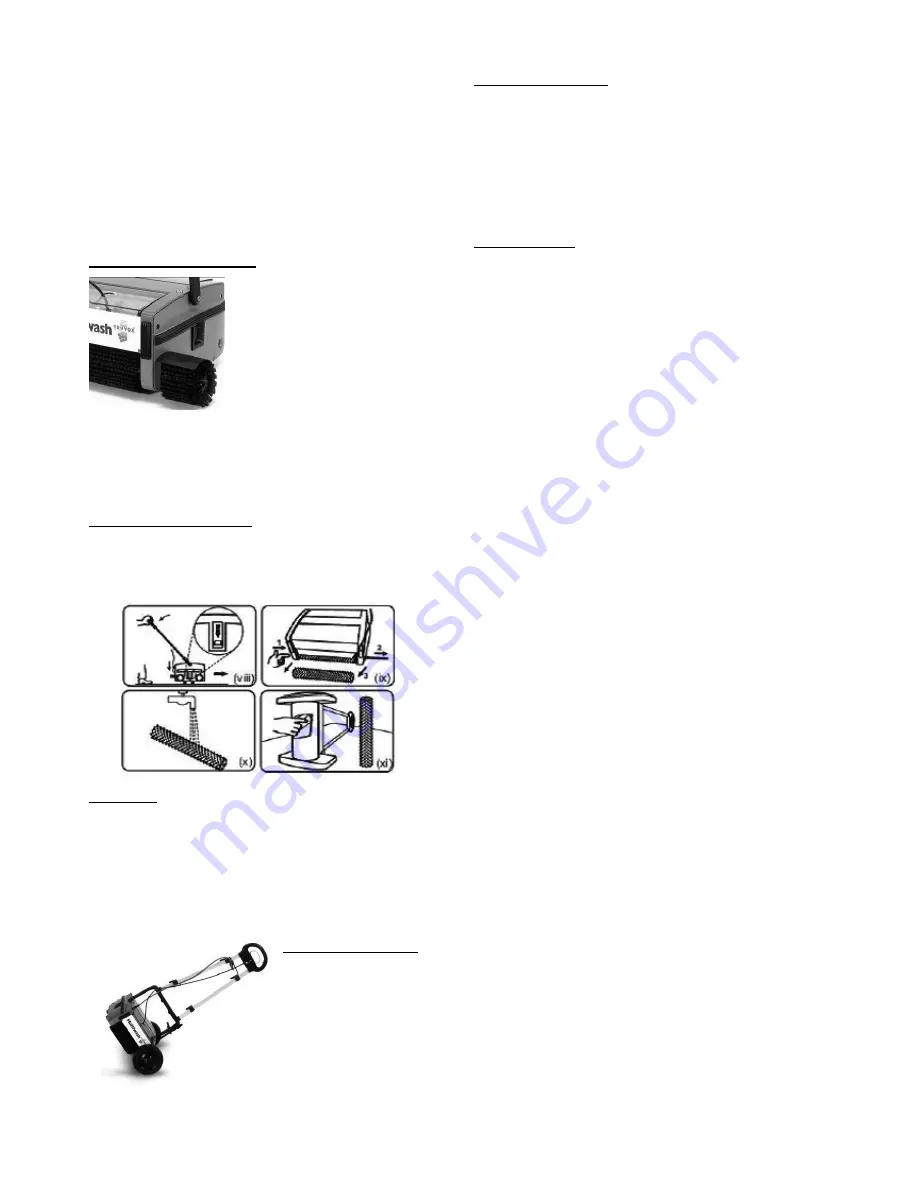
4.3 Fitting the side brush 

To clean up to walls, the side 
brush can be used. Switch off and 
unplug the machine before fitting 
the side brush. 
 

WARNING

 - Do not use side 

brush in a room with no wall 
skirting, otherwise, the wall may 
get dirty. 

 
1.  Remove the front brush and brush shaft. 
2.  Fix the shield assembly on the side plate.  
3. Insert the side brush through the shield and main 

brush. 

 
4.4 Using the side brush 

1.  Tilt the machine at an angle move forward. This way, 

the dirty water thrown by the side brush will be 
collected by the rear brush. 

2.  Use side brush only for washing the edges. 


5. Storage 

 Always switch off, empty, wipe down and dry the 

machine after use. 

 The tank should be emptied and flushed out with clean 

water. 

 Wrap the supply cord around the cable winder ensuring 

that the plug is not trailing on the floor. 

  Store the machine in a dry indoor area only. 


5.1 Transport trolley


The simply fitted trolley 
provides for ease of 
movement when 
transporting the machine. 

WARNING 

- Empty all 

liquid from the machine 
before using the


transporter. 

5.2 Using the trolley 

1.  With the machine handle in the upright position place 

the trolley centrally alongside the machine. 

2.  By holding the machine firmly, strap the Velcro with the 

machine to fix the transporter. 

3. Ensure that the Velcro strap is securely wrapped 

around the bottom handle. 

4.  Now the trolley is ready to use. The machine can then 

be manoeuvred easily whilst holding the top handle. 

 
6. Maintenance 
WARNING -

 Before undertaking maintenance operations 

or adjustments switch off machine and unplug from the 
electricity supply. 

IMPORTANT –

 All other servicing and 

repairs should only be performed by a Truvox engineer or 
Authorised Service Agent. 

IMPORTANT –

 Should the 

machine fail to operate please refer to the fault diagnosis 
section in the back of this instruction manual. If the 
problem / remedy is not listed please contact Truvox 
Customer Service Department for rapid attention. 


The machine requires minimum maintenance apart from 
the following checks by the operator prior to use:


DO NOT

 use aggressive detergents, acid, lye etc. 

during cleaning and washing and take particular care 
with electrical parts. 

 Supply cord - Regularly inspect sheath, plug and cord 

anchorage for damage or loose connection. Only 
replace the supply cord with the type specified in these 
instructions. 

 Brushes - For maximum life, wash the brushes 

regularly. Ensure machine is in Transport mode when 
not in use. Store additional brushes in a vertical position 
to avoid bending of bristles. Check for permanent 
bending of bristles in a particular direction. This may 
occur if the machine is operated for several days without 
removing the brushes, which is not recommended. If 
this occurs, reverse the brush so that the bent bristles 
are automatically straightened. 

 Wiper Blade - After years of use the wiper blade may 

wear. If this occurs the water collection performance will 
decrease. It should be replaced by an authorised 
service agent. 

 Solution tank filter (Standard) - The filter prevents 

clogging of the drip holes in the tank. Periodically clean 
the filter to ensure uniform discharge of liquid. In case of 
non-uniform discharge from the drip holes, back flush 
the tank in running


water. Clean the drip holes using 

wire or a blunt pin. 

 Solution feed filter (Pump) - The filter prevents clogging 

of the spray nozzle and should be periodically cleaned. 
Use pressurised air/water for cleaning. 

 Nozzle maintenance (Pump)


- If the spray of the nozzle 

becomes blocked, slide the nozzle cover off and remove 
nozzle wash in clean water and clean using a pin and 
refit. 


Summary of Contents for Multiwash 240

Page 1: ...USER MANUAL EN 2 BEDIENUNGSANLEITUNG DE 10 MANUEL D UTILISATION FR 20 MANUAL DEL USUARIO ES 29 03 5977 0000 05 12 V 1 www truvox com...

Page 2: ...1...

Page 3: ...distance of 1 meter from machine and 1 6 metres above floor when washing a hard floor Measurements recorded using a hand held meter Handle vibration does not exceed 2 5 m s when operating on a smooth...

Page 4: ...of stairs to avoid overbalancing Only use the machine on firm level surfaces DO NOT use on a gradient or more than 2 slopes DO NOT operate this machine on rough uneven surfaces e g industrial concrete...

Page 5: ...ay result in personal injury We advise that the manual handling regulations are followed Please refer to the technical table for details on weight of machine The machine can be moved to the area to be...

Page 6: ...e machine is now ready for use 2 4 Working principle 1 Cleaning liquid in the solution tank is applied to the floor by either gravity Standard or Spray Pump 2 The counter rotating brushes scrub the fl...

Page 7: ...y and continue working IMPORTANT Should the machine fail to operate contact the supplier from whom you purchased the machine 4 Operation 4 1 Checks before use Ensure that the brushes are fitted proper...

Page 8: ...re undertaking maintenance operations or adjustments switch off machine and unplug from the electricity supply IMPORTANT All other servicing and repairs should only be performed by a Truvox engineer o...

Page 9: ...all be liable for any incidental or consequential loss 4 This guarantee is governed by the laws of England 5 This guarantee does not cover any of the following Periodic maintenance and repair or repla...

Page 10: ...er or faulty valve in solution tank Faulty pump micro switches Damaged or broken pull cable Clean jet or inline filter Machine only sprays when handle in upright position Loose lower handle bolts Tigh...

Page 11: ...Metern ber dem Boden beim Reinigen von Hartboden gemessen Die Messungen wurden mit einem Handmessger t durchgef hrt Die Griffvibration bersteigt 2 5 m s im Betrieb auf einer ebenen harten Fl che nich...

Page 12: ...Anleitung ausgepackt und montiert werden Verwenden Sie das Ger t NICHT in R umen mit gef hrlichem Staub Verwenden Sie das Ger t NICHT in explosionsf higen Atmosph ren Starten oder verwenden Sie das Ge...

Page 13: ...ge Zubeh r auszuw hlen Benutzer m ssen k rperlich dazu in der Lage sein die Maschinen zu steuern zu transportieren und zu bedienen Benutzer m ssen dazu in der Lage sein ungew hnliches Maschinenverhalt...

Page 14: ...ie es im Uhrzeigersinn um das Bandende am Frischwassertank Standard zu befestigen 5 Montieren Sie den Zusatztank am unteren Griff w hrend Sie den oberen Griff festhalten 6 Drehen Sie den Knopf um den...

Page 15: ...inten ziehen ohne das Pedal zu treten wird die Maschine abgesenkt und die B rsten werden auf den Boden gesetzt Stellen Sie den Griff in die vertikale Position um die Maschine abzuschalten Steuerung Tr...

Page 16: ...nd die H ufigkeit der Bet tigung muss entsprechend der Art des Bodens dem Verschmutzungsgrad usw angepasst werden Tragen Sie auf Fliesen und Steinb den nur sehr wenig Wasser auf Das Spr hbild des Mult...

Page 17: ...ungs und Reparatur ma nahmen sollten nur von einem Truvox Kunden dienstmitarbeiter oder einem autorisierten War tungstechniker durchgef hrt werden WICHTIG Sollte an der Maschine eine Funktionsst rung...

Page 18: ...nach eigenem Ermessen und f r den K ufer kostenlos alle fehlerhaften Teile gem folgenden Bedingungen GARANTIEBEDINGUNGEN 1 Anspr che gem diesen Garantiebedingungen m ssen mit der Originalrechnung dem...

Page 19: ...k Mosaik Holz profilierte Gummib den Vinyl PVC Unterhaltsreinigung kurzfloriger Teppichboden Marmor Granit Seitenb rste schwarz 1 erforderlich 90 0134 0000 90 0132 0000 90 0132 0000 90 0385 0000 Zur R...

Page 20: ...Filter oder defektes Ventil im Laugentank Mikroschalter der Pumpe defekt Zugband besch digt oder defekt D se oder Inline Filter reinigen Maschine spr ht nur wenn der Griff aufrecht steht Untere Griff...

Page 21: ...veaux sonores sont mesur s une distance d 1 m tre par rapport la machine et de 1 6 m tres au dessus du sol pendant le lavage d un rev tement dur Les mesures sont enregistr es par un appareil portatif...

Page 22: ...incandescent tel que des cigarettes des allumettes des cendres ou d autres objets combustibles Veillez ce que la machine ne bascule pas si vous l utilisez proximit d escaliers Utilisez la machine sur...

Page 23: ...pour garder l quilibre vitez de vous tourner plus de 45 degr s Portez des chaussures appropri es pour viter de glisser Portez des v tements appropri s pour rester sec et chaud Quand cela est possible...

Page 24: ...s le c t de la machine Pour retirer les brosses poussez l arbre de la brosse depuis l ext rieur de la machine avec les doigts et retirez l arbre La machine est g n ralement livr e avec la brosse stand...

Page 25: ...t install dans le r servoir d eau fra che Appuyez et tournez dans le sens des aiguilles d une montre pour fixer l extr mit du c ble De m me appuyez et tournez dans le sens inverse des aiguilles d une...

Page 26: ...tra ner la fiche sur le sol Gardez la machine dans un endroit sec 5 1 Chariot de transport Le chariot facilite les mouvements lors du transport de la machine AVERTISSEMENT vidangez compl tement la mac...

Page 27: ...ntrepris par un personnel qualifi Des r parations incorrectes peuvent tre dangereuses pour l utilisateur 8 Garantie Votre produit est garanti pendant un an compter de la date d achat ou de location ba...

Page 28: ...ramique en mosa que en bois en caoutchouc profil en vinyle en PVC entretien tapis poils courts marbre granit Brosse lat rale noire 1 obligatoire 90 0134 0000 90 0132 0000 90 0132 0000 90 0385 0000 Pou...

Page 29: ...olution d fectueux Microrupteurs de la pompe d fectueux C ble d t rior ou cass Nettoyez le jet ou le filtre en ligne La vaporisation est possible uniquement lorsque le manche est en position verticale...

Page 30: ...a 1 a o Niveles ac sticos medidos a una distancia de 1 metro desde la m quina y a 1 6 metros sobre el suelo al lavar un suelo duro Mediciones registradas utilizando un medidor port til La vibraci n de...

Page 31: ...reste atenci n al utilizar la m quina cerca de la parte superior de unas escaleras para evitar perder el equilibrio Utilice la m quina nicamente sobre superficies firmes y niveladas NO utilice la m qu...

Page 32: ...tenerse seco y abrigado Cuando sea posible ponga en pr ctica turnos de trabajo y periodos de descanso adecuados para evitar el uso continuado de los mismos m sculos NO fume mientras est utilizando la...

Page 33: ...ina Para retirar los cepillos empuje el eje del cepillo hacia fuera desde el lateral de la m quina utilizando los dedos y saque el eje Normalmente el cepillo est ndar se suministra con la m quina Los...

Page 34: ...remo del cable Igualmente Apriete y gire en el sentido contrario de las agujas del reloj para desconectar el extremo del cable Protector de sobrecarga de motor En caso de que se produzca una sobrecarg...

Page 35: ...de la m quina antes de usar el transportador 5 2 Utilizaci n del carrito 1 Con el manillar de la m quina en posici n vertical coloque el carrito centrado a lo largo de la m quina 2 Sujetando la m qui...

Page 36: ...e la fecha de compra original o compra a plazos contra defectos en materiales o mano de obra durante su fabricaci n Durante el periodo de garant a nos comprometemos a nuestra discreci n a reparar o su...

Page 37: ...ra goma perfilada vinilo PVC limpieza de mantenimiento moqueta de pelo corto granito de m rmol Cepillo lateral negro se necesita 1 90 0134 0000 90 0132 0000 90 0132 0000 90 0385 0000 Para una limpieza...

Page 38: ...rointerruptores de la bomba defectuosos Cable de tracci n da ado o roto Limpie el chorro o el filtro horizontal La m quina nicamente pulveriza la soluci n cuando el manillar se encuentra en posici n v...

Page 39: ......

Page 40: ...Authorised dealer...

Reviews: