background image

19


SC2402


Operations

 ‐ 

Settings


Weld


Counter


and


Weld


Counter


Reset


The


SC2402


is


equipped


with


different


counters


to


display


the


number


of


times


the


unit


has


drawn


an


arc


or


the


stud


gun


has


been


actuated.


Perpetual


Weld


Counter


(Non

resettable)


‐ 

This


is


a


running


total


of


every


time


an


arc


is


drawn


on


the


machine.


This


is


programmed


from


the


factory


and


can


not


be


reset.


Perpetual


Gun


Counter


(Non

resettable)


‐  

This


is


a


running


total


of


every


time


the


stud


gun


is


actuated


whether


an


arc


was


drawn


or


not.


Job


Counter


(Resettable)

 ‐  

This


is


a


running


total


of


the


number


of


welds


since


the


counter


was


last


reset.


To


view


the


job


counter,


set


the


Fine/Coarse


Switch


to


the


Fine


position.


Each


weld


will


be


recorded


on


the


Current


digital


display.


If


the


switch


is


in


the


Coarse


position,


the


weld


will


still


be


counted,


but


will


not


be


displayed.


You


can


also


view


the


Job


Counter


total


by


depressing


the


Adjustment


Dial


while


the


switch


is


in


the


Coarse


position.


To


Reset


the


Job


Counter;


1.


Turn


off


unit.


2.


Depress


and


hold


down


Time


and


Current


buttons.


3.


Turn


on


machine.


4.


Keep


holding


down


buttons


until


OUTPUT


light


flashes


then


release


the


buttons.


5.


Job


Counter


will


now


be


set


at


0.


6.


Weld


count


will


now


register


on


Current


digital


display.


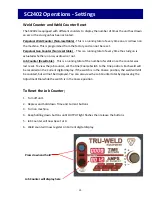
Job


Counter


will


display


here


Press


down


and


hold


Summary of Contents for TWE - SC2402

Page 1: ...m http truweldstudwelding com Operations Manual The SC2402 is a fully integrated stud welding system with two digital con trols for time and current The system was designed to meet the most challenging stud welding jobs to include weld thru deck applications TWE SC2402 Heavy Duty Stud Welding System Version 3 0 08 14 2013 ...

Page 2: ...ch has been modified Equipment which has not been installed properly Equipment which has been used for purposes other than which it had been designed Equipment which has not been properly maintained Equipment which was continued to be used after a defect had been found Equipment which was damaged in any way Truweld Equipment will never be liable for consequential damages loss or expense occurring ...

Page 3: ...ns 11 6 4 SC2402 Setup and Installation Control Cable Connections 12 7 0 SC2402 Operations Stud Gun Setup 7 1 Stud Gun Setup Initial Steps 13 7 2 Stud Gun Setup Lift Adjustment 14 7 3 Stud Gun Setup Plunge Adjustment 15 7 4 Stud Gun Setup Cable Connections 16 8 0 SC2402 Operations Settings 8 1 SC2402 Operations Unit Power Diagnostic Lights 17 8 2 SC2402 Operations Setting Time and Current 18 8 3 S...

Page 4: ... improvement Our long standing relationship with our customers and suppliers is our key to contin ued success and growth If we can be of any further assistance to you and your company please do not hesitate to contact us Product Information The SC2402 is a fully integrated stud welding system with two digital controls for time and current The system was designed to meet the most challenging stud w...

Page 5: ... designed and built with operator safety in mind but safety begins with you Every effort has been made to protect the trained operator from injury Please become familiar with the information in this manual to minimize the risk of shock or injury STUD WELDING CAN BE HAZARDOUS ALWAYS PROTECT YOURSELF AND OTHERS FROM POSSIBLE INJURY OR DEATH KEEP CHILDREN AWAY Operators who have a pacemaker should co...

Page 6: ...ine before moving a welding power source Always be sure the work cable makes a good electrical connection with the metal being welded The connection should be as close as possible to the area being welded Turn OFF welding power source before servicing unless the procedure specifically requires an energized unit Never touch the energized stud or gun before discharging the stud to ground Never use t...

Page 7: ...o the area being welded Keep welding power source and cables as far away from your body as possible Electromagnetic fields can irrevocable erase magnetic data carriers computer memory credit cards security ID cards or data storage diskettes Electromagnetic fields may magnetize and damage watches or similar digital devices PROTECT YOURSELF and OTHERS Some welding cutting and gouging processes are n...

Page 8: ...Counter that can be reset for every job or project On Demand Fan that cycles on and off when needed Weld Range 1 4 to 1 1 4 Consistent welding regardless of stud diameter Duty Cycle 1 4 thru 5 8 3 4 7 8 1 Unlimited 18 to 24 per minute 12 to 14 per minute 6 to 8 per minute Dimensions Height Width Length Weight 28 736 6mm 29 711 2mm 36 914 4mm 760 Lbs 345kg Input Voltages 380 400 VAC 3 Phase 50Hz Fu...

Page 9: ...king materials that may obstruct airflow through the welder If the equipment is not being installed immediately store it in a clean dry well ventilated area until in stallation Selecting a Location The location of the power source should be carefully selected to ensure satisfactory and depend able service Choose a location relatively close to a properly fused source of electrical power Use care ag...

Page 10: ...rough the Power Inlet Hole in the top left corner on the backside of the welder Connect the power leads Black White Red to the L1 L2 and L3 connectors as shown in Fig ure 1 Firmly tighten screws that hold the power leads in place Attach the ground wire Green to side bracket of welder as shown in Figure 1 Once the Primary Power Cable is connected tighten Power Cable Clamp on the back of the welder ...

Page 11: ...tions located in the front of the welder lift access panel Tighten ground cable to welder and secure other end to work surface using the Heavy Duty C Clamp see Figure 2 Ground Cable Lug to welder Ground Cable C Clamp to work surface Figure 2 Ground Cable Access Panel Ground connections Figure 1 Front of SC2402 ...

Page 12: ...elder Plug Control Cable plug into port on bottom front of welder lift access panel The Control Cable has a male 4 pole connector on one end that plugs into the port After the cables are connected to the welder it is time to configure your weld gun for its specific job Once the gun is configured and set up properly the gun cables will connect to the weld cables For the SC2402 the weld cable ends t...

Page 13: ...e stud to be welded After all of the proper accessories have been mounted on the stud gun place the stud in the chuck and begin the alignment of the accessories Make certain that a sufficient amount of the stud is inserted in the chuck so that the stud is held firmly Attach the ferrule to the ferrule grip Plunge setting move the leg foot and ferrule assembly so that the stud protrudes beyond the f...

Page 14: ...anging in diameter through 3 4 this adjustment should be suitable For larger diameter studs and select applications the lift should be adjusted to approximately 1 8 Adjusting the lift Remove the back cap of the stud gun Loosen the two socket set screws around the periphery of the lift adjustment screw To increase lift rotate the lift adjustment screw counter clockwise and to decrease lift rotate c...

Page 15: ... which the stud is plunged into the molten weld pool by moving the engagement point of when the shaft of the stud gun engages the damp ener Rotating the dampener cover counter clockwise increases the amount of free travel Dampener Cover TWE17000 Heavy Duty Weld Gun TWE18500 Medium Duty Weld Gun ...

Page 16: ...it and actuate the stud gun Make sure welder is set up properly to begin the welding process Place the selected stud into the chuck and attach the ferrule to the ferrule grip Place stud onto surface to be welded and press stud gun down until ferrule is flush with the welding surface Trigger the gun and hold in place until cycle is completed Pull gun assembly straight up off of the welded stud Do n...

Page 17: ...hat there is a good connection SC2402 Diagnostic Lights On the Control Panel located below the digital display is a row of diagnostic lights for the welder OUTPUT When the stud gun is triggered this light comes on to indicate that the OCV is present at the output terminals TRIGGER When the stud gun is triggered this light comes on to indicate that the trigger circuit is functioning properly and th...

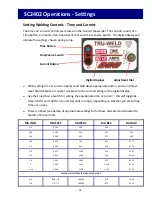
Page 18: ...te time or current this will toggle be tween 10th s and 100th s of a unit seconds or amps depending on whether you are setting Time or Current There is a Chart see below of approximate settings for full base diameter studs located to the left of the Controls Time Button Adjustment Dial Current Button Fine Coarse Switch Digital Displays DIA INCH TIME SEC AMPS DC DIA DEC DIA MM 1 4 0 200 500 250 6 3...

Page 19: ...ng total of the number of welds since the counter was last reset To view the job counter set the Fine Coarse Switch to the Fine position Each weld will be recorded on the Current digital display If the switch is in the Coarse position the weld will still be counted but will not be displayed You can also view the Job Counter total by depressing the Adjustment Dial while the switch is in the Coarse ...

Page 20: ...pring plunges the weld stud down into the molten pool of metal in the base material The cycle is completed in less than a second and the resulting weld bond develops the full strength of the fastener in the weld zone Allow metal to cool and withdraw gun from the stud pulling the gun straight up off of the stud The weld gun is withdrawn from the weld stud leaving and the ferrule The ferrule is brok...

Page 21: ...st the welds at the beginning of each shift or change in stud Bend two studs 30 degrees af ter cooling AWS Bend Test Check burn off 1 8 3 16 color silver blue and shiny and weld fillet 360 degree Visually inspect all welds Thru Deck Stud Welding Helpful Hints and Suggestions Keep weld studs and ferrules clean and dry Never attempt thru deck welding when the ambient temperature is below 32o F Deck ...

Page 22: ...ms a bumpy or jagged collar around the base of the weld stud This normally occurs when the weld time is set too high Porous Weld Collar This usually occurs from the oxidation of the weld pool resulting from the weld time being set too long and or the current being too low Reduce the current and or reduce the weld time to correct Weld Collar Off Center This is when the collar is heavy or thick on o...

Page 23: ... on control panel responds 4 Check to see if weld tool is wired according to one of the three diagrams in Chart A see page 25 5 Locate Touch Trigger Control Board 16002 Chart B Check and note the operation of the driver LED s and report the status Unit turns on no coil test no lift from gun coil trigger is good Bad connection or faulty equipment 1 Test control cable by plugging weld tool directly ...

Page 24: ...d connections in cluding grounds 3 Test the power loop by making welds on a test piece us ing only the starter cable set 4 Test 3 phase power to control contactor 5 Check taps if applicable on main transformer Weld gun lifts but does not plunge Gun maintenance If this happens it is most likely binding inside of the gun Per form routine gun maintenance or replace gun if needed All tests should be p...

Page 25: ...d Equipment Digital Series Welders will accept any one of these configurations without changing any wiring in the machine When making your own tool extensions 16 4 cable is recommended NOTE Make sure the ground pin is isolated from the case Contact Tru Weld Equipment with any questions on connections ...

Page 26: ...1 Active LED 3 L3 15Vdc LR6 PA L2 WORK LR3 GUN C A GREEN Pos 15V Supply D1 Pilot Arc Output Stud On Work Indicator GC FUSE Indicator Channel A Selected LED 4 L4 15Vdc LR4 COIL L3 TRIG LG2 GUN P B GREEN Neg 15V Supply BR1 2 Output Trigger Indicator GHV Signal Channel B Selected LED 5 LG1 PAph2 L5 2WIRE LR2 GUN P RED Q2 Drive Signal Input 2 Supply GP FUSE Indicator TR2 Active LED 6 LR5 PAph1 L4 4WIR...

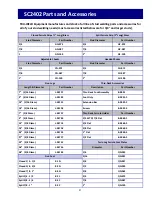
Page 27: ...iameter Part Number Description Part Number 7 5 16 Diam L 03107 Thru Deck Foot Assembly B 0021 9 5 16 Diam L 03109 Foot Only B 0021 1 14 5 16 Diam L 03114 Extension Bar B 0021 2 18 5 16 Diam L 03118 Screws B 0021 3 7 3 8 Diam L 03707 Thru Deck Ferrule Holder Part Number 9 3 8 Diam L 03709 3 4 WTD 7 8 Flat B 0060 1 14 3 8 Diam L 03714 3 4 Flat B 0060 2 18 3 8 Diam L 03718 5 8 Flat B 0060 3 24 3 8 D...

Page 28: ...28 TRU WELD Equipment Company 6400 N Honeytown Road Smithville Ohio 44677 330 725 7744 Phone 330 669 2473 Fax TWE tfpcorp com http truweldstudwelding com ...

Reviews: