background image


Page 18


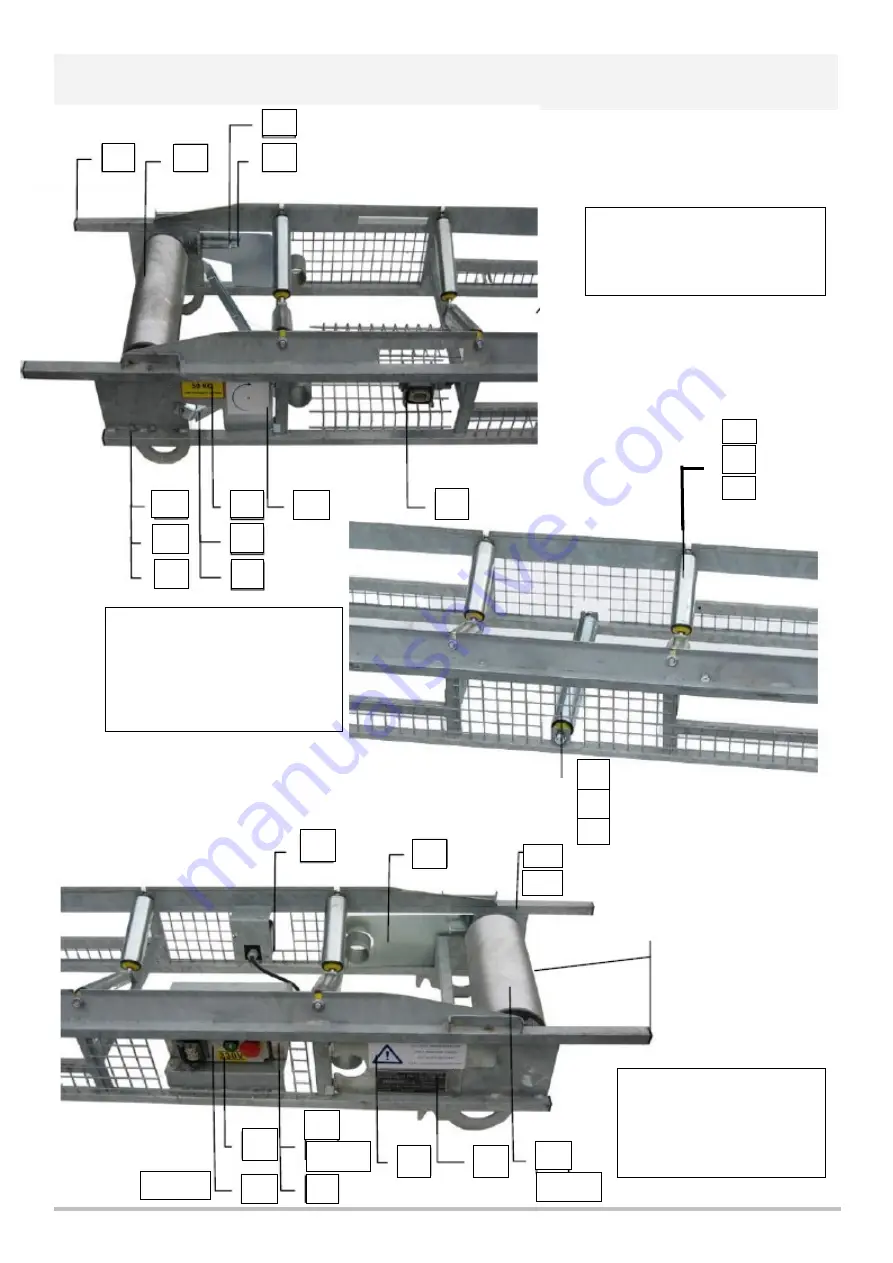
GENERAL ASSEMBLY PLAN CONVEYOR BELT


21a/21b 

22a/22b 

26a/26b 

1


2


3


4


12


11


10


9


8/a


6


5


7


20


23


22


21


24


25


26


18


17


RETURN ROLLER SIDE          

CONVEYOR BELT 

MIDDLE 

 CONVEYOR 

 BELT 

MOTOR SIDE 

 CONVEYOR BELT 


19a


19


14


15


16


15


14


13


Summary of Contents for MAXI 4.5M

Page 1: ...Machine Models MINI 3M MAXI 4 5M OPERATOR MANUAL PARTS LIST...

Page 2: ...Page 2 OWNER NOTES...

Page 3: ...11 7 Transport and storage Page 12 8 General safety instructions Page 13 9 Safety instructions for hirers Page 14 10 User instructions for hirers Page 15 Deployment diagram Page 15 Diagrams of accesso...

Page 4: ...lt Type Mini Maxi Serial number 45S Year of manufacture fulfils the provisions of the European machinery directive directive 98 37 amended by 98 79 EC and the provisions to implement it in national le...

Page 5: ...lt Type Mini Maxi Serial number 3S Year of manufacture fulfils the provisions of the European machinery directive directive 98 37 amended by 98 79 EC and the provisions to implement it in national leg...

Page 6: ...provided in the frame for the assembly of a set of pipes The conveyor belt can be used in roofed areas as well as outdoors in humid environmental conditions The conveyor belts are separate from each...

Page 7: ...ht 2 Deployment where the conveyor belts are not placed behind each other The conveyor belts can be deployed and arranged at every angle The conditions for deployment are the same as in point 1 IMPORT...

Page 8: ...e conveyor belts can be coupled via a linking lead so that a separate power supply 115V does not have to be provided for each belt The last conveyor in the series must be equipped with an end plug 3M...

Page 9: ...tart the last one in the series first Installation of a large hopper figure 1 page 16 A large hopper is placed at the start of the first conveyor belt figure 5 page 15 Installation of a small hopper f...

Page 10: ...that gets stuck between the roller and belt can be very damaging and can lead to the system breaking Also inspect the operation of the belt scraper regularly 2 Cleaning The conveyor belt can be rinsed...

Page 11: ...roove 2 Assembling the rubber belt Method and sequence Assemble the belt in the reverse order to dismantling 3 Adjusting the rubber belt for tension Method and sequence Screw bolts no 4 tight alternat...

Page 12: ...ystem Lift up the conveyor belt on the side where the wheel system is being mounted see fig 6 A page 16 and fit the wheel system into the opening provided fig 6 B page 16 The conveyor belt can now be...

Page 13: ...n veyed material from falling out e g onto staff The Mini Maxi can never be deployed in a position where the electrical contacts are underwater If the deployed installation becomes blocked during use...

Page 14: ...p slope When deploying on a slope the conveyor belts must be supported separately with a sturdy pipe construction Build the construction based on the pipe provided in the frame Ensure that the conveyo...

Page 15: ...Page 15 DEPLOYMENT DIAGRAM The belt can be adjusted in height using the position of the support Small Hopper Support Large Hopper Container figure 5...

Page 16: ...Page 16 DIAGRAM OF ACCESSORIES Large Hopper fig 1 Support fig 3 Small Hopper fig 2 Transport Wheels fig 6 Stacking fig 4 20kg 10kg...

Page 17: ...conveyor belt 22 107 00626 Capacitor 50mf 110v 3m 22a 107 01891 Capacitor 60mf 110V 4 5m 22b 107 04184 Capacitor 25mf 230V 23 107 00683 Bridge switch box 24 107 00543 Decal user instructions 26 107 00...

Page 18: ...L ASSEMBLY PLAN CONVEYOR BELT 21a 21b 22a 22b 26a 26b 1 2 3 4 12 11 10 9 8 a 6 5 7 20 23 22 21 24 25 26 18 17 RETURN ROLLER SIDE CONVEYOR BELT MIDDLE CONVEYOR BELT MOTOR SIDE CONVEYOR BELT 19a 19 14 1...

Page 19: ...Page 19 SWITCHBOX DIAGRAM ACCESSORIES DIAGRAM 27a 29a 29b 37 38 36 30 31 32 29 27 21 21a 21b 28 35 34 33 39 41 41a 42 40...

Page 20: ...Page 20 ELECTRICAL CIRCUIT DIAGRAM End Plug Emergency Stop External Emergency Stop Capacitor Motor Motor 1 Brown 2 Black 3 Blue 4 White 5 Yellow 6 Purple...

Page 21: ...Page 21 EMERGENCY STOP DIAGRAM BROWN BLUE EMERGENCY STOP...

Page 22: ...Page 22 OWNER NOTES...

Page 23: ...ecognised agents directors employees or insurers will not be held liable for consequential or other damages losses or expenses in connection with or by reason of or the inability to use the machine fo...

Page 24: ...Your local TRUXTA Dealer Tufftruk Limited Unit 5 Prince Street Business Park Prince Street Leek Staffordshire ST13 6DB Tel 44 0 1298 84687 sales tufftruk co uk 07 2020 Part No 800 20000...

Reviews: