8
One must implement additional safety measures to protect the operators
from exposure to vibrations, such as maintenance of the electric tool and
work tools, assurance of proper hand temperature, or determination of
the sequence of work operations.
NOTE:
Due to safety reasons the On/Off
(
8
) cannot be locked for
continuous operation. It must be kept depressed manually by the operator
during the entire time of the tool operation.
n
Grinding angle
Do not use the whole disk surface to grind, use its edge only.
For efficient grinding the angle between the disk and machined part
º
º
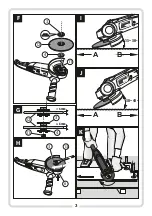
should range from approx. 15 to 30 (see: Fig.
I
, p.
3
).
n
Rough grinding
For best rough grinding efficiency the angle between the disk and
º
º
machined surface should range from approx. 30 do 40 (see: Fig.
J
, p.
3
).
The tool should be slightly pressed against the surface and smoothly
moved along the material. Thanks to the right pressure the machined
part does not heat up excessively, does not lose its color and no grooves
or other roughness will appear on its surface.
NOTE:
Never use cutting disks to grind/remove layers.
n
Cutting
While cutting with the tool do not exert excessive pressure, do not tilt
and do not oscillate. Move the tool at a constant speed adjusted to the
material machined.
Do not brake the rotating disk by pressing it against other objects.
NOTE:
Observe proper cutting direction. Cutting should be carried out at
the direction shown on the disk (see: Fig.
K
, p.
3
). Do not cut in opposite
direction! Otherwise the tool may be pulled out from the cutting line.
n
Trial start up
After inserting a disk and after connecting the grinder to the mains check
whether the disk is properly fixed and whether it rotates without any
obstacles.
The initial/trial start up should be carried our away from people.
BEFORE YOU START WORKING:
1. Make sure that the power source parameters match the parameters
presented on the grinder nameplate.
2. Make sure that the grinder power switch (
8
) is in off position.
3. When using an extension cable make sure the extension cable
REGULAR OPERATION:
parameters and conductor sections match the grinder parameters. It
n
Switching on/off
is recommended to use the shortest extension cables possible. The
Before you switch on the tool check if the switch (
8
) is in working order
extension cable should be fully unwound.
and returns to “Off” position after releasing.
To protect the grinder against accidental start, the switch (
8
) is equipped
n
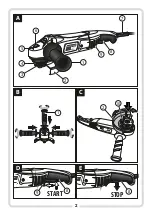
Mounting the side handle
with a locking lever (
9
).
NOTE:
For safety reasons always use the side handle (
1
).
To start the grinder:
Depending on the operating requirements screw the side handle to the
1. P
ress the locking lever (
9
) towards the arrow (see: Fig.
D
, p.
2
),
end in one of th
re
e seats provided in the grinder head (see: Fig.
B
, p.
2
).
2. P
ress the switch button (
8
).
n
Mounting the disk guard
To stop the tool just release the switch
(
8
)
(see: Fig.
E
, p.
2
).
NOTE:
Before you install or remove the disk guard, make sure that the
switch
device switch is in off position and that it is disconnected from the mains.
To cut or grind with grinding or cutting disks it is necessary to install the
disk guard (
2
). Adjust the guard position to the operation performed.
n
Tips regarding the operation
The closed side of the guard should be always directed towards the
ź
The objects to be machined that do not rest securely under their own
operator. To install the disk guard:
weight should be fixed properly.
1.
Place the grinder with the spindle (
11
) up.
ź
Avoid excessive pressure exerted on the disk. Grinding should be
2.
Install the blade guard as shown in Figure
C
, page
2
.
carried out using the weight of the tool. Only slight pressure is allowed
3.
Match holes on the guard flange (
10
) with mounting holes in
when cutting. Excessive pressure reduces the disk speed, which results
grinder's head and insert fixing screws into the flange. Tighten
in producing rough surfaces. In addition, it results in overheating and
securely the screws using a Phillips type screwdriver (Ph2).
damage to the motor.
n
Grinding tools assembly
(see: Fig.
F
,
G
,
H
p.
3
)
n
Grinding direction
NOTE:
Before you install or remove the grinding disk, make sure that the
When using a new grinding disk move the grinder back (
B
direction)
device switch is in off position and that it is disconnected from the mains.
(see: Fig.
I
, p.
3
), then the new disk edge will be rounded, which will allow
Before installation clean the grinder spindle and all fixing components.
the user to move the tool in any direction.
Make sure the admissible size and speed of the grinding disk matches
the parameters presented on the grinder nameplate. The grinding disk
should be installed without any clearance on the fixing flange. Do not
use any reduction washers or adapters.
To install a disk:
1.
Place the grinder with the spindle (
11
) up. Insert the fixing flange (
4
)
with its bottom projecting part with a groove onto the spindle shaft
to mesh the flange on the spindle.
2. Insert a disk (
12
) with its convex part down onto the upper projecting
part of the fixing flange.
3. Screw the compression nut (
3
) onto the spindle to secure the disk
properly. The compression nut has a concave and convex side.
Depending on the rated disk thickness it can be applied on one or the
other side
(see: Fig.
G
p.
3
).
4. Press the spindle lock button (
6
) and tighten the nut using the pin
wrench (
13
) exerting a slight force as the nut automatically tightens
up during operation. Observing this recommendation will help
avoiding damage to the motoreducer casing during the disk removal.
NOTE:
The spindle lock button (
6
) can be pressed only when the spindle is
stopped!
Never use a disk with improper maximum admissible speed!
3 minutes or more
1 minute or more
Trial operation
period
After disk replacement
At first start up
Summary of Contents for TMS12519
Page 2: ...2 10 C 10 10 W 2 A 1010W 7 1 2 3 4 6 8 9 B 1 STOP E 8 D START 1 2 8 9 5...
Page 17: ...17 RCD TMS12519...
Page 18: ...18 a a...
Page 19: ...19...
Page 20: ...20...
Page 21: ...21 a...
Page 24: ...24 n K 3 n 7 34 03 228 PROFIX...
Page 60: ......


