background image


6

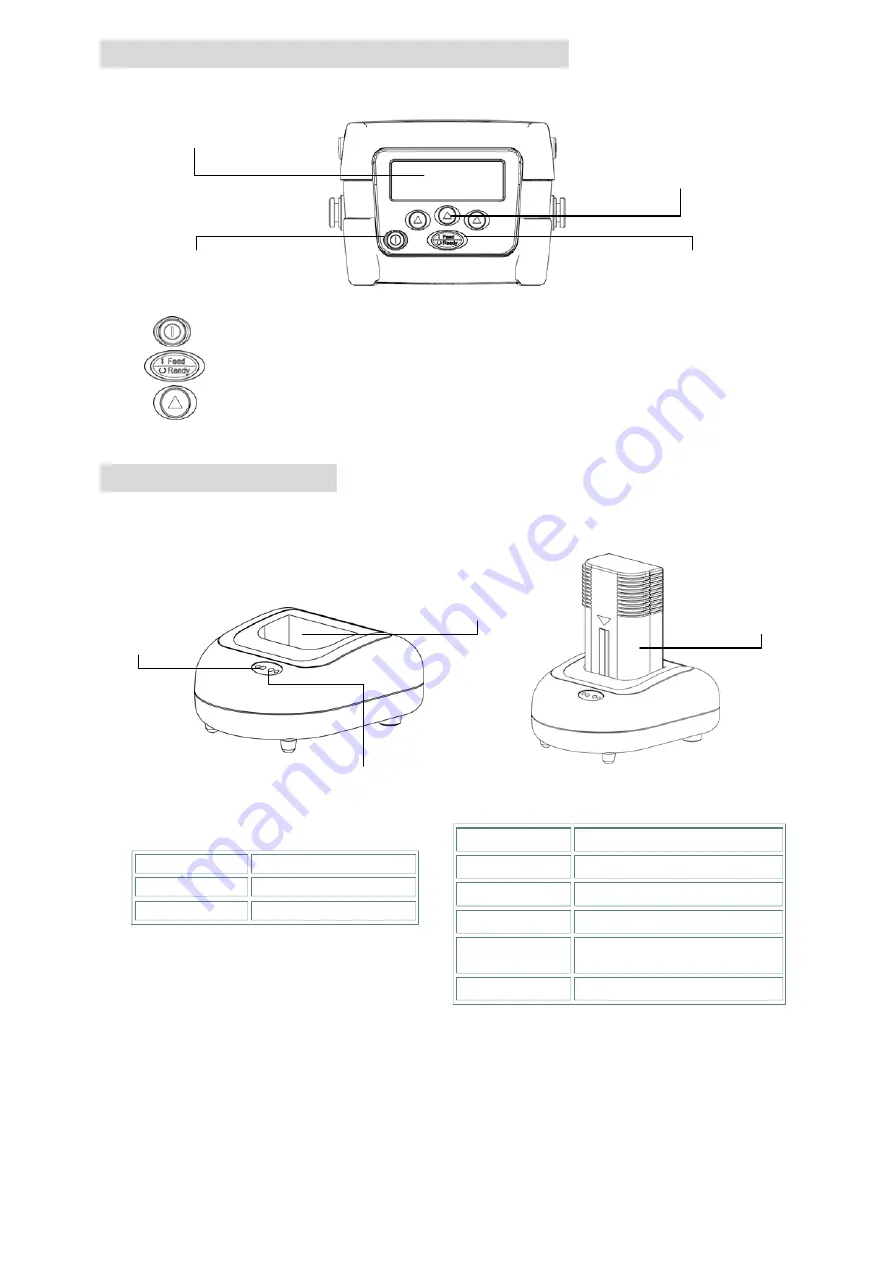
Using the LCD Display and Control Panel


         Turns the printer 

on

 and 

off

       Advances label or returns the display to the previous menu. 

        Three buttons for selecting options on the display. 


Charging the Battery


1. Open the printer supply door and remove the battery. 
2. Insert the battery into the charger station.


Status LED


Description 

Red Charging 

battery 

Amber 

Battery is 70% charged 

Green (Solid) 

Battery is completely charged 

Green 

(Blinking) 

Charger error 

Off No 

battery 

Power LED


Description 

Red 

Power is on 

Off 

Power is off 

LCD


display 

On/Off button 

Navigation buttons 

Feed/Ready button

Charger

station

Status LED

Power LED 

 Battery 

Summary of Contents for 39-0000144-10LF

Page 1: ...Quick Start Guide Direct Thermal Portable Printer ...

Page 2: ...ii ...

Page 3: ...ery 2 Using the Strap 3 Loading Media 3 Loading Continuous Labels for Receipt Paper 3 Loading Die cut Labels 4 Loading Fan fold Labels 5 Connecting the Communication Cable 5 Using the LCD Display and Control Panel 6 Charging the Battery 6 Maintenance 7 Troubleshooting 9 ...

Page 4: ... holder Li ion battery Gap black mark sensor Platen Graphic LCD with back lit display Peel off enabler Context sensitive keys Paper exit chute Front door release button Tear plate for label Peel roller Peel bar Tear bar for liner ...

Page 5: ...rinter The supply door should swing open 2 Insert the connector end of the battery into the printer 3 Close the supply door until the release buttons click into place Hinged cable door Fan fold paper entrance chute Power jack chute RS 232 interface 5V DTR switch USB interface Strap button Li ion battery Supply door Release buttons ...

Page 6: ... by pulling outward on the release buttons on both sides of the printer 2 Pull supply holder tabs apart and insert a new roll of media Make sure the media is positioned so it unwinds from the top as shown 3 Pull out enough supply to lie over the exit chute 4 Close the supply door until the release buttons click into place Note Please calibrate the gap black mark sensor when changing to different m...

Page 7: ...ibrate the gap black mark sensor when changing media Do not calibrate the gap black mark sensor in peeler mode to avoid paper jams at the peel off roller 5 Remove a couple of labels from the liner Insert the liner through the gap between peeler bar and peel off roller 6 Close the supply door 7 Press the button once or twice to advance the labels until the liner is separated from the label Peel off...

Page 8: ...o fit the paper width 5 Calibrate the media sensor if necessary 6 Close the supply door Note Please calibrate the gap black mark sensor when changing media Connecting the Communication Cable 1 Open the hinged cable door by loosening two screws Lift up on the door 2 Plug the null modem cable into the RS232 port Or plug the USB cable into the USB port 3 Place the cable in the cable cavity 4 Close th...

Page 9: ...he printer supply door and remove the battery 2 Insert the battery into the charger station Status LED Description Red Charging battery Amber Battery is 70 charged Green Solid Battery is completely charged Green Blinking Charger error Off No battery Power LED Description Red Power is on Off Power is off LCD display On Off button Navigation buttons Feed Ready button Charger station Status LED Power...

Page 10: ...ace Clean the print head when changing a new label roll Platen roller 1 Turn the power off 2 Rotate the platen roller and wipe it thoroughly with 100 ethanol and a cotton swab or lint free cloth Clean the platen roller when changing a new label roll Peel roller 1 Turn the power off 2 Rotate the Peel off roller and wipe it thoroughly with 100 ethanol and a cotton swab or lint free cloth Clean the p...

Page 11: ...use ethanol to clean it It s industry alcohol Please do not use regular alcohol which may damage the printer head You may have to clean the supply sensors more often if you frequently receive supply error messages Platen roller Gap black mark sensor Peel off sensor Peel bar ...

Page 12: ... paper Gap black mark sensor is not calibrated Calibrate the gap black mark sensor Make sure the battery is fully charged Recharge or replace a new battery Check if front door is closed completely Close front door completely Check if supply is loaded correctly Reload the supply Check for dust or adhesive accumulation on the print head Clean the print head Check if print density is set properly Adj...

Page 13: ...10 For more information and features about this printer please refer to the User s Manual inside the CD disk ...

Page 14: ...11 P N 39 0000144 10LF ...

Page 15: ...a przykład RFID OFERUJEMY Weryfikatory jakości kodów kreskowych Czytniki kodów kreskowych Drukarki etykiet termiczne i termotransferowe Drukarki etykiet kolorowych Terminale przenośne Terminale radiowe Automatyczne czytniki przemysłowe Etykiety samoprzylepne Taśmę termotransferową Materiały specjalne na zamówienie ALTAREX Sp J ul Majerankowa 12A 04 889 Warszawa tel 22 632 07 93 632 61 91 e mail al...

Reviews: