


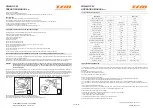


WILLMOP 50
OPERATING MANUAL
V01
·
die verbleibende Batterieladung
·
die Batteriespannung
Sie müssen die Taste ein drittes Mal drücken, um den Bildschirm auszuschalten. Andernfalls wird der Bildschirm nach einer
Minute Inaktivität automatisch ausgeschaltet.
Mit dem Erreichen des Mindestladezustands der Batterie würden, wenn Willmop noch verwendet würde, alle Funktionen
(Bürstenmotoren, Saugmotor und mögliche UV-Systeme in den Ecoray-Versionen) abgeschaltet und der Benutzer müsste die
Batterie aufladen, um den Betrieb wieder aufzunehmen Reinigungsarbeiten.
9.6 Stundenzähler
Willmop ist mit einem Stundenzähler ausgestattet, der sich am Lenker unterhalb der Batterie befindet (Abb. 11). Es ist notwendig,
die Batterie zu entfernen, um die Arbeitsstunden zu überprüfen.
9.7
Verwendung von Willmop
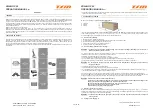
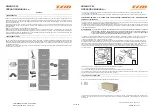
Willmop ist so verpackt, dass der Lenker senkrecht steht. Um die Reinigung zu starten und dann den Lenker loszulassen, muss
sich der Bediener hinter Willmop positionieren und den Lenker mit seinen freien Händen nach oben drücken, um das
Verriegelungssystem zu öffnen (Abb. 1.1). Sobald der Lenker losgelassen wurde, kann er sich ungehindert um 360 ° bewegen,
und das gesamte Gewicht des Lenkers wird von dem von TSM patentierten Gelenk getragen (Abb. 12).
Der Lenker ist außerdem mit einem kapazitiven System ausgestattet, das die Anwesenheit des Benutzers durch Handkontakt am
Lenker selbst erkennt. Sobald Sie das Programm in der Konsole ausgewählt haben, greifen Sie einfach mit einer oder zwei
Händen am Lenker, damit das Programm aktiviert wird.
Willmop wurde entwickelt, um dank der Bewegung der Bürsten autonom vorzurücken. Der Benutzer muss nur den Lenker fassen
und durch leichte Drehungen der Hand (oder der Hände) ist es möglich, die Richtung zu ändern.
ACHTUNG
-
Wenn der Benutzer während des Gebrauchs beide Hände vom Lenker entfernt, wird Willmop in den
Standby-Modus versetzt und alle verwendeten Funktionen werden deaktiviert. Es reicht aus, den Lenker
erneut zu greifen, um die verwendeten Funktionen wieder aufzunehmen.
Der Standby-Status bleibt bestehen, bis eine der folgenden Situationen eintritt:
·
Der Benutzer greift erneut nach dem Lenker.
·
Der Benutzer bewegt den Programmwähler in der AUS-Position zur Konsole.
·
Die Batterie ist vollständig leer.
Um Willmop vollständig auszuschalten, muss der Programmwähler an der Konsole auf OFF gestellt werden. Wenn der
Staubsauger eingeschaltet ist, wird dieser ausgeschaltet und den Saugfuß automatisch mit einer Verzögerung von ca. 3
Sekunden vom Boden angehoben, damit sich noch auf dem Boden befindliches Restwasser ansammeln kann.
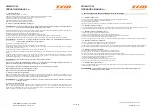
9.8 Neigung des Saugfuß
Während des Betriebs muss der Hinterreifen über seine gesamte Länge gleichmäßig leicht nach hinten gebogen arbeiten.
Sie können den Saugfußwinkel einstellen, indem Sie die Handräder beider Stromabnehmer (je einer auf jeder Seite) ein- und
ausschrauben (Abb. 13).
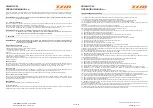
9.9 Tanks entleeren
Es ist notwendig, das Schmutzwasser oder das Wasser mit Reinigungsmittel in einen geeigneten Abfluss zu entleeren. Um den
Schmutzwassertank gründlich zu reinigen, füllen Sie ihn teilweise mit frischem Wasser und halten Sie ihn waagerecht. Kippen Sie
den Tank mehrmals und spülen Sie dabei den im Tank abgelagerten Schmutz gründlich aus (Abb. 14).
ACHTUNG - Bitte beachten Sie die örtlichen Vorschriften zur Entsorgung von Lösungen im Zusammenhang mit der
Abwasserbehandlung.
9.10 Willmop innerhalb eines Gebäudes transportieren / bewegen
Um Willmop innerhalb eines Gebäudes von einer Position zur anderen zu bewegen, verriegeln Sie den Lenker in einer vertikalen
Position (Abb. 1). Stellen Sie sicher, dass Sie die Tanks vollständig entleert haben. Positionieren Sie sich vorne am Willmop und
heben Sie mit einer Hand die Bürstengruppe leicht an und lassen Sie mit der anderen Hand das schwenkbare Rad auf dem
Boden los, indem Sie am vorderen Federkolben ziehen (Abb. 15). Auf diese Weise kann Willmop auf Rädern bewegt werden,
wobei das Seitenruder in die gewünschte Richtung gedrückt wird, als wäre es ein gewöhnlicher Wagen.
ACHTUNG - Seien Sie vorsichtig, wenn Sie Willmop über Kanten, Barrieren oder Gitter bewegen.
9.11 Willmop anheben
Zum Anheben von Willmop muss der Lenker in senkrechter Position arretiert werden (Abb. 1). Entfernen Sie die Tanks und die
Batterie, um sie leichter zu machen. Dann mit beiden Händen anheben. Eine Hand befindet sich am Lenker und die andere im
entsprechenden Griff des Rahmens (Abb. 16).
WILLMOP 50
OPERATING MANUAL
V01
It is necessary to press the button a third time to turn off the screen, alternative the screen will switched off automatically after a
minute of inactivity.
If Willmop is still in use when the minimum battery charge level is reached, all the functions (brush motors, vacuum motor and any
Energy Saving or Ecoray modes - on the Ecoray version) would be turned off and the user will have to recharge the battery to
resume the cleaning activities.
9.6 Hourmeter
Willmop is equipped with an hourmeter located on the handle below the battery (Fig. 11). It is necessary to remove the battery to
check the hours worked.
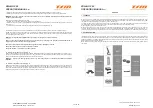
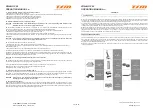
9.7 Willmop use
Willmop is packed with the handle locked in the vertical position. To start the cleaning activity, and free the handle, the user must
be positioned behind Willmop, with one hand holding the handle and with the other pushing up the locking system (Fig. 1.1).
Once the handle has been released, it is free to move at 360° without any constraint, and the whole weight of the handle is
supported by the joint designed by TSM (Fig. 12).
The handle is also equipped with a capacitive system that detects the presence of the user through the contact of the hands on
the handle itself. To activate the cleaning program chosen on the console, simply grab the handle with one or two hands and
operations will start.
Willmop is designed to move forward autonomously thanks to the movement of the brushes, the user only needs to hold the
handle and by light twisting of the hand (or hands) he can change the direction.
WARNING - If the user removes both hands from the handle when it is in operation, Willmop goes on stand-by, and all
the functions in use will be turned off. It is sufficient to re-grab the handle to resume the functions.
The stand-by status remains until one of the following situations occurs:
·
the user grabs the handle again;
·
the user moves the program selector on the console to the OFF position;
·
the battery runs out completely.
To switch off Willmop completely it is necessary to move the program selector on the console to the OFF position. In the event
that the vacuum motor was in use, it will be switched off and lifted up automaticaly with a delay of about 3 seconds to allow the
collection of any water residues still on the ground.
9.8 Squeegee inclination
During operation the rear tire must work slightly bent backwards evenly over its entire length.
It is possible, if necessary, to adjust the inclination of the squeegee by screwing / unscrewing the handwheels of both pantographs
(one on each side) (Fig. 13).
9.9 Empty the tanks
It is necessary to empty the dirty water or water with detergent, into an appropriate drain. To clean the recovery tank thoroughly,
fill it partially with fresh water and keep it in a horizontal position. Tilt the tank repeatedly, thoroughly rinsing off any dirt deposited
inside the tank (Fig. 14).
WARNING - Please observe the local regulations regarding the disposal of wastewater treatment solutions.
9.10 Transport / displacement of Willmop inside a building
To move Willmop from one position to another inside a building, lock the handle in the vertical position (Fig. 1). Make sure to have
completely emptied the tanks. Stand in front of Willmop and with one hand slightly lift the brush deck unit and with the other pull
the hand retractable spring plunger to release the castor wheel to the ground (Fig. 15).
In this way Willmop can be moved on wheels, pushing the handle in the desired direction like a common cart.
WARNING - Be careful when moving Willmop over edges, barriers or gratings.
9.11 Lifting Willmop up
To lift Willmop it is required to lock the handle in the vertical position, remove the tanks and the battery to make it lighter. Then lift
it with both hands. One hand positioned on the handle and the other in the handle of the frame (Fig. 16).
WARNING - To prevent the risk of injury and damage, keep in mind the weight of Willmop during transport and lifting.
9.12 Parking Willmop
Lock the handle in the vertical position (Fig. 1). Make sure to have completely emptied the tanks. Make sure not to leave the
battery completely discharged, recharge it if necessary.
Stand in front of Willmop and with one hand slightly lift the brush deck unit and with the other release the castor wheel to the
ground. In this way the weight of Willmop will not weigh on the brushes during the parking phase.
REINIGUNGSTECHNIK 4 YOU GMBH
Brünnerstraße 192 A, 1210 Wien
26 von 36
+43 1 925 24 81 www.r4you.at
Office@r4you.at