2
Operation
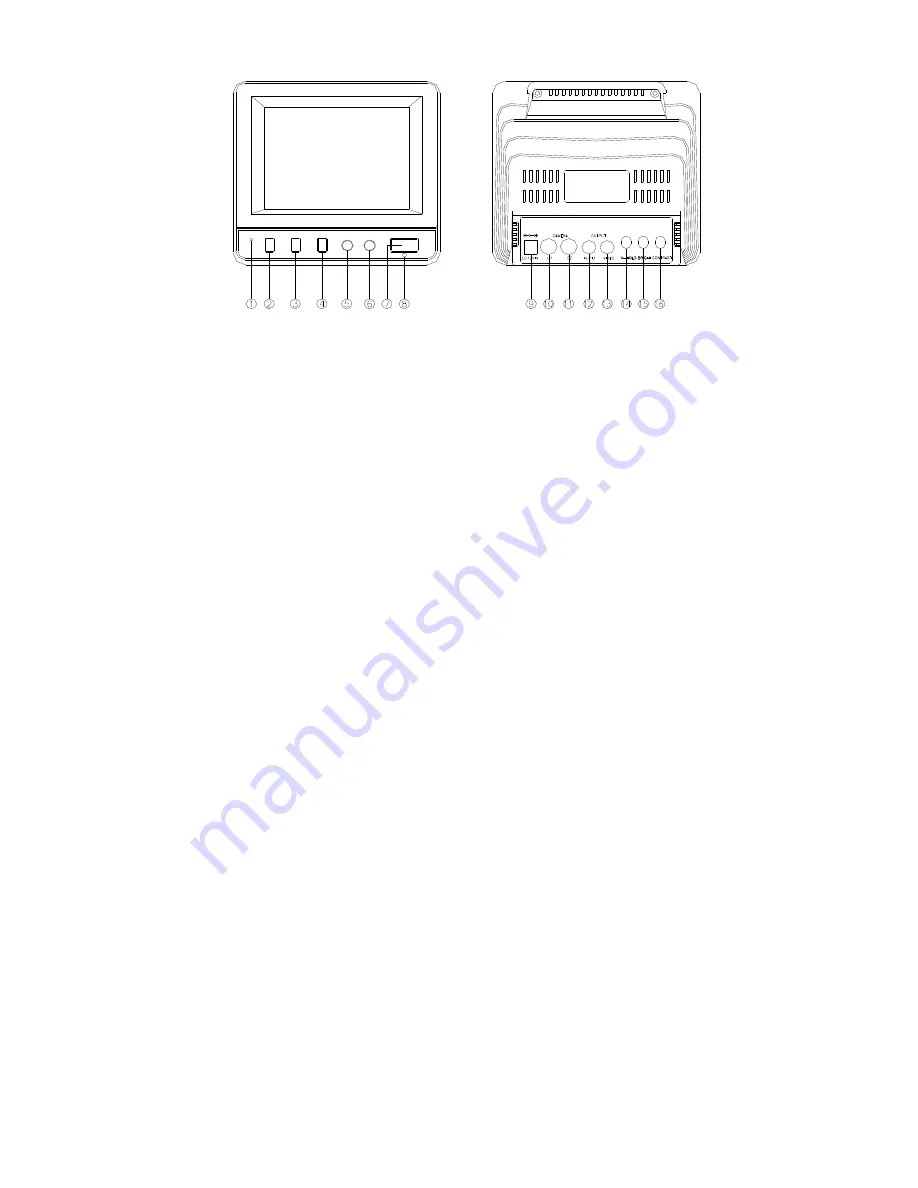
1.
Microphone
Not Used
2. Talk button
Not Used
3. Camera Selection Switch
This switch controls what camera is displayed when the Mode Selection Switch is set to manual:
Depressed – Display Camera 1
Raised – Display Camera 2
4. Mode Selection Switch
When set to Auto (button depressed) the cameras will automatically switch between each other.
When set to Manual (button raised) you can switch cameras using the Camera Selection Switch.
5. Dwell Time Adjustment Use this dial to adjust the time each camera is displayed, when automatic switching is turned on.
6. Volume Adjustment
Use this dial to adjust the volume.
7. Power Switch
Use this button to turn the unit on and off.
8. Power Indication LED
This LED indicates whether the system is turned on or off.
9. Power Socket
Connect the power supply cable to this socket.
10. Camera 1 Socket
Connect the camera 1 cable to this socket.
11. Camera 2 Socket
Connect the camera 2 cable to this socket.
12. Audio Output Socket
Connect the audio part of your AV cable, from your TV / VCR to this socket.
13. Video Output Socket
Connect the video part of your AV cable, from your TV / VCR to this socket.
14. Vertical Hold Adjustment
Use this dial to adjust the vertical hold of the picture if necessary i.e. to stop your picture scrolling.
15. Brightness Adjustment
Use this dial to adjust the brightness of the picture.
16. Contrast Adjustment
Use this dial to adjust the contrast of the picture.
Safety Information
Before installing this unit, please read through the following points:
•
Service should be handled by qualified technicians.
•
Do not place cords from the AC adapter where they can be pinched or stepped on.
•
Do not place heavy objects on cords, or cover cords with rugs or carpet.
•
Never immerse any component in water, and do not spray cleaners of solvents on the unit. Unplug units before cleaning. When
cleaning, use a damp, lint-free cloth only.
•
Do not expose the monitor or camera to excessive heat, cold, or moisture
•
Leave at least a 2” space between the monitor and walls, cabinets and/or other objects to allow air circulation around the unit.


