Preparation before installation and us
1.
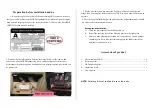
Know the type of your vehicle. When purchasing HUD, you need to choose
the type of vehicle that meets the OBDII standards for normal use. Open the engine
hood and find the paster below it (see the picture below), if it has words like OBDII
CERTIFIED, then it can be installed.
2. Find out the 16 pin diagnostic link (see the picture below) of the vehicle and
connect it well with OBDII connecting line. As different types of vehicles have
different positions for diagnostic link and some are relatively narrow, patch cord can
be purchased.
3. Put the give-away non-slip mat at the flat place in front of the navigation
bridge, then you can place the host machine of HUD on it and adjust its location at
any time.
4.The reflecting film should be pasted right above the host machine and it should
be able to reflect the mainframe screen.
Pasting the reflective film:
A Clean the place that the film will be pasted on;
B
Rip off the covering layer of the film and paste it to the right place.
C After you have adjusted the location well, you can use a scratch board or
something else flat to slick the film and squeeze the bubbles inside out
until there is no bubbles in it.
Accessories of product
1.
Host machine of HUD ....................................................................................... ×1
2.
Reflecting film ................................................................................................... ×1
3.
OBD connecting line ......................................................................................... ×1
4.
Instruction book ................................................................................................. ×1
5.
Non-slip mat ...................................................................................................... ×1
NOTE:
Reflecting foil is not certified for use on the roads.


