background image

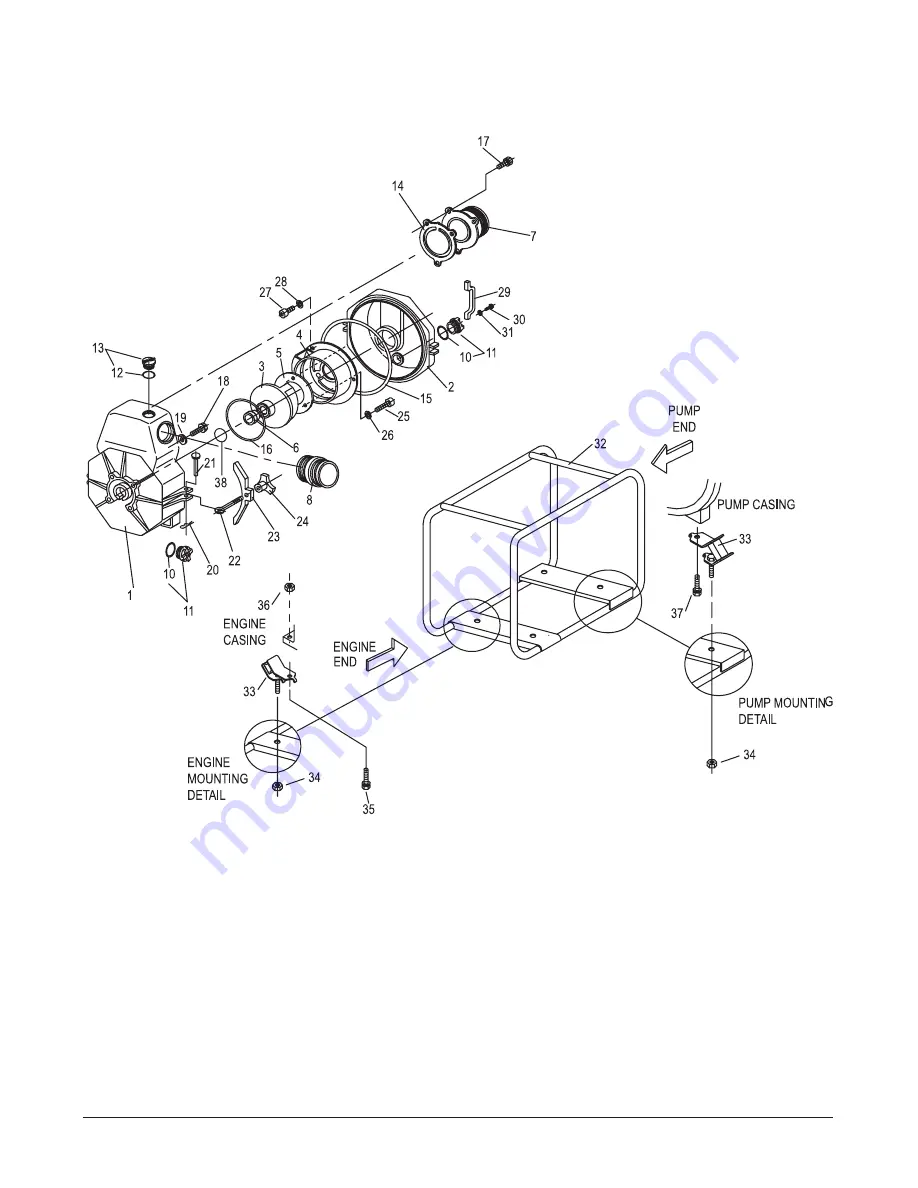
Exploded View - Model ETP3-100HA Trash Pump

Page 28

Replacement Parts

Tsurumi’s Operation, Service, and Repair Manual

Summary of Contents for EPT3 Series

Page 1: ...OPERATION SERVICE AND REPAIR MANUAL FOR TSURUMI EPT3 SERIES TRASH PUMPS MODELS EPT3 50HA EPT3 80HA EPT3 100HA ...

Page 2: ...nor does it apply to any product that has been subjected to misuse neglect alteration misapplication accident or act of God TSURUMI assumes no responsibility for compliance with any regulations codes standards or ordi nances applicable to the installation location operation or maintenance of its products No other warranty expressed or implied is authorized by or applicable to the seller No person ...

Page 3: ...ine 9 2 7 Using the Trash Pump 10 2 8 Stopping the Trash Pump 10 2 9 Oil Alert 10 3 Troubleshooting 11 3 1 Troubleshooting Charts 11 4 Maintenance 12 4 1 Maintenance Schedule 12 4 2 Changing Engine Oil 13 4 3 Air Cleaner Service 14 4 4 Sediment Cup Cleaning 14 4 5 Cleaning and Adjusting Spark Plug 14 4 6 Trash Pump Exploded Views 15 4 7 Description of Mechanical Seal 15 4 8 Replacement of Mechanic...

Page 4: ......

Page 5: ... sepa rate instructions are provided to make sure the correct procedures are used on the affected trash pumps All information in the Tsurumi manuals is based upon the latest production configuration of the trash pump at the time of approval for printing If you have a problem with your trash pump that cannot be resolved using the Operation Repair and Service Manual or if you have questions about th...

Page 6: ...n lives Keep the trash pump at least 1 meter 3 feet away from any structure or building during use When a trash pump is located close to a building or nearby equipment heat and exhaust from the engine will cause the surrounding temperature to rise This will degrade the engines cooling effi ciency causing overheating Do not enclose the trash pump nor cover it with a box The trash pump has a built i...

Page 7: ...ity of NPT3 series trash pumps Introduction Page 3 Tsurumi s Operation Service and Repair Manual A H 0 0 1 3 T P E A H 0 8 3 T P E A H 0 5 3 T P E S L E D O M Pump Output Gal Min to Total Head See Performance Curve See Performance Curve See Performance Curve e l a M T P N 4 e l a M T P N 3 e l a M T P N 2 s e h c n I e z i S n o i t c u S PUMP 4 3 2 s e h c n I e z i S e g r a h c s i D Engine Mod...

Page 8: ...TOTAL HEAD ft MODEL EPT3 50HA 0 20 40 60 80 100 0 100 200 300 400 500 600 QUANTITY g p m TOTAL HEAD ft MODEL EPT3 80HA 0 20 40 60 80 100 0 100 200 300 400 500 600 QUANTITY g p m TOTAL HEAD ft MODEL EPT3 100HA INDIVIDUAL PERFORMANCE MODEL EPT3 50HA INDIVIDUAL PERFORMANCE MODEL EPT3 80HA INDIVIDUAL PERFORMANCE MODEL EPT3 100HA ...

Page 9: ...al Suction Fitting Discharge Fitting Priming Plug Engine Air Filter Vibration Isolation Mounts Clamping Knobs Casing Cover Recoil Starter Tubular Frame Engine Controls Fuel Tank Honda Engine ENGINE END Engine Muffler PUMP END Figure 1 Key Features of the Trash Pump ...

Page 10: ...EVEL SURFACE AND THE ENGINE STOPPED A The trash pump is controlled by the engine operating controls B Use Honda 4 stroke oil or use an equivalent high detergent premium quality motor oil cer tified to meet or exceed U S automobile manufacturer s requirements for Service Classification SG SF Motor oils classified SG SF will show this designation on the con tainer SAE 10W 30 is recommended for gener...

Page 11: ... cap dipstick into the oil filler neck but do not screw it in 3 Remove the filler cap dipstick and check the oil level 4 If the level is low fill to the top of the oil filler neck with the recommended oil 5 Reinstall the oil filler cap dipstick Operating Instructions Page 7 Tsurumi s Operation Service and Repair Manual Figure 2 2 Oil Viscosity Grade to Temperature Recommendations ...

Page 12: ...OPEN FLAMES DO NOT USE SMOKING MATERIALS WHEN FILLING THE FUEL TANK DO NOT REFUEL WHILE SMOKING OR NEAR OPEN FLAME OR OTHER SUCH POTENTIAL FIRE HAZARDS OTHERWISE FIRE ACCIDENT MAY OCCUR AVOID REPEATED OR PROLONGED CONTACT WITH SKIN OR BREATHING OF VAPOR KEEP OUT OF REACH OF CHILDREN 2 4 Check Fuel Level A If fuel level is low refill with unleaded automotive gasoline B Fuel tank capacities are prov...

Page 13: ...mp at least three 3 feet one 1 meter away from buildings or other structures b Only operate trash pump in a dry well ventilated area c Keep exhaust pipe clear of foreign objects d Keep trash pump away from open flame e Keep trash pump on a stable and level surface f Do not block trash pump air vents with paper or other material 2 6 Starting and Operating the Engine A Refer to the Honda engine owne...

Page 14: ... suction and discharge hoses Make sure suction hose is fitted with a strainer B Remove priming plug from top of pump and fill chamber with water C Operate the engine at idle speed for 3 to 5 minutes D After engine warm up move the throttle lever to the operating speed 2 8 Stopping The Trash Pump A Move the throttle lever fully to the right B Set the ON OFF switch to OFF C Turn the fuel valve to th...

Page 15: ...or pump pressure too low Air leaks caused by O ring damage Replace O rings Suction hose or strainer clogged Replace hose Clean strainer Excessive impeller clearance Disassemble to obtain casing cover and impeller Determine clearance and re shim as required refer to Replacement of Mechanical Seal Engine rpm too low Check rpm and reset throttle as required Lift head too high Lower lift head Pump pri...

Page 16: ...AS CAUTION REFER TO THE HONDA ENGINE OWNER S MANUAL FOR OTHER MAINTENANCE REQUIREMENTS Table 4 1 Maintenance Schedule n o i t c A e c n a n e t n i a M y c n e u q e r F Daily Check oil level Check all components according to the PRE OPERATIONAL CHECKS section 50 Hours Wash cleaner element Check spark plug and clean if necessary 100 Hours Change engine oil 200 Hours Adjust spark plug gap Clean fue...

Page 17: ...ironmental regulations for disposal and handling requirements C Drain the oil while the engine is still warm to assure rapid and complete draining D Remove the oil filler dipstick cap and drain plug Allow oil to drain from the engine refer to Figure 4 1 E Install the drain plug and tighten it securely F Refill with the recommended oil refer to Figure 2 2 G After filling with oil check the oil leve...

Page 18: ... 2 1 B Remove the sediment cup and O ring Wash both parts in nonflammable or high flash point solvent C Wipe the sediment cup and O ring dry then reinstall WARNING After installing the sediment cup check for leaks and make sure the area is free of resid ual fuel spills or seepage before starting the engine D Set the fuel shutoff valve Figure 2 1 to ON Check for leaks 4 5 Cleaning and Adjusting Spa...

Page 19: ...he outside diameter of the seal C The rotating element is installed in the center bore of the impeller The rotating element consists of a silicone carbide mating ring and a close fitting rubber cushion Water is used as an assembly aid when installing the cushion and mating ring 4 8 Replacement of Mechanical Seal WARNING THE SHIPPING WEGHT OF THE MODEL EPT3 SERIES PUMPS RANGES FROM 80 TO 160 POUNDS...

Page 20: ... Casing 3 Impeller 2 Casing Cover 1 Casing 23 Holder 24 Knob 15 O Ring View A Remove casing cover to gain access to impeller the rotating member of the mechanical seal is in the impeller View C Remove 3 screws to remove liner Discard old liner View B If liner is damaged remove 2 screws and separate inner casing from casing cover Replace liner during re assembly ...

Page 21: ... hex is cast into the impeller and is not a separate removable part E Remove two nuts 34 securing pump anti vibration mounts to the pump casing F Remove four bolts and washers 18 and 19 securing the pump casing 1 to the engine G Remove fixed element of the old seal using a driver similar to the driver in Figure 4 6 The tool should be sized to have a slip fit with the bore the sealant used on the m...

Page 22: ...d fixed seal elements J Select the combination of shims 41 that will provide clearance of 0 020 inch to 0 040 inch 0 508 mm to 1 016 mm K If the liner 5 was damaged remove two screws 25 and separate casing cover 2 from inner casing 4 L Remove three screws from liner 5 and inner casing 4 Separate liner 5 from inner casing 4 M Secure liner 5 to inner casing 4 using three screws 25 View E Install sea...

Page 23: ...epair Manual Figure 4 5 Shimming Of Mechanical Seal 4 VOLUTE CASING 1 CASING 6 MECHANICAL SEAL 41 IMPELLER SHIM 3 IMPELLER 5 WEAR PLATE 6 3 MECHANICAL SEAL FIXED ELEMENT 1 CASING 3 IMPELLER 6 1 RUBBER CUSHION 6 2 MATING RING ROTATING ELEMENT REMOVED VIEW ...

Page 24: ...ck valve 14 C Align bolt holes in replacement check valve 14 and suction case 7 D Attach suction case 7 to pump casing 1 Model Number Shim Thickness OD x ID Part Number EPT3 50HA 0 3 mm 0 012 Inch 0 6 mm 0 024 Inch 20 x 18 mm 0 787 x 0 709 inch 801 037 801 038 EPT3 80HA 0 3 mm 0 012 Inch 0 6 mm 0 024 Inch 1 0 mm 0 039 Inch 24 2 x 20 0 mm 0 952 x 0 787 inch 1001 043 1001 044 1001 045 EPT3 100HA 0 3...

Page 25: ...air Manual 14 Check Valve 1 Casing Figure 4 7 Replacement of Check Valve 23 Holder 22 Bolt 20 Pin 7 Case 17 Bolt 13 Priming Plug and 12 O Ring 11 Plug and 10 O Ring 21 Rivet 24 Knob Special Orientation Make sure tab on check valve is at zero degrees at top ...

Page 26: ...edures should be followed before storing your pump for periods of 6 months or longer 1 Carefully drain fuel from the fuel tank gasoline left in the fuel tank will eventually dete riorate making engine start difficult 2 Remove the carburetor float chamber and also drain the carburetor 3 Change engine oil 4 Check for loose bolts and screws tighten if necessary 5 Clean pump thoroughly with oiled clot...

Page 27: ...ings that pro vide part number description and quantity The item numbers shown on the illustrations correspond with the item numbers in the facing parts listing 6 2 Ordering Parts Order replacement parts from Tsurumi America Inc 1625 Fullerton Ct Glendale Heights IL 60139 Tel 1 888 878 7864 Fax 1 630 793 0146 E mail info tsurumiamerica com Replacement Parts Page 23 Tsurumi s Operation Service and ...

Page 28: ...Page 24 Replacement Parts Tsurumi s Operation Service and Repair Manual Exploded View Model EPT3 50HA Trash Pump ...

Page 29: ...3 100 110 Washer Spring M6 SUS 3 Ref No Part Number Description Qty 27 203 000 650 Bolt Hex Socket M8 X 20 SUS 2 28 203 100 130 Washer Spring M8 SUS 2 29 200 500 230 Handle Drain Cover 2 30 203 000 530 Bolt Hex M6 X 25 SUS 4 31 19W0 3906000 Plain Washer M6 4 32 200 101 160 Frame Black 1 33 200 900 520 Mount Anti Vibration 4 34 1001 024 Nut Spring M8 Mount to Frame 4 35 203 000 250 Bolt Hex M8 X 35...

Page 30: ...Exploded View Model ETP3 80HA Trash Pump Page 26 Replacement Parts Tsurumi s Operation Service and Repair Manual ...

Page 31: ... SUS 3 27 203 000 650 Bolt Hex Socket M8 X 20 SUS 2 Ref No Part Number Description Qty 28 203 100 130 Washer Spring M8 SUS 2 29 200 500 230 Handle Drain Cover 2 30 203 000 530 Bolt Hex M6 X 25 SUS 4 31 19W0 3906000 Plain Washer M6 4 32 200 101 170 Frame Black 1 33 200 900 520 Mount Anti Vibration 4 34 1001 024 Nut Spring M8 Mount to Frame 4 35 203 000 130 Bolt Hex M10 X 40 P 2 Engine to Mount 2 36...

Page 32: ...Exploded View Model ETP3 100HA Trash Pump Page 28 Replacement Parts Tsurumi s Operation Service and Repair Manual ...

Page 33: ...000 670 Bolt Hex Socket M8 X 20 SUS 2 Ref No Part Number Description Qty 28 142 163 18 Washer Spring M8 SUS 2 29 200 500 230 Handle Drain Cover 2 30 203 000 530 Bolt Hex M6 X 25 SUS 4 31 142 126 19 Plain Washer M6 4 32 200 101 180 Frame Black 1 33 200 900 520 Mount Anti Vibration 4 35 1001 024 Nut Spring M8 Mount to Frame 4 34 203 000 130 Bolt Hex M10 X 40 P 2 Engine to Mount 2 36 203 200 070 Nut ...

Page 34: ...nstallation to pump or generator pro vides carefree service 2 Know the typical limitations and poten tial hazards associated with operating and transporting gasoline engine driven pump or generator equipment Never run the pumps or generator in an enclosed area Pump or generator should only be operated in well ventilated areas Engines produces exhaust gas containing odorless and poisonous carbon mo...

Page 35: ...ace one plain washer Ref No 9 over the axle Ref No 1 and 2 on each side of the axle Ref No 1 and 2 A total of two washers Ref No 9 are required one on each side of the axle Ref No 1 and 2 After the washers Ref No 9 are installed over the ends of the axle Ref No 1 and 2 insert the hairpin sprint pins Ref No 10 into the holes on each side of the axle Ref No 1 and 2 One hair pin style cotter pin is r...

Page 36: ......

Reviews: