background image

Copyright © 2021 TTAAll Rights Reserved.

G200 Manual

18

4.3 Registration and Login

4.3.1 Registration

(1) Click “Register” to start registration.
(2) Use phone number or email to receive the verification code.

Attention: When using email to register, please view the junk mail list as the verification
mail may be recognized as junk mail.

4.3.2 Login

(1) Click “Login” to enter the login page
(2) Input your account to log in.

4.3.3 Account Update

There are four classes of account type: Manufacturer (TTA), Seller (TTA’s dealer),
Owner(drone owner), Normal.
User shall upgrade the account’s class for getting according rights. Upgrading process is
as follow.

“Normal” Upgrading to “Seller”

(1) Click “Account update” to enter the upgrading page.
(2) Select the according account class - “seller”, input “

19801108966

” as the Verifier, and

upload the photo of relevant materials for applying for the account class.
(3) Click “Submit”, and then contact TTA AS engineer to notice them for further
verification.

“Normal” Upgrading to “Owner”

(1) Click “Account update” to enter the upgrading page.
(2) Select the according account class - “owner”, input “

19801108966

” as the Verifer, and

upload the photo of relevant materials for applying for the account class.
(3) Click “Submit”, and then contact TTAAS engineer to notice them for further verification.

Summary of Contents for G200

Page 1: ...TTA M6E G200 USER INSTRUCTIONS V3 0 Make sure the pilot is well trainned in operating UAVs before going on mission ...

Page 2: ... Manual Item Component Item Component 1 Obstacle Avoidance Radar 8 Intelligent Battery 2 Pump 9 Electronic Box 3 Flow meter 10 Camera LED 4 Terrain Follow Radar 11 Main Body 5 Tank 12 Tank Holder 6 RTK Antenna optional 13 Sprinkler 7 Arm 12 13 ...

Page 3: ...duction 10 3 1 2 UAV Parameters 10 3 1 3 G200 Agriculture UAV Specification 11 3 2 Remote Controller 12 3 2 1 RC Introduction 12 3 2 2 RC Parameters 13 3 3 Intelligent Battery 14 3 4 Charger Station 15 3 4 1 Charger Specification 15 3 4 2 Safety Rules 15 4 Prepare for Work 16 Operation Flow of A New Drone 16 4 1 Software Installation 17 4 2 Registration Procedure 17 4 2 1 Registration Procedure 17...

Page 4: ...ion 37 5 2 Parameters Settings 37 5 2 1 Sensor 37 Two kinds of method of compass calibration 38 5 2 2 Battery 38 5 2 3 Spray 39 5 2 4 Parameters 41 5 3 Extra Mode 42 5 3 1 Smart Battery 42 5 3 2 Terrain Follow Radar 42 5 3 2 J RTK 43 5 3 3 Obstacle Avoidance Module 44 5 4 About 45 6 Remote Controller 46 6 1 Function Description 47 6 2 Bind 47 6 3 RC Hardware Calibration 47 6 4 RC Connection Device...

Page 5: ...light area Don t use this product in rain thunder sandstorm fog snow high wind and low temperature and other bad environments When flying in more than three kilometers altitude be aware that environmental factors can lead to flight performance degradation When operating this product fly in low height please always keep a safe distance of more than 10m between the drone and people or animals Please...

Page 6: ...ing please clear your skin copter and remote control When changing chemicals to spray user should clean spray system completely or there will be interaction between different chemicals Spraying shall be carried out in windless sunny day don t spray under high temperature at noon Pilot should stand in the upwind area outside the operating area Not suggested to perform missions if wind speed is abov...

Page 7: ...hin the permit of local law and regulations To fly the UAV safely as required please fly it within in the height of 50 meters If it has local flying height limit within 50 meters please make sure obey the related regulations 1 5 Operation Please ensure the multi rotor UAV flying height is within 8 meters except the special requirements Before remote control calibration hardware update parameter se...

Page 8: ...r with medicine limitation Be familiar with the remote control operation each flight mode and ensure you know how to operate the control condition User shall know and obey all the law and regulations in flying location 1 6 Compass Calibration Requirements Compass has to be calibrated before using the first time If else it cannot work and will affect flying safety Please do not calibrate it in the ...

Page 9: ...Copyright 2020 TTAAll Rights Reserved G200 Manual 5 2 Product Introduction 2 1 Tank and Landing Gear Installation ...

Page 10: ...ank holder and mount the tank to the corresponding location from down to top with the water inlet pointing to the back of aircraft Pull up the tank holder to proper location to lock the tank Insert quick release plug to lock the holder with the quick release plug being pressed down and held 4 Plug the modular connectors to the ports of electronic box accordingly Port Module Port Module LL Flowmete...

Page 11: ...Copyright 2020 TTAAll Rights Reserved G200 Manual 7 2 2 Arm Installation 1 Arm Location 2 Connect the XT30 and MT60 connectors as Figure 2 Figure 1 Figure 2 Ports of Electronic Box ...

Page 12: ...ferent rotation direction of the propellers which produce lift force There is a mark arrow on every motor holder to help differentiate CCW arrow means CCW arm you need to install the CCW propeller otherwise it will be CW arm which you need to install the CW propeller 2 The camera points to the orientation of aircraft head 3 Attention CCW M1 arm with Red LED CW M2 arm with Red LED CCW M3 arm with G...

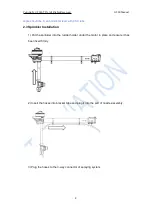
Page 13: ...vel with ESC tube 2 3 Sprinkler Installation 1 Put the sprinkler into the rudder holder under the motor in place and ensure it has been fixed firmly 2 Insert the hoses into bracket tube and plug it into the port of nozzle assembly 3 Plug the hoses to the 3 way connector of spraying system ...

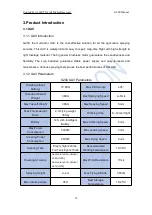
Page 14: ...AV Parameters G200 UAV Parameters Weight without battery 15 8KG Max Pitch Angle 25 Standard Takeoff Weight 36KG Best Spraying Speed 4 6m s Max Takeoff Weight 38KG Max Spaying Speed 8m s Max Thrust weight Ratio 2 3 Flying weight 36Kg Working Time 6 12min flight Battery 14S LiPo Intelligent Battery Max Climbing Speed 5m s Max Power Consumption 5000W Max Landing speed 3m s Hovering Power Consumption ...

Page 15: ...0A Working Voltage 14S 50 4 58 8v Working Pulse Width 1100 1900us Compatible Signal Frequency 50 500Hz Drive PWM frequency 400Hz Foldable Propellers Material High toughness engineering plastic Diameter Screw pitch 3090 L 762mm Weight 203g Battery Capacity 14S 17000MAh Spraying System Tank Rated Payload 16L Sprayer Model No Pressure Type Sector Cone Quantity 4 6 pcs Nozzle Diameter 0 5 1 5mm Sprayi...

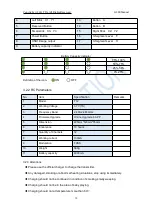
Page 16: ...ing Micro USB 5V 2A Charging time 3 4 5h Working Environment Temperature 0 40 C Best Storage Temperature 10 25 C Best Charging temperature 10 25 C 3 2 Remote Controller 3 2 1 RC Introduction No Specifications No Specifications 1 2 4G 3DB Antenna 10 USB2 Charge Data Transmission 2 3 Segment Lever G 11 Button D 3 3 Segment Lever E 12 Button C ...

Page 17: ...0mA 9 Modulation FHSS 10 Weight 560g 11 Battery capacity 4000mA 3 2 3 Attentions Please use the official charger to charge the transmitter Any damaged smoking or abnormal heating situations stop using immediately Charging should not be continued in condition of smoking smelly weeping Charging should not be in the area of baby playing Charging should not at temperature more than 60 4 Left Stick X1 ...

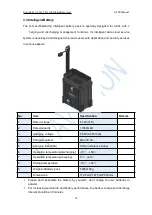
Page 18: ... Specification Remark 1 Rated voltage 51 8V 14S 2 Rated capacity 17000mAH 3 Charging voltage 58 8V 4 20V Cell 4 Charging current Max 30 0A 5 Charging time 30A 50min reference value 6 Operation temperature discharging 10 60 7 Operation temperature charging 0 45 8 Storage temperature 10 35 9 Weight of Battery pack 5900 100g Dimensions 112 5mm 167 5mm 235mm Please don t assemble the battery by yourse...

Page 19: ...voltage in real time for easily checking battery performance and charging status The internal heat dissipation channel of the product is designed reasonably which can effectively dissipate heat and ensure continuous stable and reliable operation of the product 3 4 1 Charger Specification 1 Input voltage AC110V 240V 2 Max charging power 1200W 2 3 Charging Mode 10A 20A 30A 4 Battery supported 14S 5 ...

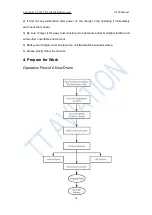
Page 20: ...ting it immediately and check the manual 3 Be sure charger is far away dust moisture rain heat source direct sunlight vibration and some other unsuitable environment 4 Battery and charger must be placed on uninflammable insulated surface 5 Please strictly follow the manual 4 Prepare for Work Operation Flow of A New Drone ...

Page 21: ... org downloadcat app 2 After GCS installation the label will be appeared as figure 5 1 TTA GCS support Android 4 0 or above 4 2 Registration Procedure 4 2 1 Registration Procedure Attention Account has two selectable level Seller and Owner Customer can apply to the corresponding level to update One drone can only be added to one account of one level Figure 5 1 ...

Page 22: ... shall upgrade the account s class for getting according rights Upgrading process is as follow Normal Upgrading to Seller 1 Click Account update to enter the upgrading page 2 Select the according account class seller input 19801108966 as the Verifier and upload the photo of relevant materials for applying for the account class 3 Click Submit and then contact TTA AS engineer to notice them for furt...

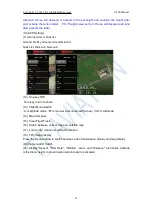
Page 23: ...us as Figure 5 42 3 RTK Icon Red indicates not connected Green indicates connected Grey indicates not installed yet 4 Remote control connection status The upper part represents the signal strength of the remote controller and the lower part represents the image transmission signal strength Green means the remote control is connected Gray means the remote controller is not connected 1 2 3 4 5 6 7 8...

Page 24: ...uring flying Spray Auto It is precise spraying Drone can spray a certain amount of liquid per hectare The spray amount can be set in APP before each flight Spray Link The flow rate is relative to flight speed Pilot can set the flying speed for controlling the pump At which speed pump will start to be turned on from the min setup flow rate At which flying speed pump will reach its max setup flow ra...

Page 25: ...k List Wait Job Now Job 12 One key RTH One key return to home 13 Flight Mode Switch A is attitude mode M is manual work mode GPS mode AB is AB mode 14 Map Compass 15 Clear Flight Track 16 Switch between normal map and satellite map 17 Locate my location or aircraft s location 18 FPV image display Press the small window to switch between video transmission display and map display 19 Camera LED Swit...

Page 26: ...nect 1 Power on Remote controller 2 Power on the drone 3 Open the Agri Assistant APP 4 Log into your account 5 Press Connect select H12 The connect icon will turn to connected after connecting successfully 1 Press to connect 2 Select H12 3 Connected successfully ...

Page 27: ...ick the Completed button to finish adding as Figure 5 6 2 4 6 3 Nofly Apply Nofly Apply is used to apply to UAV manufacture for flying in No fly zones in special situations Drones can not take off in No fly zones without manufacture s permission Click Device click Nofly Apply select the expected time of performing mission upload the relevant certificate the flight control serial number is automati...

Page 28: ...ck Confirm 4 7 Record 1 Log in to your account add the UAV to the Device manager 2 Connect to the app and perform missions 3 After the flight is over enter the Record page of APP or go to the ai fei fang com website to view the mission records Process of viewing records on website 1 Enter ai fei fang com and use your account to log in 2 Click UAV manage to view the drone list and select the drone ...

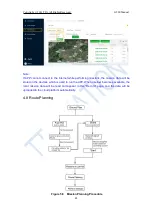
Page 29: ...ing missions the mission data will be stored in the devices which is used to run the APP When internet becomes available the local mission data will be read and appear in this Record page and the data will be uploaded to the cloud platform automatically 4 8 Route Planning Figure 5 8 Mission Planning Procedure ...

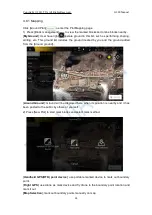
Page 30: ... includes the ground created by you and the ground added from the Around ground Around Ground Ground will be displayed here when its position is nearby and it has been posted to the public by others or yourself 2 Press New Plot to start mark blocks and select mark method Handheld GPS RTK point device use portable marked device to mark out boundary point Flight GPS use drone as mark device and fly ...

Page 31: ...s an example 3 Input contract name cellphone number block name to name the blocks 4 Mark area Slide the map to place the Mark icon on the proper point press Boundary pint to mark one boundary point 5 Add obstacles Press Obstacle point to select the shape of obstacle Polygon or Circle ...

Page 32: ...o edit it 4 Save blocks Chose to continue mapping or exit mapping 4 8 2 Mission Assignment 1 After mapping click My Ground to view the plot list 2 Select the plot you want to share with others 3 Click Share on the right corner of the interface input task name e g sky start the account name which you want to share with Crop type Rout type Attention The account name do not need to fill if the blocks...

Page 33: ...our ground to everyone nearby Select the ground in My Ground you want to share and Press Push Plot Input the password of this ground and Confirm Everybody nearby can view the shared ground in Around Ground 3 Input share password and confirm 1 Select the ground 2 Press to push ...

Page 34: ... Reserved G200 Manual 30 4 8 2 2 ADD a ground from Around Ground into my ground list Select the ground in Around Ground list and press Save ground plot Input share password and confirm Then ground will be added into My Ground list ...

Page 35: ...e ground in My Ground list with yourself Select the ground and press Share Input the Task name and Account name you want to share with Attention The account name do not need to fill if the blocks is shared with yourself Back to home page and open Start section The ground has already in your Wait job list 1 Select the ground 2 Press to share ...

Page 36: ...nual 32 4 9 Start Mission 4 9 1 Route Adjust 1 Press Task Management to view the tasks which is assigned Wait Job indicates the job need to be finished after somebody released a marked field to you Now Job indicates the job you are performing now ...

Page 37: ... line Obstacle boundary distance distance between obstacle boundary of nearby route Route Type Route arrangement when encountering obstacles Route settings Position adjust of the whole routes 2 kinds of Route types Cross Turn back 4 9 2 Start Spraying 1 After adjusting route completely press Start to enter into spraying process 2 The spraying parameters can be adjusted in the spraying interface su...

Page 38: ...g volume per area unit CT U type turn coordinated turn 3 Press Confirm and the route will be uploaded by itself 4 After uploading complete the Task Check will pop up Ensure all parameters are normal Forbid taking off if any sensor is incorrect such as the pictures below ...

Page 39: ... for regular blocks By setting the two boundary points A and B a simple regional flight can be created as show below Note Before record AB points previous AB data must be removed by moving the F lever rapidly from top to bottom 1 AB recording Switch the flight mode to AB mode Fly the drone to expected A point and click A icon to record point A The below window of spraying settings will pop up for ...

Page 40: ...TTAAll Rights Reserved G200 Manual 36 2 Check the drone state and ensure all are normal before take off Note User can adjust the take off altitude extend or shorten the course with the remote control during the flight ...

Page 41: ...sions instead of triggering Fail Safe protection action when drone is out of control 5 2 Parameters Settings 5 2 1 Sensor 1 Accelerometer calibration Place the UAV on a horizontal platform click the button Accelerometer calibration LED will flash in red green yellow alternately Solid green LED means successful calibration data will be stored by restart 2 Compass calibration Situations when need ca...

Page 42: ...nd keep copter rotating clockwise and slowly leave copter head to the ground when green led is on rotate copter clockwise and slowly till LED flash in red green and yellow alternately After vertical calibration calibration mode will be exited automatically and LED will flash normally if successful If fails LED will keep red for 3 seconds then user need to calibrate again Please power again after s...

Page 43: ... level LED will flash rapidly when get to the second alarm level and low voltage protection will be triggered 3 Voltage Calibration Flight controller voltage sensor need to be calibrated if the result of sensor is different from real voltage Real battery voltage should be filled after measuring battery voltage then voltage sensor will be calibrated by clicking save It s unnecessary to set by user ...

Page 44: ...ual 40 1 First drain all the liquid in the tank and hoses 2 Pour 5 10 liters of water into the tank with measuring cup 3 Input the value of the water into the blank 4 Input the output percentage of pump Volume of added water Pump output percentage ...

Page 45: ...utton Save to save the changes Note It s not suggested to reset the Max Angel Work End Action refers to what drone will do after mission is completed U Open refers to the turn shape Course Mode refers to the drone heading direction when drone is performing missions Manual indicates drone will keep the heading direction in AB mode or autonomous route mode unless turn it manually Auto indicates dron...

Page 46: ... 5 3 2 Terrain Follow Radar Terrain following sensitivity Control the drone to follow the height change of the terrain and keep the relative distance from the ground fixed at all times 1 Low sensitivity suitable for high stalk crops such as sorghum corn etc It can prevent falling and twitching caused by high loft lodging and uneven high loft 2 Medium sensitivity suitable for most scenarios and non...

Page 47: ...rcraft its status should be Fixed before takeoff RTK Diff_Age display the latency of RTK differential data If the value changes between 1 3 it indicates the RTK signal status is good RTK Protect display the protection action when RTK fails RTK trust recommended to set on Mid Hight Drone can t be armed unless RTK positioning and RTK Location Status is fixed Mid Drone can t be armed unless RTK posit...

Page 48: ...tacles automatically when detected obstacles Hang Drone will hover when detected obstacles Avoid Safe Dis After the aircraft detects the obstacle the distance between the final hovering position of the aircraft and the obstacle generally set 8 10 meters Avoid Help Dis When triggering the Cross avoidance action the actual avoidance flying distance swath 2 Avoid Help Dis referring to the Figure 6 33...

Page 49: ...is page Map type User can chose proper map tape according to the working country Correct coordinates It is suggested to turn it on when the positioning deviation is large fpv unit Turn on or off FPV display Switch to Metric Unit or US unit Voice Prompt Turn on or off the voice prompt of APP Unlock Password Set the password of arming drone US Units Switch statistic unit between Metric Unit and US U...

Page 50: ...ition of smoking smelly weeping Charging should not be in the area of baby playing Charging should not at temperature more than 60 No Specifications No Specifications 1 2 4G 3DB Antenna 10 USB2 Charge Data Transmission 2 3 Segment Lever G 11 Button D 3 3 Segment Lever E 12 Button C 4 Left Stick X1 Y1 13 Button A 5 Reserved Button 14 Button B 6 Small stick X3 Y3 15 Right Stick X2 Y2 7 Power Button ...

Page 51: ...troller Drone will bind the remote controller successfully with seven beeps from remote controller Remote controller need to be calibrated after binding Remark Binding remote controller can not be operated for more than one pair at the same time Only one to one pairing is allowed 6 3 RC Hardware Calibration The following method is to calibrate the channels of RC itself 1 keep pressing both button ...

Page 52: ... the according options to reset 2 Device Helper introduction ADJUST PARAMETERS Adjusting channels rudder value fail safe value OTHER OPTIONS Selecting SBUS or PPM output mode of receiver and telemetry baud rate HAND SETTINGS Select hand mode USA Japan ect UPDATE DEVICE Update firmware online Connection mode Bluetooth mode SBUS receiver mode Cautions Don t do any adjustment unless under professiona...

Page 53: ...ct user s phone remote controller and drone 2 Open Device Helper APP click HAND SETTINGS and select hand mode USA mode 2 or JPN mode 1 3 Click SAVE SETTINGS to save Note 1 The default mode is USA mode mode 2 2 Do not change stick mode in RC Mode of RC Calibration page Do not change stick mode here ...

Page 54: ... TTAAll Rights Reserved G200 Manual 50 6 6 Remote Controller Antenna Remote controller antenna should straight up when it is stretched Caution Incorrect directions as the two pictures below Straight up when stretched ...

Page 55: ...rence and all parts of aircraft are in good condition 4 Before take off please check the stick mode and confirm the current settings is the mode you want If not never reset by yourself without the introduction of TTA s engineer 6 5 2 Disarming After landing the aircraft push the throttle down and hold for 3 seconds The motors will be stopped and drone will be disarmed at the same time Emergency di...

Page 56: ...ibration Yellow light constant light Middle Vertical calibration Green light constant light Middle Calibration failed Red light constant light Middle Calibration succeed Red green and yellow light alternating flash Middle Accelerator Calibration Calibrating Red green and yellow light alternating flash Middle Calibration succeed Green light constant light Middle Error Remote controller lose control...

Page 57: ...e Otherwise battery may be damaged because of over self discharge In long term storage charge and discharge battery to activate battery every 2 3 month Otherwise battery performance will be largely reduced More details referring to Battery Use and Maintenance Instruction Any losses caused by improper battery maintenance and storage shall be taken by users 3 Drone Idle Time Protection To maximize t...

Page 58: ...Copyright 2021 TTAAll Rights Reserved G200 Manual 54 This content is subject to change If you have any questions please contact TTA lan li ttaviation com Copyright 2020 TT Aviation All rights reserved ...

Reviews: