background image

Beijing TT Aviation Technology Co., Ltd.

Add: No.1 TTA Building, Niantou Industrial Park ,Changping District,Beijing, China

www.ttaviation.org

38

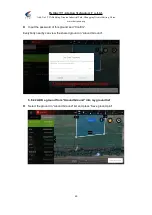
1) Waiting for permissions from UAV manufacturer.

2) After getting the permission, the time displayed on the “Device” interface will be the

time you submitted in “Nofly Apply” when the APP connects to the aircraft. It indicates that

the no-fly zone is successfully lifted temporarily during the apply time.

5.6.4 Switch Owner

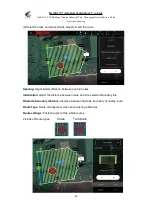
“Switch Owner” can only be performed in “Owners” for transferring the ownership of UAV.

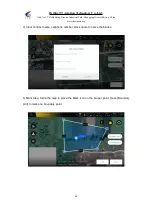
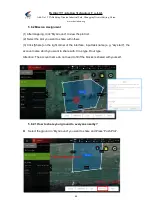
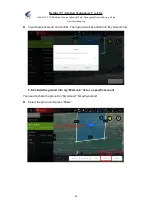
1) Click “Device” - “Plane List”;

2) Select the UAV and click “Switch Owner”;

3) Input the info. and click “Confirm”;

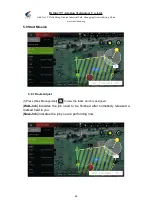
5.6.3 Nofly Apply

5.6.4 Switch Owner

Summary of Contents for TIANNONG M6E-XT

Page 1: ...TIANNONG M6E XT USER INSTRUCTIONS Make sure the pilot is well trainned in operating UAVs before going on mission ...

Page 2: ...m Component Item Component 1 Fuselage 7 Intelligent Battery 2 Clockwise Arm with LED 8 Landing Gear 3 Counter Clockwise Arm with LED 9 Camera Module 4 Clockwise Arm 10 Arm Joint Fuselage 5 Counter Clockwise Arm 11 Propeller clockwise 6 Water Tank 12 Propeller Counter clockwise 1 8 1 11 2 3 4 6 7 9 1 5 ...

Page 3: ... Intelligent Battery Instruction 19 3 1 Key Function 19 3 2 Electricity Inspection 19 3 3 Charging 20 3 3 1 Charging Protection Function 20 4 Charger Station Introduction 21 4 1 Production Parameters 21 4 2 Wiring diagram 22 4 3 Indicator Lamp Instruction 24 4 4 Operation Instruction 25 4 5 Interface Instruction 26 4 6 Operation Instruction 27 5 App Setting of Copter 29 Operation Flow of A New Dro...

Page 4: ...4 Parameters 59 6 3 Extra Mode 60 6 3 1 Smart Battery 60 6 3 2 Terrain Follow Radar 60 6 3 2 J RTK 61 6 3 3 Obstacle Avoidance Module 61 6 4 About 63 7 Remote Controller 64 7 1 Function Description 65 7 2 Bind 65 7 3 RC Hardware Calibration 65 7 4 RC Connection Device Helper APP Introduction 66 7 5 Hand Mode Settings Introduction 67 7 6 Remote Controller Antenna 68 7 7 Flying Control 68 7 7 1 Manu...

Page 5: ...magnetic interference environments When using this product please keep away from army and kinds of manned craft flight area Don t use this product in rain thunder sandstorm fog snow high wind and low temperature and other bad environments When flying in more than three kilometers Environmental factors can lead to flight performance degradation please care of using it When operating this product fl...

Page 6: ...al residue in fuselage will be harmful to human body When dispensing please pay more attention and use protective tools and do not let body directly touch with the chemicals After chemical spraying please clear your skin copter and remote control When changing chemicals to spray user should clean spray system completely or there will be interaction between different chemicals Spraying shall be car...

Page 7: ... buildings high voltage wires and others Please fly the drone in a dedicated space Please ensure the drone fly within the operator s eyesight The drone working temperature is between 0 40 Ensure the drone fly within the permit of local law and regulations To fly the drone safely as required please fly it within in the height of 50 meters If it has local flying height limit within 5ometers please m...

Page 8: ... restricted areas and is proper for flight Please make sure do not fly or operate the drone when you are drunk or with medicine limitation Be familiar with the remote control operation each flight mode and ensure you know how to operate the control condition User shall know and obey all the law and regulations in flying location 1 6 Compass Calibration Requirements Compass has to be calibrated bef...

Page 9: ...uselage material The big power brushless motor guarantees the sensitiveness and flexibility The Lipo batteries guarantee the power supply and easy to repair and maintain Various spraying tests proves the best performances of this UAV 2 1 TIANNONG M6E XT Parameter Weight without battery 9 5KG Max Pitch Angle 35 Standard Takeoff Weight 20KG Best Spraying Speed 4 6m s Max Takeoff Weight 24KG Max Spay...

Page 10: ...S 44 50 4v Working Pulse Width 1000 2000us Compatible Signal Frequency 50 400Hz Drive PWM frequency 400Hz Foldable Propellers Material High strength engineering plastic Diameter Screw pitch 2388 L 585mm Weight 95g Battery Capacity 14000MAh Battery TTA Intelligent Battery 12S Max Climbing Speed 5m s Max Power 12000W Max Landing speed 3m s Hovering Power 3150W Max Flying Speed 10m s Hovering Time Em...

Page 11: ...h 4 6m up to height Spraying Droplet Diameter 80 200μm adjustable Remote Controller Remote Controller Model No R4 Working Frequency 2 4Ghz Endurance 10h Effective Signal Distance 1 2KM Battery capacity 3 7V 4000mAh Charging type DC 5V 2A Charging time 5 10h Working Environment Temperature 0 40C Best Storage Temperature 10 25C Best Charging temperature 10 25C 2 3 Preparation Before Takeoff 2 3 1 In...

Page 12: ...ark on the bottom of dome indicates the direction of drone nose 1 Put the upside of drone head down as Figure1 2 Mount the fuselage and the water tank kit according to the Figure3 The upper tank lid is at the drone tail 3 Pay attention to the raised position on landing gears as Figure 4 4 Slip the landing gear gently into the groove as Figure5 Gently hit the landing gear to make its raise position...

Page 13: ...tion 12 2 3 2 Arm Installation Make all the arms ready 1 clockwise CW arm with LED 1 counter clockwise CCW arm with LED 2 CW arms and 2 CCW arms Totally 6 arms Motor rotation direction same as the cover Label M1 to same label of copter M1 CCW arm assembly ...

Page 14: ... Rights Reserved Product Introduction 13 Label M2 same as copter frame Motor rotation direction as the cover M2 CW arm assembly Label M3 same as the copter frame rotation direction same as motor M3 CCW arm assembly with LED ...

Page 15: ...ll Rights Reserved Product Introduction 14 Arm label same as the copter s M4 Same as the motor rotation direction CW M4 CW arm assembly Same as the label of copters label M5 Same as the motor rotation M5 CCW arm assembly ...

Page 16: ...on direction CW M6 CW arm assembly with LED Copter s M6 same as the copter s M6 安装 Head direction as the arrow Arm M1 same as the copter s M1 Arm M2 same as the copter s M2 Copter s M3 same as the copter s M3 Copter s M4 same as the copter s M4 Copter s M5 same as the copter s M5 安装 Arm and copter installation figure ...

Page 17: ... Figure 8 figure 9 4 Install the M5 49 plug screw from the hexagon side of the 6mm hole on fuselage arm joint see figure 10 5 Lock the plug screw with a M5 nut from the other side the bolt end should same as the the nut that means lock works as Figure 11 Bolt on hex hole Nut in hole M5 shutter screw M5 nut Self lock when bolt end and nut in same plane Figure 10 figure 11 5 Install the rest 5 arms ...

Page 18: ...the heading direction 3 According to the Figure 7 install CCW arm on M1 and M5 install CW arms on M2 and M4 install CCW Arm with LED on M3 install CW Arm with LED on M6 4 Arm could only fold down instead of up during the installation arm should be in an horizontal level with ESC 2 3 3 Spraying Tube Installation 1 First insert the Φ8 spraying tube into the three way connector as Figure 14 1 Second ...

Page 19: ... 3 4 Intelligent Battery Installation 1 Push the Intelligent battery into the water tank as Figure 15 1 due to interference fit it will be installed well when the battery wear pad stuck into the position Mark 3 in the Figure 15 2 It will be completed like Figure 15 3 2 The battery will be completely installed like Figure 15 4 ...

Page 20: ...e battery is off you can check the real time electricity with a short press Power LED1 LED2 LED3 LED4 Attention Electricity indicate light represents both the quantity of electricity when charge and discharge Battery Indicate Light Indicator LED1 LED4 Battery Electricity Green LED1 Green LED2 Green LED3 Green LED4 0 12 Flash OFF OFF OFF 13 24 ON OFF OFF OFF 25 37 ON Flash OFF OFF 38 49 ON ON OFF O...

Page 21: ...connect the discharging cable before charging Indicator LED1 LED4 Battery Electricity Green LED1 Green LED2 Green LED3 Green LED4 0 25 Flash OFF OFF OFF 26 50 Flash Flash OFF OFF 51 75 Flash Flash Flash OFF 76 99 Flash Flash Flash Flash 100 OFF OFF OFF OFF 3 3 1 Charging Protection Function 1 The best charging current for intelligent battery is 0 5C and 25A is maximum current supported Large charg...

Page 22: ...temperature open circuit reversed polarity Working Temperature 5 45 Dimension 320x121x30 4mm Weight 1 35kg Standard Charging Station Input 100 120V 18A 60Hz 180 240V 16A 50Hz Output Max50 4V Max30 0A Output Power 100 120V Max 750Wx2CH 180 240V Max 1200Wx2CH Battery LiPo Intelligent battery Battery Cells 12S Charging Channel No 2 channels Optional 10 channel double charging manager station Input Pr...

Page 23: ...d Add No 1 TTA Building Niantou Industrial Park Changping District Beijing China www ttaviation org 22 4 2 Wiring diagram Indicator lamp XT90 output port Balance port Power input port Master voltage port Charging Manager Charging Station ...

Page 24: ... Brand LCD monitor Cooling fan Charge port LED AC input port Master Voltage Charging button 1 Connect the charging station and charging manager by inserting the XT port and balance port Fix their connection with 4 screws Fixed Connection 2 Insert the port of power cable into the input port of charging station first Then connect a AC power 100 240V 50 60HZ 3 Connection of M6E XT 12S intelligent bat...

Page 25: ...ug 3 To avoid short circuit user must connect the banana plug and link box first then connect battery when user want to charge it Meanwhile user must disconnect the battery first then disconnect the link box and charging station 4 3 Indicator Lamp Instruction Indicator Lamp Status Description ˉˉˉˉ Green Flash Standby Red Constant Working Green Constant Complete ˉˉˉˉ Green red flash alternately Err...

Page 26: ...will be charging rapidly in this mode Storage mode The battery is suggested to be maintained every 15 days when no use for long time Battery needs to be maintained in storage mode when the endurance declines apparently or the voltage difference between each battery cell beyond 50mv In storage mode charger will try to balance the voltage of each battery cell to 3 84 3 86 by charging discharging and...

Page 27: ...battery and monitor will display real time maintaining specify status 2 Green lamp on constantly Maintaining completely 3 Press any button Stop charging 4 5 Interface Instruction 1 Charging station Interface 2 Error Warning When using the charger incorrectly or meet any problems charger will display some errors as below Display status Charging Storage Standby Error Real time Charge Maintain curren...

Page 28: ...ease do not disconnect battery without urgent use thus battery life will be prolonged 6 Battery will discharged by charger for full charge storage discharging will be stopped when single cell voltage lower than 3 85V or total voltage lower than 46 2V but balance current will not be stopped until battery balanced or disconnected Please do not disconnect battery to avoid total voltage less than 46 2...

Page 29: ...oltage 2 12S 50 4V LiPo battery is suitable to this product correct battery should be chosen 3 Please take care of charging status when charger connecting stop operation for any abnormal phenomenon 4 Be sure charger is far away dust moisture rain heat source direct sunlight vibration and some other unsuitable environment 5 Battery and charger must be placed on uninflammable insulated surface 6 Ple...

Page 30: ...Beijing TT Aviation Technology Co Ltd Add No 1 TTA Building Niantou Industrial Park Changping District Beijing China www ttaviation org 29 5 App Setting of Copter Operation Flow of A New Drone ...

Page 31: ... has two selectable level Seller and Owner Customer can apply to the corresponding level to update One drone can only be added to one account of one level 5 2 Software Installation 1 Please download and the GCS software in the following link https www ttaviation org downloadcat app 2 After GCS installation the app will appear as figure 5 1 TTA M6E XT support Android 4 0 or above Figure 5 1 ...

Page 32: ... as the verification mail may be recognized as junk mail 5 3 2 Login 1 Click Login to enter the login page 2 Input your account to log in 5 3 3 Account Update There are four classes of account type Manufacturer TTA Seller TTA s dealer Owner drone owner Normal After passing real name authorization user shall upgrade the account s class for getting according rights Upgrading process is as follow Nor...

Page 33: ...lass 3 Click Submit and then contact TTA AS engineer to notice them for further verification Normal Upgrading to Owner 1 Click Account update to enter the upgrading page 2 Select the according account class owner input 19801108966 as the Verifer and upload the photo of relevant materials for applying for the account class 3 Click Submit and then contact TTAAS engineer to notice them for further ve...

Page 34: ...vice to be connected as Figure 5 41 With devices connected press it to view the drone status as Figure 5 42 3 RTK Icon Red indicates not connected Green indicates connected Grey indicates not installed yet 4 Remote control connection status The upper part represents the signal strength of the remote controller and the lower part represents the image transmission signal strength 1 2 3 4 5 6 7 8 9 1...

Page 35: ...Manual work mode equal to GPS mode AB mode indicates AB work mode M indicates M work mode 8 Spray Mode Spray Manual the flow rate is fixed once pilot set it up But it can be adjusted at any time during flying Spray Auto It is precise spraying Drone can spray a certain amount of liquid per hectare The spray amount can be set in APP before each flight Spray Link The flow rate is relative to flight s...

Page 36: ...e set to 0 Drone will descend and land after activate the radar 10 APP Settings 11 Ground List or Task list Ground list My Ground Around Ground Task List Wait Job Now Job 12 One key RTH One key return to home 13 Flight Mode Switch A is attitude mode M is manual work mode GPS mode AB is AB mode 14 Map Compass 15 Clear Flight Track 16 Switch between normal map and satellite map 17 Locate my location...

Page 37: ... the default is Off thus it should be opened every time 2 Power on Remote controller 3 Turn on the Bluetooth of cellphone search for the Bluetooth of remote controller and connect Remote controller Bluetooth name T12_ password 1234 4 Run the Agri Assistant APP 5 Click Connect select Bluetooth and connect the Bluetooth of remote controller The connect icon will turn to connected after connecting su...

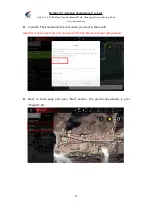
Page 38: ...ly after connecting to the aircraft then click the Completed button to finish adding as Figure 5 6 2 5 6 3 Nofly Apply Nofly Apply is used to apply to UAV manufacture for flying in No fly zones in special situations Drones can not take off in No fly zones without manufacture s permission Click Device click Nofly Apply select the expected time of performing mission upload the relevant certificate t...

Page 39: ...on the Device interface will be the time you submitted in Nofly Apply when the APP connects to the aircraft It indicates that the no fly zone is successfully lifted temporarily during the apply time 5 6 4 Switch Owner Switch Owner can only be performed in Owners for transferring the ownership of UAV 1 Click Device Plane List 2 Select the UAV and click Switch Owner 3 Input the info and click Confir...
Page 40: ...ge to view the drone list and select the drone you want to check 3 Chose the data sources of the records APP KBOX IOT APP is the default APP Mission data is uploaded to sever via APP KBOX Mission data is uploaded to sever via KBOX build in 4G device IOT Mission data is uploaded to sever via IOT module temporary offline data storage device 4 Click Search to find the data Note If APP cannot connect ...

Page 41: ... Block management to view the marked blocks and online blocks nearby My Ground User have rights to operate ground in this list such as performing sharing editing etc This ground list includes the ground created by you and the ground added from the Around ground Around Ground Ground will be displayed here when its position is nearby and it has been posted to the public by others or yourself Figure ...

Page 42: ... 2 Press New Plot to start mark blocks and select mark method Handheld GPS RTK point device use portable marked device to mark out boundary point Flight GPS use drone as mark device and fly drone to the boundary point location and mark it out Map Selection mark out boundary points manually on map Here will use Map Selection as an example ...

Page 43: ...iantou Industrial Park Changping District Beijing China www ttaviation org 42 3 Input contract name cellphone number block name to name the blocks 4 Mark area Slide the map to place the Mark icon on the proper point press Boundary pint to mark one boundary point ...

Page 44: ...obstacles Press Obstacle point to select the shape of obstacle Polygon or Circle Take a circle obstacle as an example Slide the map to place the Mark icon on the proper point and press RBI to mark one red obstacle point Then press the obstacle point to edit it 4 Save blocks Chose to continue mapping or exit mapping Adjust Radius Adjust Position ...

Page 45: ... the plot you want to share with others 3 Click Share on the right corner of the interface input task name e g sky start the account name which you want to share with Crop type Rout type Attention The account name do not need to fill if the blocks is shared with yourself 5 8 2 1 How to share your ground to everyone nearby Select the ground in My Ground you want to share and Press Push Plot 1 Selec...

Page 46: ...Beijing China www ttaviation org 45 Input the password of this ground and Confirm Everybody nearby can view the shared ground in Around Ground 5 8 2 2 ADD a ground from Around Ground into my ground list Select the ground in Around Ground list and press Save ground plot 3 Input share password and confirm ...

Page 47: ...ing China www ttaviation org 46 Input share password and confirm Then ground will be added into My Ground list 5 8 2 3 Add the ground into my Wait Job list or a specific account You need to share the ground in My Ground list with yourself Select the ground and press Share 1 Select the ground 2 Press to share ...

Page 48: ...Changping District Beijing China www ttaviation org 47 Input the Task name and Account name you want to share with Attention The account name do not need to fill if the blocks is shared with yourself Back to home page and open Start section The ground has already in your Wait job list ...

Page 49: ...gping District Beijing China www ttaviation org 48 5 9 Start Mission 5 9 1 Route Adjust 1 Press Task Management to view the tasks which is assigned Wait Job indicates the job need to be finished after somebody released a marked field to you Now Job indicates the job you are performing now ...

Page 50: ...ust to edit the route Spacing adjust lateral distance between each 2 routes Indentation adjust the distance between route and one selected boundary line Obstacle boundary distance distance between obstacle boundary of nearby route Route Type Route arrangement when encountering obstacles Route settings Position adjust of the whole routes 2 kinds of Route types Cross Turn back ...

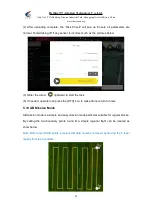
Page 51: ...0 5 9 2 Start Spraying 1 After adjusting route completely press Start to enter into spraying process 2 The spraying parameters can be adjusted in the spraying interface such as spray type flying speed Radar etc Auto Pwm spraying volume per area unit CT U type turn coordinated turn 3 Press Confirm and the route will be uploaded by itself ...

Page 52: ...t such as the pictures below 5 Slider the arrow rightward to start the task 6 If needed operator can press the RTH icon to make drone return to home 5 10 AB Mission Mode AB mission mode is a simple and easy mission mode particular suitable for regular blocks By setting the two boundary points A and B a simple regional flight can be created as show below Note Before record AB points previous AB dat...

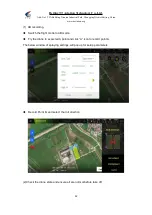
Page 53: ...ww ttaviation org 52 1 AB recording Switch the flight mode to AB mode Fly the drone to expected A point and click A icon to record point A The below window of spraying settings will pop up for setup parameters Record Point B and select the roll direction 2 Check the drone state and ensure all are normal before take off ...

Page 54: ...maximum and minimum values of the remote control and finally display the middle value Attention Do RC Calibration when drone receiver or transmitter is changed 2 RC Mode is used to select the stick mode of RC After switching one beep sound from the remote control indicates successful change 3 Fail Safe is used to set the protection action when RC is out of control 4 Fail Safe Continue After turn i...

Page 55: ... transport the drone to another place the compass have to be calibrated 2 If you fly in the mountain every time you move from one hill to the other one do the compass calibration 3 Everytime you get new drone or a repaired drone do the compass calibration 4 Once you find that the drone cannot stay when it s hover in GPS it might be moving like a cycle do the calibration Calibration order Two kinds...

Page 56: ...ll LED flash in red green and yellow alternately After vertical calibration calibration mode will be exited automatically and LED will flash normally if successful If fails LED will keep red for 3 seconds then user need to calibrate again Please power again after successful calibration Attention Calibration should be done in outdoor wild and far away from high tension line tower which is easy infl...

Page 57: ...second alarm LED will flash when get to the first alarm level LED will flash rapidly when get to the second alarm level and low voltage protection will be triggered 3 Voltage Calibration Flight controller voltage sensor need to be calibrated if the result of sensor is different from real voltage Real battery voltage should be filled after measuring battery voltage then voltage sensor will be calib...

Page 58: ... Niantou Industrial Park Changping District Beijing China www ttaviation org 57 3 flowmeter calibration 1 First drain all the liquid in the tank and hoses 2 Pour 5 10 liters of water into the tank with measuring cup 3 Input the value of the water into the blank ...

Page 59: ...ww ttaviation org 58 4 Input the output percentage of pump 5 Click Start then APP will prompt the flowmeter to start calibration successfully 6 After the calibration is completed the APP voice will prompt the flowmeter calibration successfully Volume of added water Pump output percentage Start calibration successfully ...

Page 60: ... Work End Action refers to what drone will do after mission is completed U Open refers to the turn shape Course Mode refers to the drone heading direction when drone is performing missions Manual indicates drone will keep the heading direction in AB mode or autonomous route mode unless turn it manually Auto indicates drone will keep the heading direction to flight routes and drone won t turn Targe...

Page 61: ...low the height change of the terrain and keep the relative distance from the ground fixed at all times 1 Low sensitivity suitable for high stalk crops such as sorghum corn etc It can prevent falling and twitching caused by high loft lodging and uneven high loft 2 Medium sensitivity suitable for most scenarios and non stalk crops such as rice wheat soybeans etc The speed of the simulation is modera...

Page 62: ...f_Age display the latency of RTK differential data If the value changes between 1 3 it indicates the RTK signal status is good RTK Protect display the protection action when RTK fails RTK trust recommended to set on Mid Hight Drone can t be armed unless RTK positioning and RTK Location Status is fixed Mid Drone can t be armed unless RTK positioning is fixed and RTK yaw angle is the same with compa...

Page 63: ...e the routes to avoid obstacles automatically when detected obstacles Hang Drone will hover when detected obstacles Avoid Safe Dis After the aircraft detects the obstacle the distance between the final hovering position of the aircraft and the obstacle generally set 8 10 meters Avoid Help Dis When triggering the Cross avoidance action the actual avoidance flying distance swath 2 Avoid Help Dis ref...

Page 64: ...e User can view the total flight time in this page Map type User can chose proper map tape according to the working country Correct coordinates It is suggested to turn it on when the positioning deviation is large fpv unit Turn on or off FPV display Switch to Metric Unit or US unit Voice Prompt Turn on or off the voice prompt of APP Unlock Password Set the password of arming drone US Units Switch ...

Page 65: ... smoking or abnormal heating charger should not be used Charging should not be continued in condition of smoking smelly weeping Charging should not be in the area of baby playing Charging should not at temperature more than 60 No Specifications No Specifications 1 2 4G 3DB Antenna 10 USB2 Charge Data Transmission 2 3 Segment Lever G 11 Button D 3 3 Segment Lever E 12 Button C 4 Left Stick X1 Y1 13...

Page 66: ...matically Turn on remote controller Drone will bind the remote controller successfully with seven beeps from remote controller Remote controller need to be calibrated after binding Remark Binding remote controller can not be operated for more than one pair at the same time Only one to one pairing is allowed 7 3 RC Hardware Calibration The following method is to calibrate the channels of RC itself ...

Page 67: ...ort press long press Open bluetooth search and connect bluetooth of remote controller T12 password 1234 2 Device Helper introduction ADJUST PARAMETERS Adjusting channels rudder value fail safe value OTHER OPTIONS Selecting SBUS or PPM output mode of receiver and telemetry baud rate HAND SETTINGS Select hand mode USA Japan ect UPDATE DEVICE Update firmware online Connection mode Bluetooth mode SBUS...

Page 68: ...7 5 Hand Mode Settings Introduction 1 Connect user s phone remote controller and drone 2 Open Device Helper APP click HAND SETTINGS and select hand mode USA mode 2 or JPN mode 1 3 Click SAVE SETTINGS to save Note 1 The default mode is USA mode mode 2 2 Do not change stick mode in RC Mode of RC Calibration page Do not change stick mode here ...

Page 69: ...l Park Changping District Beijing China www ttaviation org 68 Arm 7 6 Remote Controller Antenna Remote controller antenna should straight up when it is stretched Caution Incorrect directions as the two pictures below 7 7 Flying Control Straight up when stretched Emergency Disarm ...

Page 70: ...ted to take off in GPS mode when satellites is more than 14 no magnetic field interference and all parts of aircraft are in good condition 4 Before take off please check the stick mode and confirm the current settings is the mode you want If not never reset by yourself without the introduction of TTA s engineer 7 7 2 Disarming After landing the aircraft push the throttle down and hold for 3 second...

Page 71: ...cked fixed altitude Transmitter operation empty tank reaction others GPS satellites enough LED does not flash red AB mode Copter will fly and spray along with AB point Switch to AB mode then Record point A and B roll left or right for choosing the mission direction GPS satellites enough LED does not flash red RTH Copter will fly back home point automatically flying back tail to home point and then...

Page 72: ... smoothly 3 Blades should be folded well and be held by the blade holder or belts after flight and should be released and put straight before take off 2 Motors 1 Motors should be or be suggested to be replaced 2 Before the rotor clearance get loose or running after 3000 hours 3 The rotor movement get blocked 3 ESC should be or be suggested to be replaced 1 When Esc output obviously different from ...

Page 73: ... flash High Compass Calibration Horizontal calibration Yellow light constant light Middle Vertical calibration Green light constant light Middle Calibration failed Red light constant light Middle Calibration succeed Red green and yellow light alternating flash Middle Accelerator Calibration Calibrating Red green and yellow light alternating flash Middle Calibration succeed Green light constant lig...

Page 74: ...pen the protection cover see figure 1 2 Find the computer connection cable from the attached bag see figure 2 3 One connect to computer another end connect to copter Waiting for a moment It takes few minutes to install the driver for the first connection with a new computer 4 Open PC GCS select the language you need Click the connection button see figure 3 ...

Page 75: ...l Rights Reserved Appendix Technical Support 74 Appendix Ⅳ How to download log from PC GCS 1 Open the PC GCS select Tool menu 2 Click Refresh button 3 Click Download button 4 Log is saved in the position as the orange word ...

Page 76: ...lect the correct firmware 4 Click the button Auto Update then the circular indicator will turn to be green LED of copter usually is OFF during upgrading 5 Waiting until the down left corner to 100 The circular indicator will also turned to red and LED will flash red yellow green to self inspection Waiting for a moment the led will flash normally then upgrading is finished 6 Close the upgrading too...

Page 77: ...the time Otherwise battery may be damaged because of over self discharge In long term storage charge and discharge battery to activate battery every 2 3 month Otherwise battery performance will be largely reduced More details referring to Battery Use and Maintenance Instruction Any losses caused by improper battery maintenance and storage shall be taken by users 3 Drone Idle Time Protection To max...

Page 78: ...ms and conditions of all safety instructions It s user s commitment to their own behavior and therefore is responsible for all the consequences Users promised to use this product only for legitimate purposes and agree to these terms and any others policies or guidelines TTA company may develop 5 In the process of using this product please be sure to strictly obey the safety instructions included i...

Reviews: