2-4
Section 2 - Operation -
Nitro 275RS
WARNING :
Use extreme care when working
around a high pressure hydraulic system. Make
sure all connections are tight and all components
are in good repair. Wear hand and eye protection
then searching for suspected leaks.
7.
Inspect all hydraulic lines, hoses, fittings
and couplers for tightness. Tighten if there
are leaks. Use a clean cloth to wipe any
accumulated dirt from the couplers before
connecting to the
tractor’s hydraulic system.
See “
” in the Troubleshooting
/ Maintenance section of this manual.
8. Inspect all moving and rotating parts. Remove
any debris that has become entangled in the
rear beaters or the PTO drive line.
9. Make sure that all guards and shields are
installed and secured in position.
10. Check the oil level in the gearboxes. Top up
as required.
11. Ensure that the PTO driveline is securely
attached on both ends and can telescope
easily. Check that the PTO driveline shield
rotates freely.
Loading
WARNING :
When parking the spreader for
loading, put the tractor in PARK or NEUTRAL and
apply the parking brake.
1. Fully Close Rear Hydraulic Gate
2. Load the Spreader
The manure consistency will determine how full
your spreader can be loaded. Solid manure can
usually be loaded level to slightly heaped. Wet
materials are heavier and may limit loading.
NOTICE
: It is unlawful to allow any manure
spillage to occur on public roadways. Do not
heap load such that manure is allowed to fall off
spreader during transporting on roadways.
Always check the apron chain and slats to make
sure they are not frozen to the bottom of the bed.
Operating the spreader when the slats or chain
are frozen to the bed may cause damage. Also
make sure there are no lumps of manure frozen
to the floor.
It is recommended to make sure the apron chain
is operating properly before loading the spreader.
Unloading
1. Engage the Rear Beaters.
2. Fully Open Rear Gate
Fully extend the cylinders so the gate is fully
open all the way to the top.
NOTICE : Before starting the apron chain, the
operator should get the beaters up to speed and
open the rear gate to desired height.
Turn on the tractor hydraulics used to start the
apron chain. The hydraulics adjust the speed at
which material is being pulled towards the rear
beaters. The slower the speed - the finer the
spread as the rear beaters have more time to
“process” the material.
See Optional Flow Control
if applicable to your Nitro Manure Spreader.
Summary of Contents for Nitro 275RS
Page 1: ...40299 Rev 1 1 18 04 2018 Operator s Manual Parts Manual...
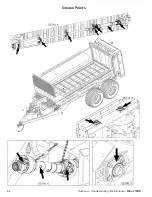
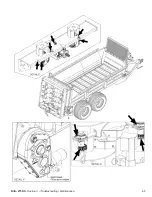
Page 24: ...4 4 Section 4 Troubleshooting Maintenance Nitro 275RS Grease Points...
Page 25: ...Nitro 275RS Section 4 Troubleshooting Maintenance 4 5...
Page 26: ...Intentionally Left Blank...
Page 27: ...Nitro 275RS Section 5 Parts Breakdowns Lists 5 1 Section 5 Parts Breakdowns Lists...
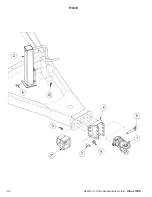
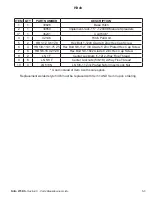
Page 28: ...5 2 Section 5 Parts Breakdowns Lists Nitro 275RS Hitch...
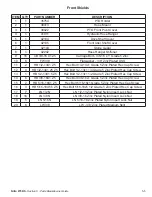
Page 30: ...5 4 Section 5 Parts Breakdowns Lists Nitro 275RS Front Shields...
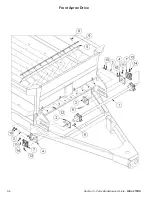
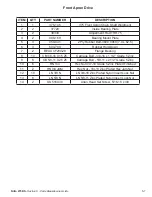
Page 32: ...5 6 Section 5 Parts Breakdowns Lists Nitro 275RS Front Apron Drive...
Page 34: ...5 8 Section 5 Parts Breakdowns Lists Nitro 275RS Driveline...
Page 36: ...5 10 Section 5 Parts Breakdowns Lists Nitro 275RS Rear Apron Drive...
Page 38: ...5 12 Section 5 Parts Breakdowns Lists Nitro 275RS Endgate...
Page 40: ...5 14 Section 5 Parts Breakdowns Lists Nitro 275RS Beaters...
Page 42: ...5 16 Section 5 Parts Breakdowns Lists Nitro 275RS Floor Side Boards...
Page 44: ...5 18 Section 5 Parts Breakdowns Lists Nitro 275RS Single Axle...
Page 46: ...5 20 Section 5 Parts Breakdowns Lists Nitro 275RS Tandem Axle w o Scales...
Page 48: ...5 22 Section 5 Parts Breakdowns Lists Nitro 275RS Tandem Axle w Scales...
Page 50: ...5 24 Section 5 Parts Breakdowns Lists Nitro 275RS Apron Runners...
Page 52: ...5 26 Section 5 Parts Breakdowns Lists Nitro 275RS Hydraulic Layout...
Page 54: ...Intentionally Left Blank...
Page 56: ...6 2 Section 6 Optional Features Nitro 275RS Light Kit Assembly...
Page 58: ...6 4 Section 6 Optional Features Nitro 275RS Light Kit Wiring Harness...
Page 60: ...6 6 Section 6 Optional Features Nitro 275RS Flow Control Hydraulics...
Page 62: ...6 8 Section 6 Optional Features Nitro 275RS Electric Flow Control Wiring...
Page 64: ...6 10 Section 6 Optional Features Nitro 275RS N750LC GT400 N750LCNT460 Scales...
Page 65: ...Nitro 275RS Section 6 Optional Features 6 11 N750LCNT8000 Scales...
Page 67: ...Nitro 275RS Section 7 PTOs 7 1 Section 7 PTOs...
Page 68: ...7 2 Section 7 PTOs Nitro 275RS 39850 PTO 375 450 525 600 750 V80 141P028359 028028 CV80 CLS...
Page 70: ...7 4 Section 7 PTOs Nitro 275RS 39852 PTO 600 750 T60 086P265011 306028 CLS 2500NM...
Page 72: ...VII Torque Value Chart Imperial Nitro 275RS Torque Value Chart Imperial...
Page 73: ...Nitro 275RS Torque Value Chart Metric VIII Torque Value Chart Metric...
Page 76: ......

