background image

1.2. Mounting Extrusion - Attachment Instructions

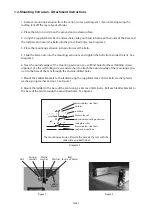
1. Remove mounting extrusion from the carton (cut as per Diagram 1 if you intend opening the
rooftop tent off the rear of your vehicle.)

2. Place the tent on its side on the ground onto a clean surface. 

3. Using the supplied 6mm bolts and washers, slide your hand in between the inside of the base and
the mattress and insert the bolts into the pre-drilled holes.  See Diagram 2.

4. Place the mounting extrusion into position over the bolts.

5. Slide the 6mm nuts into the mounting extrusions and tighten the bolts from inside the tent.  See
Diagram 2.

6. Near the outside edges of the mounting extrusion you will find holes for the self drilling screws
supplied.  Use the self drilling screws and washers to attach the outside edge of the mounting extru-
sion to the base of the tent through the end pre-drilled holes.

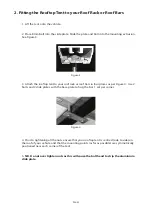
7. Mount the Ladder brackets to the ladder using the supplied 6mm x 20mm bolts, washer, plastic
washer, spring washer and nut.  See Figure 1.

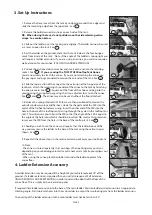
8. Mount the ladder to the base of the tent using 4 x 6mm x 40mm bolts.  Bolt each ladder bracket to
the base of the tent through the pre-drilled holes.  See Figure 2.

6mm stainless steel bolt 
washer

aluminium mounting extrusion

6mm nyloc nut

slide plate with
8mm stainless steel bolt
roof rack or roof bars

tent base

The mounting extrusion fitted to the base of the tent with the 

slide plate and bolt fitted.

Diagram 2

PAGE 2

Figure 1

Nut

Spring

washer

Plastic

washer

Ladder

Mount

Washer

Bolt

(6mm x 20mm)

Figure 2

Summary of Contents for roof top tent

Page 1: ...F ROOFTOP TENT the quick and easy way to enjoy camping Included in this leaflet is all the information that you require to obtain the maximum enjoyment and benefit from your rooftop tent Given proper...

Page 2: ...o the base of the tent at right angles to the roof rack or roof bars in the direction of opening along the length of the tent base OR B Off the Side For most medium or small vehicles opening off the s...

Page 3: ...find holes for the self drilling screws supplied Use the self drilling screws and washers to attach the outside edge of the mounting extru sion to the base of the tent through the end pre drilled hole...

Page 4: ...our places as per Figure 4 Use 2 bolts and 2 slide plates with the base plate to hug the bar 1 set per corner 4 Prior to tightening all the nuts ensure that your rooftop tent is centred side to side o...

Page 5: ...e outside window awnings and flysheet Hook the shaped end of the SSR into the eyelet of the flysheet window awning Insert the other end of the SSR into the hole in the base of the rooftop tent passing...

Page 6: ...can drill holes above the existing ladder locking pin holes Be aware that with a rooftop tent fitted to your vehicle the overall height is increased Your should measure the overall height of your veh...

Page 7: ...lt is found to be caused by defective or faulty materials workmanship or manufac turing process Original proof and date of purchase is provided This warranty does not cover transport postal costs and...

Reviews: