background image


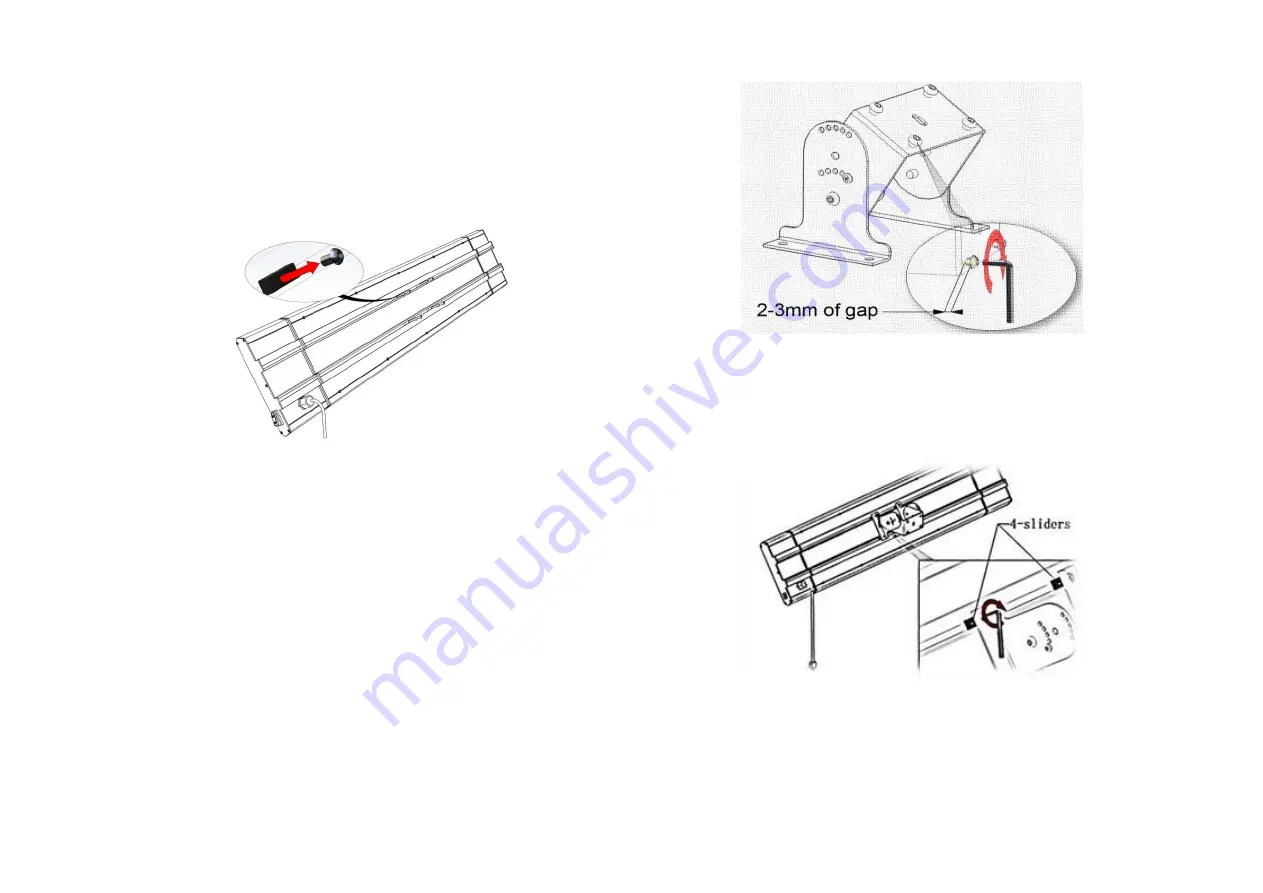
Assembling Processfor wall mounted 

Preparation stage: 

Please remove the four M6*10 Screwson the heater,and use them   

for the 

Step 2


Step1: Assemble the bracket. (

,

⑥,⑦,⑧)


Do not tighten the four M6*10screws 

, reserve 2-3mm of gap for 

step 4. 


Step 2:Install the bracket on the back of the heater. 

Adjust the four sliders which inside the track to the middle of the 

heater .Fix the bracket which you have assemble in the step 1 with four 

M6*10 screws

3 , tighten them with 

‘L ‘hexagonal wrench

10


Step 3:

 Fix the part 1

1 on the wall, tighten the four nuts (a part of 

explosive bolt M6*50)

2   with M6 spanner

9  

Summary of Contents for 31.5007

Page 1: ...erience and knowledge if they have been given supervision or instruction concerning use of the appliance in a safe way and understand the hazards involved Children shall not play with the appliance Cleaning and user maintenance shall not be made by children without supervision The instruction manual shall provide adequate instructions for connection to the supply ensuring an equivalent protection ...

Page 2: ...ailing legal regulations and certified for safety in use For best results from the appliance please ensure that the installation is done by a qualified electrician in accordance with the following instructions and taking full account of current regulations When using the heater please carefully follow the instructions and recommendations below You could change the position of the M4 8 screws 7 and...

Page 3: ... to a wall with the bracket supplied to allow adequate ventilation Never fix or place heater near flammable or combustible materials Generally heaters must be placed at a safe distance clear space of at least 2 0m from combustible materials and glass walls If installed in workshops or garages where inflammable or combustible paints are used the heaters must be installed at a distance of at least 4...

Page 4: ...ews reserve 2 3mm of gap for step 4 Step 2 Install the bracket on the back of the heater Adjust the four sliders which inside the track to the middle of the heater Fix the bracket which you have assemble in the step 1 with four M6 10 screws 3 tighten them with L hexagonal wrench 10 Step 3 Fix the part 1 1 on the wall tighten the four nuts a part of explosive bolt M6 50 2 with M6 spanner 9 ...

Page 5: ...Step 4 Put the heater on the wall slide it into the part 1 1 Step 5 Please tighten the M6 10securityscrew 5 toavoid accidents Complete ...

Page 6: ...e four sliders which inside the track The distance between the sliders should be between 600 mm to 788 mm Fix the Brackets with four M6 18 screws tighten them with L hexagonal wrench Step2 Let the carabineer at the end of the chains 12 through the holes of the Brackets The length adjustment range of two Chains 12 are between 500mm 750mm Complete ...

Page 7: ... before storing away 11 Do not touch the heater head when in use 12 Do not leave after turn it on and unattended especially when children or animals are in the vicinity 13 The indication of different positions of switches should be visible from a distance of 1M at least 14 The Marking concerning covering shall be visible after the heater has been installed It shall not be placed on the back of hea...

Page 8: ...re risk exist if the heater is covered or positioned incorrectly 36 Place the heater outside or in a large open area and well away from any obstructions such as branches or where the heater is close to any objects that can be affected by heat such as furniture curtains or other inflammable objects minimum distance 1 meter 37 The instruction manual shall provide adequate instructions for connection...

Page 9: ...connected from the electrical supply clean the surface of the patio heater with a damp cloth Never use corrosive or solvent cleaners or immerse in water Any maintenance or repairs including replacing the halogen tube should only be carried out by a qualified electrician or by a recommended service center Technical specification Power supply 230V 50Hz Wattage max1800w Net weight 6 5 kg Insulation c...

Reviews: