background image

27

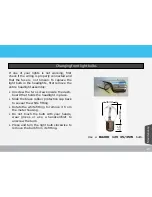
• 

Unscrew the two screws inside the dash-

board that holds the headlight in place.

• 

Slide the black rubber protection cap back 

to seveal the white fitting.

• 

Rotate the white fitting to remove it f r o m 

the metal housing.

• 

Do  not  touch  the  bulb  with  your  hands, 

wear  gloves  or  use  a  handcerchief  to 

unscrew the bulb

• 

Press and turn the light bulb clockwise to 

remove the bulb from its fitting.

Use  a 

BA20D  12V  35/35W

  bulb.

36mm

54mm

17 mm

Changing front light bulbs 

If  one  of  your  lights  is  not  working,  first 

check if the wiring is properly connected and 

that the fuse is  not broken. To replace the 

light bulb in the headlights, first remove the 

entire headlight assembly:

Maintenance

Summary of Contents for E-TUK LIMO

Page 1: ...T TU UK KT TU UK K F FA AC CT TO OR RY Y Keep this booklet with your vehicle USER MANUAL MAINTENANCE GUIDE E TUK LIMO...

Page 2: ...our safety and the safety of your passengers please read the instructions carefully It provides you with helpful information what to do in case of an error and how to get the most out of your e Tuk Al...

Page 3: ...our range 13 BATTERY INFORMATION 14 Battery health 14 Battery specs 16 CHARGING STANDARD CHARGER 20 Standard charging sequence 20 Time to charge 21 The Charger display 22 Dashboard charging LED 23 ELE...

Page 4: ...cle is not being charged the e Tuk should not be able to drive while you are charging Place the charging cable securely under the rear seats Put the direction switch in neutral N and make sure the thr...

Page 5: ...ible the Ub or system voltage If it is around 76V your battery is full Make sure the park brake is released The e Tuk will not drive when it is engaged Also make sure theat the red emergency button is...

Page 6: ...30 4 10 20 0 002 002 10 20 30 40 50 60 8 70 10 20 30 40 5 0 0 ON OFF 1 2 3 4 5 6 A B C D E A Signal light B Driving lights on off C Main beam dip beam D Directions left right E Horn GETIING FAMILIAR D...

Page 7: ...sher 2 Windscreen wiper 3 Taxi sign light 4 Windscreen washer fluid 5 Tell tales display 6 Speedo Odometer 7 Battery Display Indicator 8 Charger LED 9 Key switch 10 Throttle 11 Direction Switch 12 Haz...

Page 8: ...to slow down and stop The easier you are on the throttle and brakes the further one battery charge will take you Familiarize yourself with the controls on the steer switch before you start driving Be...

Page 9: ...ts drawn from the battery r RPM Rotations Per Minute of the engine A Total number of ampere drawn from the battery h Total driving time of the vehicle in hours T Temperature of the controller on some...

Page 10: ...vehicle and could be dangerous to you and your fellow passengers Please be aware that your eTuks driving behaviour and range change when driving around with more passengers or higher loads Driver plu...

Page 11: ...l make the e Tuk shut down immediately Keep in mind that this will not stop the vehicle You will still have to use the manual brake for that This Vehicle Identification Number Plate can be found above...

Page 12: ...will get you up a hill inclination of 20 When you are stationary on a hill do not use the throttle to prevent the vehicle from rolling down the hill This will cause the controller to get very hot Inst...

Page 13: ...uce road friction The recommended tire pressure is 3bar 44psi Check your eTuks tire pressure every month Lower your maximum speed and acceleration the batteries will last longer if you take it easy on...

Page 14: ...g should be done by an authorised service mechanic Always wear protective clothing gloves and goggles when handling batteries Battery health Safety Inspection Cleaning Keep flames sparks or metal obje...

Page 15: ...weeks Lead acid batteries DO NOT have a memory affect they do not need to be fully discharged prior to charging The charging cycle should always be finished completely to ensure battery life If chargi...

Page 16: ...ORMATION Battery specs Your e Tuk has been fitted with 12 Lead Acid Deep Cycle batteries Each battery produces 6Volt and around 185Ah The total battery pack gives your vehicle 72V to power the motor a...

Page 17: ...en the vent caps and look inside the fill wells Check the liquid level the lead plates in the battery should be submerged If necessary add water until the liquid level is 0 3cm below the bottom of the...

Page 18: ...d stops flowing the batteries are full Refilling the battery using the water filling system The De ionizing unit uses cartridges to purify the water Each disposable cartridge purifies about 2400 litre...

Page 19: ...harge characteristic Colder temperatures below 25 C will 3P 051 103 lower battery capacity and prolong battery life Cooler temperatures will slow self discharge Therefore operating batteries at temper...

Page 20: ...ed up cords can generate heat The electrical plug that is needed to charge your e Tuk can be found underneath the rear seats It is connected to the yellow black charger box Wait at least 15 minutes be...

Page 21: ...a huge battery Tuk Tuk factory offers faster chargers which are listed below Optional On board speed charger 30A 5 hours to 80 9 hours to full charge Optional External speed charger 60A 2 5 hour to 8...

Page 22: ...almost complete finishing Charger turned on Solid AC power good Flashing Low AC Voltage check voltage and ex tension cord length Error Flashing Charger error Reset charger pocontact your service prov...

Page 23: ...High internal charger temperature Use a shorter extension cord Red Flashing Charging error Replug the charger plug in the socket or contact your service supplier Dashboard charging LED If you do not n...

Page 24: ...ed unswitched relay relay The Fusebox The e Tuk contains several fuses All of the 12V fuses are located in the fusebox underneath the driver seat To reach the fusebox you will have to remove the drive...

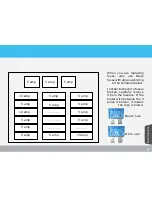
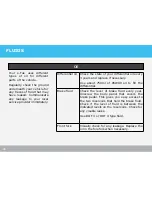
Page 25: ...15 amp 5 amp 10 amp 10 amp 5 amp 5 amp When you are replacing fuses only use blade fuses with amps according to the schedule below In order to check if a fuse is broken carefully remove it from the fu...

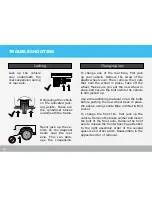
Page 26: ...king and the problem cannot be linked to the fuse or the connections replace the unit ELECTRICS 12V Battery Tail lights WARNING NEVER CONNECT THE 12V BATTERY TO THE CHASSIS B The 12Volt battery and th...

Page 27: ...b with your hands wear gloves or use a handcerchief to unscrew the bulb Press and turn the light bulb clockwise to remove the bulb from its fitting Use a BA20D 12V 35 35W bulb 36mm 54mm 17 mm Changing...

Page 28: ...l oil every 3 years and replace if necessary Use about 750ml of 85W90 oil to fill the differential Brake fluid Check the level of brake fluid every year Unscrew the body panel that covers the brake pe...

Page 29: ...ill the washer reservoir Maintenance Your windscreen washer can easily befilled with washer fluid Best way to do it is to lift it out of its holder This way the opening cap is easy to reach and you wo...

Page 30: ...e and secure the bolts while the vehicle is still jacked up Use a threadlocking material on all the bolts before putting the new wheel back in place We advice using Loctite Blue 242 Nut Bolt Locker To...

Page 31: ...se to switch to a heavier setting A heavier setting means less wobbling and more stability but also means heavier steering In case your vehicle needs to be towed only use the towing ring at the front...

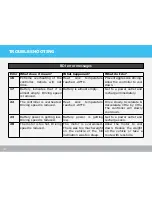
Page 32: ...ting sequence Check if the direction switch is in N Makesurethattheredemergency button is not pressed Rotate the botton clockwise to release L O C K Check the battery display for the battery level Rem...

Page 33: ...t i l l o n E m e r g e n c y b u t t o n p u s h e d i n C h a r g e r s t i l l c o n n e c t e d W r o n g s t a r t u p s e q u e n c e e r r o r 4 7 B a t t e r y v o l t a g e t o o l o w 5 8 V...

Page 34: ...y 22 The controller is overheated Driving speed is reduced Heat sink temperature reached 85 C Drive slowly Accelarate deccelarate little by little The controller will slowly cool down 23 Battery power...

Page 35: ...shuts down The main contactor did not close or the tips are oxidized Check pins on contactors or replace main contactor 44 There is an error in the throttle The throttle broke or the wiring is faulty...

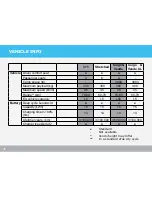
Page 36: ...rt seat Passenger seats 3 6 Cargo space ltr 2000 3000 Maximum payload kg 300 300 380 300 Maximum speed km h 45 45 45 45 Range km 70 80 60 70 70 80 60 70 EU vehicle category L5 L5 L50 L5 Battery Deep c...

Page 37: ...ht Size Length mm 2980 3980 2980 3980 Width mm 1410 1410 1410 1410 Height mm 1850 1850 1850 1850 Cargo space Length mm 850 1850 1400 1400 Height mm 1200 1200 Track mm 1255 1255 1255 1255 Wheelbase mm...

Page 38: ...sh brake fluid Mainenance done by U U U U U U U U M M Weekly or 200km x x x Monthly or every 800km x x x x x x x x Yearly or every 12 500km x x x x x x x x x Every 2 years or 25 000km x x x x x x x x...

Page 39: ...tire pressure is 3bar 44 psi Check to see if all the lights front rear direction indicators work every week Replace brake discs Replace brake pads Read controller history Update controller software W...

Page 40: ...40 Classico Limo Cargo CargoXL Vendo VendoXL VIN Type Color Licence plate nr Installed Options Country Distributer stamp YOUR ETUK S DNA...

Page 41: ...ular maintenance Regular checks need to be done on your battey You can find the maintenance schedule on page 38 We advice you to keep all invoices you receive for these repairs They will give addition...
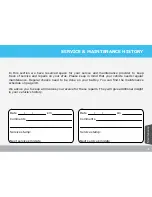
Page 42: ...Next service km date Service stamp Date Comments km Next service km date Service stamp Date Comments km Next service km date Service stamp Date Comments km Next service km date Service stamp SERVICE...

Page 43: ...ments km Next service km date Service stamp Date Comments km Next service km date Service stamp Date Comments km Next service km date Service stamp Date Comments km Next service km date Service stamp...

Page 44: ...Next service km date Service stamp Date Comments km Next service km date Service stamp Date Comments km Next service km date Service stamp Date Comments km Next service km date Service stamp SERVICE...

Page 45: ...ments km Next service km date Service stamp Date Comments km Next service km date Service stamp Date Comments km Next service km date Service stamp Date Comments km Next service km date Service stamp...

Page 46: ...46 Notes...

Page 47: ...47 Notes Maintenance...

Page 48: ...u vehicle please contact your local service provider Before you do please make sure you have read this manual carefully If the manual does not give you an answer to your problem please contact the fol...

Page 49: ...www tuktukfactory com service tuktukfactory com T TU UK KT TU UK K F FA AC CT TO OR RY Y...

Reviews: